background image

Distributed by: 
Tristar Products, Inc. 
Fairfield, NJ 07004
© 2021 Tristar Products, Inc.

Made in China

EMERIL-AFP-12QT_IB_TP_ENG_V4_210326

We are very proud of the design and quality of our 

Emeril Lagasse AirFryer Pro

TM

.

This product has been manufactured to the highest standards. Should you have 

any questions, our friendly customer service staff  

is here to help you. 


For parts, recipes, accessories, and everything  

Emeril Everyday, go to tristarcares.com or  

scan this QR code with your smartphone or tablet:

To contact us,  

email us at  [email protected]  

or call us at 973-287-5132.

Summary of Contents for AIRFRYER PRO GLA-1003

Page 1: ...e followed Do not use the Emeril Lagasse AirFryer ProTM until you have read this manual thoroughly SAVE THESE INSTRUCTIONS FOR HOUSEHOLD USE ONLY Owner s Manual Visit TristarCares com for tutorial vid...

Page 2: ...e manual making certain that you are completely familiar with the appliance s operation and precautions Air Fryer Dehydrator More Model Supply Power Rated Power Capacity Temperature Display GLA 1003 A...

Page 3: ...sories 6 Using the Accessories 8 Using the Digital Control Panel 11 Cooking Presets 12 Cooking Guidelines 13 General Operating Instructions 14 Cooking Chart 16 Cleaning Storage 18 Troubleshooting 19 F...

Page 4: ...is NOT INTENDED FOR USE by children 10 When cooking DO NOT PLACE the appliance against a wall or other appliances Leave at least 5 inches of free space on the back and sides and above the appliance D...

Page 5: ...s Important Before initial use and after each use 1 Hand wash the cooking accessories 2 Wipe the outside and inside of the appliance with a warm moist cloth and mild detergent 3 Preheat the appliance...

Page 6: ...nents that you ordered some accessories may be sold separately Check everything carefully before use If any part is missing or damaged do not use this product Contact shipper using the customer servic...

Page 7: ...the Shaft from each end and then into the meat Lock in place with the Set Screws There are indentations on the Shaft for the Set Screws You can adjust the Screws closer to the center of the Shaft if n...

Page 8: ...Appliance 1 Insert the Drip Tray into the bottom of the appliance Fig A 2 Place Crisper Trays into appliance by sliding them through the side grooves and onto the back lip Fig B 3 Place the Crisper T...

Page 9: ...slight angle with the right side higher than the left side and insert the left side of the Spit into the Rotisserie connection inside the appliance see Fig I 4 With the left side securely in place low...

Page 10: ...ok the bottom of the left and right sides of the shaft attached to the Rotisserie Spit Fig K 2 Pull the Rotisserie Spit slightly to the right to disconnect the accessory from the Rotisserie Socket 3 C...

Page 11: ...trol Buttons These buttons enable you to raise or lower cooking temperature by 5 F 2 7 C intervals ranging from 150 F 65 C to 400 F 204 C Dehydration ranges from 90 F 32 C to 170 F 77 C 5 Time Control...

Page 12: ...9 C 2 hrs 2 24 hrs 14 Shrimp 320 F 160 C 12 mins 15 Reheat 240 F 116 C 12 mins 16 Pizza 360 F 182 C 15 mins Cooking time for whole roasted chicken will vary with weight Use meat thermometer to check i...

Page 13: ...amb Ground 160 F 71 C Steaks roasts medium 140 F 60 C Steaks roasts rare 130 F 54 C Pork Chops ground ribs roasts 160 F 71 C Fully cooked ham 140 F 60 C Use this chart and a food thermometer to ensure...

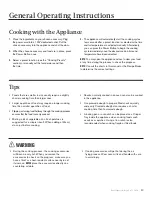
Page 14: ...ods The charts and tables provided within this manual and the Recipe Guide will help you get great results Please refer to this information for proper time temperature settings and proper food quantit...

Page 15: ...s the Power Button to begin the cooking cycle immediately once the desired cooking time and temperature have been selected NOTE You may open the appliance s door to view your food at any time during t...

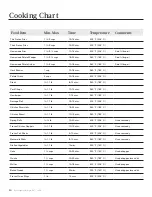
Page 16: ...82 C Hamburger 1 1 lb 7 14 mins 360 F 182 C Sausage Roll 1 1 lb 13 15 mins 400 F 204 C Chicken Drumsticks 1 1 lb 18 22 mins 360 F 182 C Chicken Breast 1 1 lb 10 15 mins 360 F 182 C Spring Rolls lb 15...

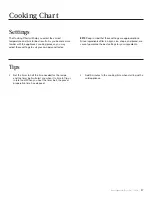
Page 17: ...n personal tastes Tips Set the timer to half the time needed for the recipe and the timer bell will alert you when it is time to flip or rotate food When you hear the timer bell the preset preparation...

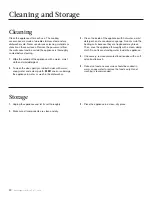
Page 18: ...and a damp cloth DO NOT soak or submerge the appliance in water or wash in the dishwasher 3 Clean the inside of the appliance with hot water a mild detergent and a nonabrasive sponge Do not scrub the...

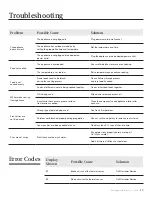
Page 19: ...d Foods of different sizes are being cooked together Cook similar sized foods together White smoke coming from appliance Oil is being used Wipe down to remove excess oil Accessories have excess grease...

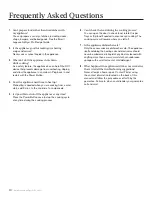
Page 20: ...ossible to shut off the appliance at any time Press the Power Button once to stop the cooking cycle at any time during the cooking process 6 Can I check the food during the cooking process You can ope...

Page 21: ......

Page 22: ...er number can be used as the return merchandise authorization number RMA If the product was purchased in a retail store return the product to the store or use RETAIL as the RMA Return your product to...

Page 23: ......

Page 24: ...ril Lagasse AirFryer ProTM This product has been manufactured to the highest standards Should you have any questions our friendly customer service staff is here to help you For parts recipes accessori...

Reviews: