EMC VNXe Replacing Download Page 11

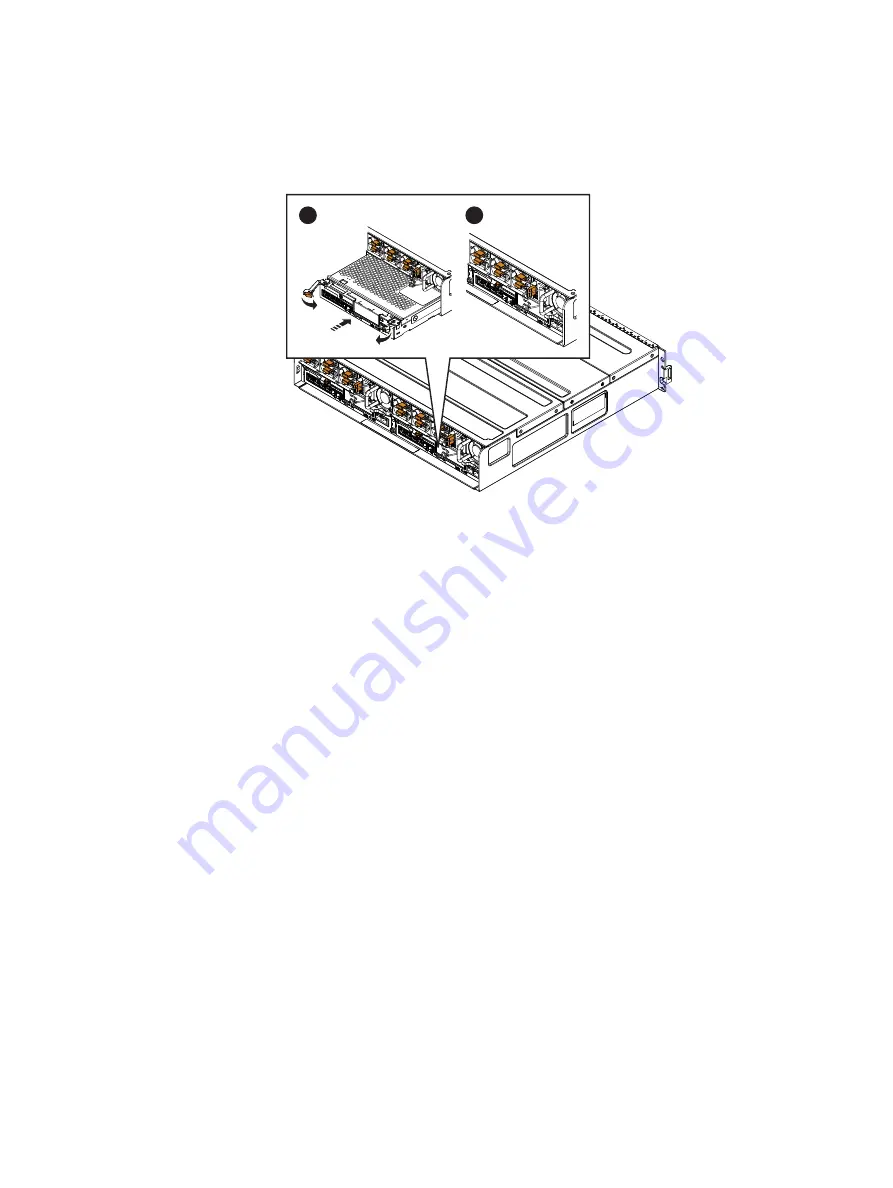
3. Close the right and left latches to fully seat the SP assembly in the enclosure.

An audible click indicates that the latches are secure.

Figure 8   Installing an SP assembly

CL5232

1

2

4. Ensure that the SP assembly starts powering up after installation. If not, reseat the SP

assembly.

5. Reconnect the cables to the back of the SP assembly being sure to connect all cables

to the same ports from which you removed them.

Rebooting an SP

When you have returned the SP assembly to the enclosure, reboot the recently serviced
SP to ensure that it leaves Service mode using the procedure that follows.

Procedure

1. From Unisphere, select 

Settings

, then 

Service System

.

2. Log in with your service password.
3. In the 

System Components

 column, select the storage processor currently in Service

mode (SP A or SP B).

4. Under 

Service Actions

, select 

Reboot

, then 

Execute service action

.

It may take up to 12 minutes for the system to complete its reboot to return to normal
mode.

5. Either refresh your browser or follow the on-screen instructions to bring the software

out of service mode and restore full-function Unisphere.

Verifying the operation of a part

Verify that the new part is recognized by your system, and operating correctly using the
procedure that follows.

Procedure

1. In Unisphere

, select 

System

 > 

System Health

.

2. Select the part in the 

System Component

 list or the graphical view:

Replacing an input/output module in a disk processor enclosure

Rebooting an SP


11

Summary of Contents for VNXe

Page 1: ...n access to CPU board components You access an I O module from the rear of the enclosure NOTICE Always replace an I O module with one that is the exact same type Verify the type by reading the label o...

Page 2: ...that has accumulated on your body discharges through the circuits If the air in the work area is very dry running a humidifier in the work area will help decrease the risk of ESD damage Follow the pr...

Page 3: ...you must move around the room or touch other surfaces before installing a unit first place the unit back in the antistatic bag When you are ready again to install the unit repeat these procedures Har...

Page 4: ...when removing handling or storing replaceable units CAUTION Some replaceable units have the majority of their weight in the rear of the component Ensure that the back end of the replaceable unit is s...

Page 5: ...r filler panel to ensure proper air flow throughout the system Unpacking a part Procedure 1 Wear ESD gloves or attach an ESD wristband to your wrist and the enclosure in which you are installing the p...

Page 6: ...the storage processor with the part you are replacing SP A or SP B 4 Under Service Actions select Enter Service Mode then Execute service action 5 In the Service Confirmation dialog box click OK Putt...

Page 7: ...dropping it 2 Squeeze the orange levers on the latches on the sides of the SP assembly to release the latches and then pull the latches outward 3 Pull out the latches until they are fully extended and...

Page 8: ...back 1 4 inch 3 Lift the cover up Figure 4 Removing the SP top cover CL5233 1 3 2 Removing the I O module Refer to Figure 5 on page 9 while performing the procedure that follows Procedure 1 Lift the b...

Page 9: ...lignment pins NOTICE Do not attempt to seat the module into the CPU connector while you are holding the module at an angle Doing so will damage the connections The module should be flat before you att...

Page 10: ...tab secures the cover Figure 7 Replacing the SP top cover CL5234 3 1 2 Installing an SP assembly Refer to Figure 8 on page 11 while performing the procedure that follows Procedure 1 Pull out the latc...

Page 11: ...t Settings then Service System 2 Log in with your service password 3 In the System Components column select the storage processor currently in Service mode SP A or SP B 4 Under Service Actions select...

Page 12: ...aterial within 5 10 business days All instructions and material required to return your defective part were supplied with your good part shipment Procedure 1 Package the faulted part in the shipping b...

Page 13: ...ically disclaims implied warranties of merchantability or fitness for a particular purpose Use copying and distribution of any EMC software described in this publication requires an applicable softwar...

Reviews: