background image

86

BIOS - Overview and functions

Appendix

IND100077-227

BQ370-MH3 BIOS


BQ370-MH3 BIOS 


BIOS Menu Screen


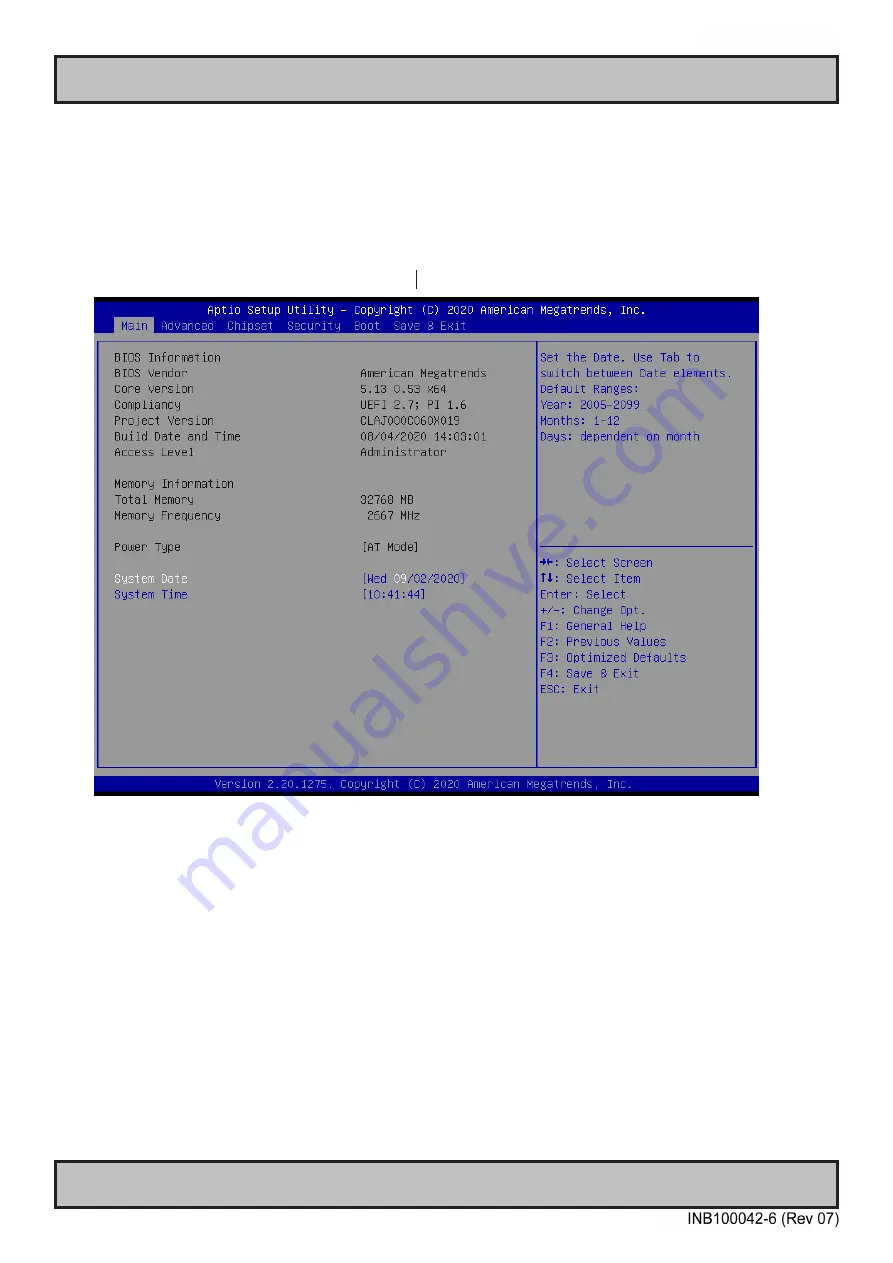
When you enter the BIOS, the following screen appears. The BIOS menu screen displays the 
items that allow you to make changes to the system configuration. To access the menu items, 
press the up/down/right/left arrow key on the keyboard until the desired item is highlighted, 
then press [Enter] to open the specific menu.


Summary of Contents for Hatteland Technology HTC03 AC Series

Page 1: ...4 Bay Model 2 Bay Model HTC03 Compact Computer User Manual HTC03 Updated 28 May 2021 Doc Id INB100042 6 Rev 02 Created 7495 363 Approved 6987 Models HTC03 xx AC yzzzzzz Single AC power input HTC03 xx...

Page 2: ...righted to the respective owners The products may not be copied or duplicated in any way This documentation contains proprietary information that is not to be disclosed to persons outside the user s c...

Page 3: ...verview 20 Cabinet cover removal 22 Installing PCIe Card Rework PCI Bracket Options Notice 23 HT 00275OPT A1 PCIe Card Bracket Removal Replacement HL FL HH 25 Air Filter removal replacement H733S30Q20...

Page 4: ...DisplayPort to VGA adapter 60 Specifications RC3473 HT DPM2DVI DF A1 61 DisplayPort to DVI adapter 61 Specifications JH C01MF A A 62 Technical Drawings 63 Technical Drawings HTC03 xx AC xxxxxxx 64 Tec...

Page 5: ...Monitor Configuration 133 Pinout Assignments 134 Trouble shooting 137 Operating System Recovery tool 137 How to activate Windows Recovery Environment on OS Drive 141 IEC62368 policy for Hatteland Tech...

Page 6: ...0V AC to be fully compliant with type approvals Review installation chapter for more information HT 00226 OPT A1 Mounting brackets incl screws for console mounting HT RET STD A3 Cable Retainer Relief...

Page 7: ...SLCAN 4 x 5 pin Terminal Block 3 81 for RS 422 RS 485 NMEA 4 Channel PCA100828 1 4 x 5 pin Terminal Block 3 81 for Digital Input Output PCA100297 1 PNY NVIDIA Quadro P2200 1 x Installation guide 1 x...

Page 8: ...8 This page left intentionally blank...

Page 9: ...9 General...

Page 10: ...ble for use in locations where children are likely to be present Ordinary person Sailor End User Not allowed to open unit Not allowed to install the unit Not allowed to terminate connect cables to the...

Page 11: ...elp you make an informed choice as to the right product for your needs You will find detailed product descriptions and specifications for the entire range on Displays Computers and Panel Computers Mil...

Page 12: ...ring or entertainment solutions Hatteland Technology can fulfil your high expectations at a reasonable cost Our computer range covers all eventualities and requirements We offer a wide range of proces...

Page 13: ...ndicates that the unit is produced tested and packed according to the manufacture s QA specifications It will include a Personal ID and signature by the personnell responsible for approving the unit i...

Page 14: ...e Distance IP Rating Lowest value used higher may apply check specifications Quality Control QC Label This label indicates that the unit is produced tested and packed according to the manufacture s QA...

Page 15: ...15 Installation...

Page 16: ...e must be provided 5 To further improve the cooling of the unit we recommend installing Cooling Fans underneath blowing upwards into the unit air inlet This may be required in high temperature applica...

Page 17: ...his distance is measured from the centre of the magnetic system of the compass to the nearest point on the corresponding unit concerned The exact distance is often mentioned in the specific product sp...

Page 18: ...d cord 3 A one megaohm resistor installed in the wrist connection end of the ground cord is a safety requirement 4 Hatteland Technology recommends to use an Static dissipative ESD work mat positioned...

Page 19: ...cable and located as close as possible to the connector piece that connects to the rear of computer When ready Open the ferrite place the cable inside as shown in FIG1 and then gently close it until...

Page 20: ...the unit for accessories contents of package Illustrations below are approximate actual Housing and Hood may deviate slightly but function remains the same 5 pin Cable Housing Illustration 4 pin Cover...

Page 21: ...factory installation FIG 2 Strip carefully the insulation from the cable to expose the wire s inside FIG 3 Ensure that the wire s is without any loose threads to ensure good connection FIG 4 Insert c...

Page 22: ...in RED color Please disconnect ALL cables from the computer unit before proceeding Procedure applies for all HTC03 models 1 Unscrew 20 screws from top of cabinet and 3 screws in rear Use a Pozidriv 2...

Page 23: ...es from the computer unit before proceeding 1 Identify if either of the PCI Bracket Options are present in any of the slots as indicated If yes proceeed to step 2 3 4 If no please proceed to next page...

Page 24: ...e rotation clockwise to slide it out of the tracks Then lift up the top bracket to remove it PCIe Card removal replacement Note Areas of interest are marked in this section with circles and arrows in...

Page 25: ...es and arrows in RED color Please disconnect ALL cables from the computer unit before proceeding Procedure applies for HTC03 models For Half Length HL Full Length FL Half Height HH PCIe cards Place th...

Page 26: ...on with circles and arrows in RED color Please disconnect ALL cables from the computer unit and cards before proceeding Procedure applies for all HTC03 models 1 Unscrew 4 screws from the fan filter co...

Page 27: ...all HTC03 models 1 Remove cabinet cover then unscrew 1 screw from the back of the fan cover inside the computer to loosen the fan and fan cover Use a Pozidriv 2 screwdriver 2 Remove fan filter cover s...

Page 28: ...1 Place the complete unit onto your desired location i e desktop wall and mark the positions you need to drill The drilling hole should be M5 The space under the location should allow for M5 locking...

Page 29: ...kage Please review specifications and Technical Drawings Accessories chapter in this user manual for additional information Procedure applies for all HTC03 models Bracket View and Measurements 1 Botto...

Page 30: ...computer and final solution note that there is no 4U top cover as the HTC03 model has its own already 2 Showing mounting and screw included positions A 4 Panhead M6 x 8 mounted from under B 4 Counters...

Page 31: ...y please write down changes if known before doing this procedure Operating System installed will not be affected by a battery replacement After battery was replaced and unit powered check BIOS setting...

Page 32: ...remove it from the holder 6 Place the NEW battery as aligned in the lower part first Viewed in opposite direction below 7 Finally push the battery down with thumb finger 1 until it is reseated flat ve...

Page 33: ...33 This page left intentionally blank...

Page 34: ...ease it immediately The Power LED indication riing will illuminate green and the operating system will automatically boot To turn OFF the computer press down this button and hold it for 3 seconds The...

Page 35: ...H2 Tightening torque 0 4Nm Repeat the procedure in reverse FIG3 2 1 to mount Locked unlocked by quarter turn fasteners with springs To unlock turn 90 degrees anti clockwise To lock push the quarter tu...

Page 36: ...x1 Expansion Module Area RS 232 RS 422 RS 485 4 x USB3 1 USB C Grounding Screw MIC and Speaker 4 x Network Connector area of computer Multi Power AC DC power input model Power Input AC Audio AMP PCIe...

Page 37: ...This makes it possible to use AC power as primary power and a 24V battery as secondary power eliminating the need for expensive UPS systems 1 x COM RS 232 422 485 Serial Port INPUT OUTPUT Supports RS...

Page 38: ...most USB devices are usually included in operating system or on separate installation CD s delivered with Third Party products For most stable operation only USB3 0 specific external compliant periph...

Page 39: ...onnectors 4 x miniDP DisplayPort Female Typenumber PNY NVIDIA Quadro P620 PCIe x16 Intel Network Adapter 10GbE Connectors 2 x RJ 45 Typenumber X710T2LBLK PCIe x16 PCIe x4 Intel Network Adapter 1GbE Co...

Page 40: ...n this manual for each factory mounted module Prior to installing module yourselves the cover should be removed punch out plate The plate is hinged on two small welded points Bend it sideways and use...

Page 41: ...41 Specifications...

Page 42: ...ite for long life and low service costs External Connector Type Computer Specifications Power Supply External Connector Type 100 240VAC 50 60Hz Std IEC Power Consumption Operating 70W typical 240W max...

Page 43: ...0 x4 1 x PCIe 3 0 x1 M 2 Storage PCIe options 1 x M 2 2280 M key one SATA NVMEx4 1 x M 2 2230 E Key PCIe USB for WiFi Ethernet 1 2 2 x LAN 10 100 1000Mbps Intel Support for Intel Teaming 2 x RJ45 Team...

Page 44: ...44 This page left intentionally blank...

Page 45: ...45 Specifications Factory Options...

Page 46: ...GL Germanischer Lloyd LRS Lloyd s Register of Shipping ABS American Bureau of Shipping BV Bureau Veritas CCS China Classification Society KR Korean Register of Shipping ClassNK Nippon Kaiji Kyokai EU...

Page 47: ...ermination resistor always see the full output voltage No ECHO x NOTE Required for some MODBUS Compability Jumper mounted This setting is only to be used during half duplex communication When this jum...

Page 48: ...cable Termination at end of cable TX External Device TX External Device RX RX Pin 1 TxD Z Pin 2 TxD Y Pin 5 RxD A Pin 4 RxD B 1 1 1 2 2 2 4 4 4 5 5 5 Note 120 termination on TX pins are rarely needed...

Page 49: ...ion Black is always connected Blue is connected when the device acts as a receiver Red is connected when the device acts as a transmitter Total 5 wires Termination if unit is master 1 x 110 120 resist...

Page 50: ...Open IEC 60950 Compliant 48VDC Pin 01 In 052 24VDC Pin 02 In 053 GND Ground Pin 03 In 061 24VDC Pin 04 In 062 Input 10 pin Digital Output Input Serial Module Mechanical Relay COM isolated RS 422 485...

Page 51: ...ault for Series X Panel Computers and selected Stand alone Computers The Hatteland Technology CAN Module support socketCAN driver in both Windows and Linux environment which allow the user to add thei...

Page 52: ...turer i e in the normal case is there no requirements for low level software development This module will mainly be integrated electrical and mechanical in the final products such as Series X G1 G2 Pa...

Page 53: ...sification societies IEC 60945 4th EN 60945 2002 IACS E10 EU RO MR Mutual Recognition ClassNK Nippon Kaiji Kyokai Safety IEC60950 The DIO module is intended to be used in control circuits and does the...

Page 54: ...ical for the product such as Series X G1 G2 Panel Computers and selected Stand alone Computers Please check datasheet for your unit if PCA100298 1 is listed as part of Factory Options Description Inte...

Page 55: ...a card is replaced most operating system will not change COM port number Outputs are short circuits protected 1 2 3 4 5 6 7 8 9 2 Ports available in Operating System as COMx A COMx B Pinout Assignmen...

Page 56: ...56 This page left intentionally blank...

Page 57: ...57 Specifications Accessories...

Page 58: ...odule version This provides flexibility for new installations and easy upgrade of already installed systems In fact any Hatteland Technology product that has a USB2 0 port can take advantage of these...

Page 59: ...mmer_guide_windows pdf www hattelandtechnology com hubfs pdf misc doc101356 1_hd_can_module_programmer_guide_linux pdf www hattelandtechnology com hubfs drivers can_gw_application_note_package zip HT...

Page 60: ...60 IND100129 238 Specifications VSDDPVGA340 HT DPM2VGAF A1 DisplayPort to VGA adapter...

Page 61: ...61 IND100129 255 Specifications RC3473 HT DPM2DVI DF A1 DisplayPort to DVI adapter...

Page 62: ...A ports to all Hatteland Technology computers and panel computers with standard USB Type A ports RoHS Compliant Description Specifications Waterproof Rate IP67 No Ingress of dust Protected against har...

Page 63: ...63 Technical Drawings...

Page 64: ...nology AS Any authorized reproduction in whole or in part must include this legend Hatteland Technology AS Proprietary information Not to be distributed to any third party without written permission D...

Page 65: ...Any authorized reproduction in whole or in part must include this legend Hatteland Technology AS Proprietary information Not to be distributed to any third party without written permission Dimensions...

Page 66: ...66 This page left intentionally blank...

Page 67: ...67 Technical Drawings Accessories...

Page 68: ...orized reproduction in whole or in part must include this legend Hatteland Technology AS Proprietary information Not to be distributed to any third party without written permission Dimensions might be...

Page 69: ...AS Any authorized reproduction in whole or in part must include this legend Hatteland Technology AS Proprietary information Not to be distributed to any third party without written permission Dimensi...

Page 70: ...y way against the interest of Hatteland Technology AS Any authorized reproduction in whole or in part must include this legend Hatteland Technology AS Proprietary information Not to be distributed to...

Page 71: ...AS Any authorized reproduction in whole or in part must include this legend Hatteland Technology AS Proprietary information Not to be distributed to any third party without written permission Dimensio...

Page 72: ...hole or in part must include this legend Hatteland Technology AS Proprietary information Not to be distributed to any third party without written permission Dimensions might be shown with or without d...

Page 73: ...roduction in whole or in part must include this legend Hatteland Technology AS Proprietary information Not to be distributed to any third party without written permission Dimensions might be shown wit...

Page 74: ...n whole or in part must include this legend Hatteland Technology AS Proprietary information Not to be distributed to any third party without written permission Dimensions might be shown with or withou...

Page 75: ...n whole or in part must include this legend Hatteland Technology AS Proprietary information Not to be distributed to any third party without written permission Dimensions might be shown with or withou...

Page 76: ...76 This page left intentionally blank...

Page 77: ...77 Appendixes...

Page 78: ...ve test program which guarantee that SSD performance complies to defined parameters in the specifications and that the SSD will operate without issues in delivered system con figuration hardware and s...

Page 79: ...tional lifetime 2 Selection of SSD Select SSD type series Define minimum expected lifetime Year Define minimum required SSD capacity GB From datasheet check if the endurance is expressed as PBW TBW or...

Page 80: ...imum lifetime with respect to wear out year Where x Data rate GB per year Where z Total amount of data written data to SSD during its whole lifetime Step by Step Calculation Step 1 Measure preferred o...

Page 81: ...file button at home screen Measurement 1 Check and save time for start test scenario 2 Execute the test scenario long enough to cover all valid use cases which may affect disk activity Recommended mea...

Page 82: ...82 Appendix IND100077 227 BIOS Overview and functions BQ370 MH3 BIOS Step Ver 0 1...

Page 83: ...4 7 1 1 Smart FAN mode Configuration 20 4 8 Preheat Function Configuration 21 4 9 S5 RTC wake settings 22 4 10 Serial Port Console Redirection 23 4 11 Intel TXT information 24 4 12 USB Configuration 2...

Page 84: ...3 BIOS 3 5 2 1 5 PCI Express Root Port 21 PCIe x4 Slot PCIEX4_1 40 5 2 2 SATA and RST Configuration 41 5 2 3 USB configuration 42 5 2 4 HD Audio Configuration 43 5 2 5 Serial IO Configuration 44 6 Sec...

Page 85: ...can display a sub menu from this field A sub menu contains additional options for a field parameter To display a sub menu move the highlight to the field and press Enter The sub menu appears Use the...

Page 86: ...you enter the BIOS the following screen appears The BIOS menu screen displays the items that allow you to make changes to the system configuration To access the menu items press the up down right lef...

Page 87: ...verview of the general system specifications The BIOS automatically detects the items in this menu Use this menu for basic system configurations such as time date etc BIOS Information Displays the aut...

Page 88: ...the screen such as Chipset configuration to go to the sub menu for that item You can display an Advanced BIOS Setup option by highlighting it using the Arrow keys All Advanced BIOS Setup options are d...

Page 89: ...This depends on CPU sku Software Guard Extensions SGX software controlled Enable or disables Guard Extensions Configuration options Disabled Enabled Software Controlled Select owner EPOCH input type...

Page 90: ...Configuration options Disabled Enabled Turbo mode Enabled Enable or disable Turbo mode Configuration options Enabled Disabled C status Enabled Enable or disable CPU Power Management Allows CPU to go...

Page 91: ...Configuration It shows ME version and ME status ME State Enable Enable or Disable Intel ME Configuration options Enable Disable ME Unlock Control Lock ME unlock switch function This function will aut...

Page 92: ...BQ370 MH3 BIOS BQ370 MH3 BIOS 11 4 3 Intel ICC ICC OD Watchdog Timer Disabled When enabled the ICC OC watchdog timer is exposed to OS as an ACPI device WDT HW is always used by BIOS when clock settin...

Page 93: ...r Disable BIOS support for security device Configuration options Disable Enable SHA 1 PCR Bank Enabled Enable or Disable SHA 1 PCR Bank Configuration options Disabled Enabled SHA256 PCR Bank Enabled E...

Page 94: ...sabled Enabled ACPI Sleep State S3 Suspend to RAM Select the highest ACPI sleep state the system will enter the SUSPEND button is press Configuration options Suspend Disabled S3 suspend to RAM S3 Vide...

Page 95: ...Step 14 BQ370 MH3 BIOS 4 6 NCT6106D Super IO configuration Provide NCT6106D super IO configuration settings WatchDog count mode Second WatchDog count mode Selection Configuration options Second Minute...

Page 96: ...uration Serial Port Enabled Enable or Disable serial Port COM Configuration options Disabled Enabled Change Settings Auto Select an optimal settings for super IO device Configuration options as below...

Page 97: ...hange the speed mode for serial port BaudRate Configuration options Low Speed High Speed 4 6 2 Serial Port 2 Configuration Serial Port Enabled Enable or Disable serial Port COM Configuration options D...

Page 98: ...eed Mode Low Speed Change the speed mode for serial port BaudRate Configuration options Low Speed High Speed 4 6 3 Digital I O Configuration Digital I O Pin1 Input Configure Digital I O Pin Configurat...

Page 99: ...s Input Output High Output Low Digital I O Pin5 Output Low Configure Digital I O Pin Configuration options Input Output High Output Low Digital I O Pin6 Output Low Configure Digital I O Pin Configurat...

Page 100: ...100 BIOS Overview and functions Appendix IND100077 227 BQ370 MH3 BIOS BQ370 MH3 BIOS 19 4 7 1 Smart FAN Smart FAN Function Enabled...

Page 101: ...ion SYS Smart Fan Mode Manual Mode SYS Smart FAN Mode selection Configuration options Manual Mode Thermal Cruise Mode SMART FAN IV Mode CPU Smart Fan Mode Manual Mode CPU Smart FAN Mode selection Conf...

Page 102: ...IND100077 227 BQ370 MH3 BIOS BQ370 MH3 BIOS 21 4 8 Preheat Function Configuration Preheat Function Disabled Check CPU and system temperature If either is lower than specific temperature then do prehea...

Page 103: ...w and functions Appendix IND100077 227 BQ370 MH3 BIOS Step 22 BQ370 MH3 BIOS 4 9 S5 RTC wake settings Wake system from S5 Disabled Enabled or Disabled system wake on alarm event Configuration options...

Page 104: ...w and functions Appendix IND100077 227 BQ370 MH3 BIOS BQ370 MH3 BIOS 23 4 10 Serial Port Console Redirection Console Redirection Disabled Enabled or Disabled Console Redirection Configuration options...

Page 105: ...105 BIOS Overview and functions Appendix IND100077 227 BQ370 MH3 BIOS Step 24 BQ370 MH3 BIOS 4 11 Intel TXT information Display Intel TXT information...

Page 106: ...USB devices available only for EFI application Configuration options Enabled Disabled Auto XHCI Hand off Enabled This is a workaround for OSes without XHCI hand off support This XHCI ownership change...

Page 107: ...ions UEFI and Legacy Legacy Only UEFI Only Network UEFI Control the execution of UEFI and Legacy PXE OpROM Configuration options Do not launch UEFI Legacy Storage UEFI Control the execution of UEFI an...

Page 108: ...108 BIOS Overview and functions Appendix IND100077 227 BQ370 MH3 BIOS BQ370 MH3 BIOS 27 4 14 NVMe Configuration Display NVMe controller or Drive information...

Page 109: ...view and functions Appendix IND100077 227 BQ370 MH3 BIOS Step 28 BQ370 MH3 BIOS 4 15 Network Stack Configuration Network Stack Disabled Enabled or disabled UEFI Network Stack Configuration options Dis...

Page 110: ...110 BIOS Overview and functions Appendix IND100077 227 BQ370 MH3 BIOS BQ370 MH3 BIOS 29 5 Chipset...

Page 111: ...ctions Appendix IND100077 227 BQ370 MH3 BIOS Step 30 BQ370 MH3 BIOS 5 1 System Agent SA Configuration VT d Enabled VT d capability Configuration options Disabled Enabled 5 1 1 Memory configuration Dis...

Page 112: ...view and functions Appendix IND100077 227 BQ370 MH3 BIOS BQ370 MH3 BIOS 31 Max TOLUD Dynamic Maximum value of TOLUD Configuration options As above picture 5 1 2 Graphic Configuration Graphic configura...

Page 113: ...s Auto Keep IGFX enabled based on the setup options Configuration options Auto Disabled Enabled PSMI Support Disabled Enable or disable PSMI Configuration options Disabled Enabled DVMT Pre Allocated 3...

Page 114: ...Enable Root Port Auto Enable or Disable the Root Port Configuration options Disabled Enabled Auto Max Link Speed Auto Configure PEG 0 1 0 Max Speed Configuration options Auto Gen1 Gen2 Gen3 Detect No...

Page 115: ...Lan1 Controller Configuration options Disabled Enabled Lan2 Controller Enabled Enable or Disable onboard Lan2 Configuration options Disabled Enabled Lan2 PXE DpROM Disabled Enable or Disable boot opt...

Page 116: ...ed Enabled Lan4 PXE DpROM Disabled Enable or Disable boot option for Lan4 Controller Configuration options Disabled Enabled Pcie P11 SSC Auto Pcie P11 SCC percentage Auto Keep HW default no BIOS overr...

Page 117: ...2_1 PCI Express Root Port 3 Enabled Control the PCI Express Root Port Configuration options Disabled Enabled ASPM 3 Disabled Set the ASPM level Force L0s Force all links to L0s State Auto BIOS auto co...

Page 118: ...Root Port 4 Enabled Control the PCI Express Root Port Configuration options Disabled Enabled ASPM 4 Disabled Set the ASPM level Force L0s Force all links to L0s State Auto BIOS auto configure Disable...

Page 119: ...ess Root Port 5 Enabled Control the PCI Express Root Port Configuration options Disabled Enabled ASPM 5 Disabled Set the ASPM level Force L0s Force all links to L0s State Auto BIOS auto configure Disa...

Page 120: ...t Port 13 Enabled Control the PCI Express Root Port Configuration options Disabled Enabled ASPM 13 Disabled Set the ASPM level Force L0s Force all links to L0s State Auto BIOS auto configure Disabled...

Page 121: ...ss Root Port 21 Enabled Control the PCI Express Root Port Configuration options Disabled Enabled ASPM 21 Disabled Set the ASPM level Force L0s Force all links to L0s State Auto BIOS auto configure Dis...

Page 122: ...mines how SATA controller operate Configuration options AHCI Intel RST Premium with Intel Optane System Acceleration Port 0 Enabled Enable or Disable SATA Port Configuration options Disabled Enabled P...

Page 123: ...70 MH3 BIOS Step 42 BQ370 MH3 BIOS 5 2 3 USB configuration XHCI Compliance Mode Disabled Options to enable Compliance Mode Configuration options Disabled Enabled USB Power Selection 5V_Dual Select 5V_...

Page 124: ...S Overview and functions Appendix IND100077 227 BQ370 MH3 BIOS BQ370 MH3 BIOS 43 5 2 4 HD Audio Configuration HD audio Enabled Control Detection of the HD Audio device Configuration options Disabled E...

Page 125: ...OS Overview and functions Appendix IND100077 227 BQ370 MH3 BIOS Step 44 BQ370 MH3 BIOS 5 2 5 Serial IO Configuration I2C0 Enabled Enables Disables Serial IO Controller Configuration options Disabled E...

Page 126: ...126 BIOS Overview and functions Appendix IND100077 227 BQ370 MH3 BIOS BQ370 MH3 BIOS 45 6 Security Administrator Password Set setup Administrator Password User Password Set User Password...

Page 127: ...e or Disable system secure boot Configuration options Disabled Enabled Secure Boot mode Custom Secure boot mode option Configuration options Standard Custom Restore Factory keys Force system to user m...

Page 128: ...dix IND100077 227 BQ370 MH3 BIOS BQ370 MH3 BIOS 47 6 1 1 Key management This sheet describe keys installation and status for secure boot We suggest user do not change these default setting if you are...

Page 129: ...indefinite waiting Bootup NumLock State On Select the keyboard NumLock state Configuration options On Off Quick Boot Disable Enable or disable Quick Boot option Configuration options Disabled Enabled...

Page 130: ...49 8 Save Exit Save changes and Exit Exit system setup after saving the changes Discard changes and Exit Exit system setup without saving the changes Save changes and Reset Reset the system after savi...

Page 131: ...Volume1 b Select RAID Level Available options depend on how many drives are connected 2 drives 1 RAID0 Stripe a Increased Read and Write performance b No redundancy c Not recommended for critical sys...

Page 132: ...boot to enter RAID BIOS menu Intel RST Option ROM After you have entered RAID BIOS the steps to create RAID volume are the same as for step 3 in procedure for UEFI above Available RAID levels RAID 0 S...

Page 133: ...ddition to PCIe graphics card To enable onboard display outputs when PCIe graphics is present 1 Press Del key during boot to enter BIOS menu 2 From first BIOS menu navigate to Chipset System Agent SA...

Page 134: ...ntrol Via RTS signal controlled by user application Note Configuration performed in computer BIOS Note Configuration performed in computer BIOS 9 pin USB3 0 3 1 3 2 TYPE A 1 2 3 4 9 8 7 6 5 PIN 01 VCC...

Page 135: ...side connector pinout will have lanes 0 3 reversed in order i e lane 3 will be on pin 1 n and 3 p while lane 0 will be on pin 10 n and 12 p 9 pin Amplified Mono Stereo Audio Out DSUB Female 5 4 3 2 1...

Page 136: ...TX to RX Note The jumper for force of transmitter Forced TX y is open by factory default For some custom models this jumper is preset to closed active in that case unit has to be opened and jumper se...

Page 137: ...Please note At least 30GB of free disk space is needed on the unit in order to create the 16GB USB Memory Stick It can take up to 1 hour to create the USB Memory Stick DOC207939 1 Revision 03 Hattelan...

Page 138: ...mpletely wiped of all data The USB stick chosen will have all its data deleted 4 The program will run for a couple of minutes the speed of the creator depends on the speed of the operating system and...

Page 139: ...ot support Legacy BIOS only UEFI is supported 1 3 2 How to use Boot into your USB stick by pressing F7 key during start up of your Hatteland Technology Panel Computer Some of our computer models uses...

Page 140: ...ll be wiped and all data on the drive will be lost After pressing yes the program will do everything needed for the recovery automatically When finished you are asked to restart or shut down your comp...

Page 141: ...ed 2 If your Windows RE status is Disabled or did not boot into Windows Recovery Environment during boot test do the following steps a Open Command Line window with administrator rights b Run the foll...

Page 142: ...fault condition ordinary persons should not be exposed to parts comprising energy sources capable of causing injury Instructed person Instructed person is a term applied to persons who have been instr...

Page 143: ...Battery Obligated to use battery specified for the product Altitude Products are designed for a max operating altitude of 2000m Installation Description Mounting brackets Only bracket defined specifi...

Page 144: ...d and found to comply with the limits for a Class A digital device pursuant to part 15 of the FCC Rules These limits are designed to provide reasonable protection against harmful interference when the...

Page 145: ...Please contact our service sales department if additional questions or review the following links at bottom of page for more information online Return Of Goods Information Make sure you surround the p...

Page 146: ...ION For any claims the following documentation is required and must forwarded to the company or their agent invoice way bill and or bill of landing and or statement of arrival inspection document besi...

Page 147: ...ths Note This is a general listing for a varity of OS s Hatteland Technology can factory install depending on unit Please check specification for your unit to verify type of OS installed in order to r...

Page 148: ...148 Appendix IND100077 24 User Notes...

Page 149: ..._02 JE SE 31 Dec 2020 Revised after internal reviews 00_03 JE BB SE 08 Jan 2021 Revised after internal reviews 00_04 JE SE MS 24 Feb 2021 Revised after internal reviews 00_05 VM SE 10 Mar 2021 Revised...

Page 150: ...Hatteland Technology AS www hattelandtechnology com Enterprise no NO974533146...

Reviews: