background image

12

2.7  OPERATING SAFETY

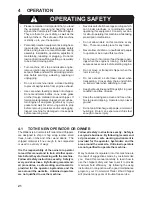
1.  Please remember it is important that you read 

and heed the safety signs on the Commercial 

Trailer Wood Chipper.  Clean or replace all 

safety signs if they cannot be clearly read and 

understood.  They are there for your safety, as 

well as the safety of others.  The safe use of 

this machine is strictly up to you, the operator.

2.  All things with moving parts are potentially 

hazardous.  There is no substitute for a cau-

tious, safe-minded operator who recognizes 

potential hazards and follows reasonable 

safety practices.  The manufacturer has 

designed this Commercial Trailer Wood Chip-

per to be used with all its safety equipment 

properly attached, to minimize the chance of 

accidents.  Study this manual to make sure 

you have all safety equipment attached.

3.  Close and secure rotor cover before operat-

ing.

4.  Close and secure all guards, deflectors and 

shields before starting and operating.

5.  Read and understand operator's manual 

before starting.  Review safety instructions 

annually.

6.  Personal protection equipment including hear-

ing protection, hard hat, safety glasses, safety 

shoes, and gloves are recommended during 

assembly, installation, operation, adjustment, 

maintaining, repairing, removal, or moving.  

Do not allow long hair, loose-fitting clothing, or 

jewellery to be around moving parts.

7.  Keep hydraulic lines and fittings tight, in good 

condition and free of leaks.

8.  Keep electrical harness, sensors and con-

troller in good condition before operating to 

maintain control.

9.  Never place any part of your body where it 

would be in danger if movement should occur 

during assembly, installation, operation, main-

tenance, repairing, unplugging or moving.

10. Turn machine off, stop and disable engine, 

remove ignition key and place in your pocket, 

set park brake and wait for all moving parts to 

stop before servicing, adjusting, repairing or 

unplugging.

11.  Do not run machine inside a closed building to 

prevent asphyxiation from engine exhaust.

12. Use care when feeding material into chipper.  

Do not send metal, bottles, cans, rocks, glass 

or other foreign material into wood chipper.  If 

foreign material enters chipper, stop machine, 

turn engine off and place ignition key in your 

pocket and wait for all moving parts to stop 

before removing material and/or unplugging.  

Inspect machine for damaged or loose parts 

before resuming work.

13. Never use alcoholic beverages or drugs which 

can hinder alertness or coordination while 

operating this equipment.  Consult your doc-

tor about operating this machine while taking 

prescription medications.

14. Do not allow riders on this machine at any 

time.  There is no safe place for any riders.

15. Never allow children or unauthorized people 

to operate or be around this machine.

16. Do not reach into rotor or feed hopper open-

ings when the engine is running.  Install and 

secure access covers before starting engine.

17. Keep the working area clean and free of de-

bris to prevent tripping.  Operate only on level 

ground.

18. Do not point discharge at people, animals or 

buildings.  Rotor can expel wood chips fast 

enough to cause injury.

19. Do not move or transport chipper when the 

rotor is turning.

20. Do not exceed a safe travel speed when 

transporting.  Cross safety chain under hitch 

on trailer model when attaching to truck.

Summary of Contents for Wallenstein CR100

Page 1: ...1 COMMERCIAL TRAILER WOOD CHIPPER MODEL CR60 CR100 OPERATOR S MANUAL BY EMB MFG INC ...

Page 2: ...contact your local engine dealer Under no circumstances will the manufacturer be liable for any consequential damage or expense of any kind including loss of profits The manufacturer is under no circumstances liable for tow vehicle of any kind The manufacturer is not liable for the maintenance of the product This warranty is extended only to the original purchaser and is not transferable Warranty ...

Page 3: ... Name Model Serial Number Delivery Date I have thoroughly instructed the buyer on the above described equipment which review included the Op erator s Manual content equipment care adjustments safe operation and applicable warranty policy DEALER INSPECTION REPORT SAFETY ____ Safety Chain on Hitch ____ All Decals Installed ____ Guards and Shields Installed and Secured ____ Review Operating and Safet...

Page 4: ...information The serial number plates are located where indicated Please mark the numbers in the spaces provided for easy reference SERIAL NUMBER LOCATION Model Number _____________________________________________________ Chipper Serial Number ______________________________________________ Engine Serial Number ______________________________________________ Machine Engine ...

Page 5: ...Tire Safety 10 2 14 Battery Safety 10 2 15 Employee Sign Off Form 11 3 Safety Sign Locations 12 4 Operation 16 4 1 To the New Operator or Owner 16 4 2 Machine Components 17 4 3 Machine Break In 18 4 4 Pre Operation Checklist 18 4 5 Controls 19 4 6 Control Unit Operation and Programming 23 4 7 Attaching Unhooking 26 4 8 Field Operation 28 4 9 Transporting 41 4 10 Storage 42 5 Service and Maintenanc...

Page 6: ...Mainte nance and Trouble Shooting information contained within the Operator s Manual This manual covers the Wallenstein Commercial Trailer Wood Chipper CR60 Use the Table of Contents or Index as a guide to locate required information Keep this manual handy for frequent reference and to pass on to new operators or owners Call your Wallenstein dealer or the Distributer if you need assistance informa...

Page 7: ... 519 699 9283 or Fax 519 699 4146 DANGER Indicates an imminently hazardous situation that if not avoided will result in death or serious injury This signal word is to be limited to the most extreme situations typically for machine components which for func tional purposes cannot be guarded WARNING Indicates a potentially hazardous situation that if not avoided could result in death or serious inju...

Page 8: ...these Most accidents can be avoided A person who has not read and understood all using and safety instructions is not qualified to use the machine An untrained operator exposes himself and bystanders to possible serious injury or death Do not modify the equipment in any way Unauthorized modification may impair the function and or safety and could affect the life of the equipment Think SAFETY Work ...

Page 9: ...owed to work with this equipment Do not allow persons to use or assemble this unit until they have read this manual and have developed a thorough understanding of the safety precautions and of how it works Review the safety instructions with all users annually 6 This equipment is dangerous to children and persons unfamiliar with its operation The operator should be a responsible properly trained a...

Page 10: ...6 Train all new personnel and review instruc tions frequently with existing workers Be certain only a properly trained and physically able person will use the machinery A person who has not read and understood all using and safety instructions is not qualified to use the machine An untrained operator exposes himself and bystanders to possible serious in jury or death If the elderly are assisting w...

Page 11: ... in good operating condition 7 Ensure that all safety shielding and safety signs are properly installed and in good condi tion 2 6 MAINTENANCE SAFETY 1 Good maintenance is your responsibility Poor maintenance is an invitation to trouble 2 Follow good shop practices Keep service area clean and dry Besureelectrical outlets and tools are properly grounded Use adequate lightforthejobat hand 3 Make sur...

Page 12: ...where it would be in danger if movement should occur during assembly installation operation main tenance repairing unplugging or moving 10 Turn machine off stop and disable engine remove ignition key and place in your pocket set park brake and wait for all moving parts to stop before servicing adjusting repairing or unplugging 11 Do not run machine inside a closed building to prevent asphyxiation ...

Page 13: ...e pressure on hydraulic system before maintaining or working on system 2 9 STORAGE SAFETY 1 Store the unit in an area away from human activity 2 Do not allow children to play on or around the stored machine 3 Store the unit in a dry level area Support the frame with planks if required 2 10 TRANSPORT SAFETY 1 Comply with state and local laws governing safety and transporting of machinery on public ...

Page 14: ...sition and crank until engine starts 15 DO NOT strike flywheel with a hard object or metal tool as this may cause flywheel to shat ter in operation Use proper tools to service engine 16 DO NOT operate engine without a muffler Inspect periodically and replace if necessary If engine is equipped with a muffler deflector inspect periodically and replace if necessary with correct deflector 17 DO NOT op...

Page 15: ...2 Do not attempt to mount a tire unless you have the proper equipment and experience to do the job 3 Have a qualified tire dealer or repair service perform required tire maintenance 4 When replacing worn tires make sure they meet the original tire specifications Never undersize 2 14 BATTERY SAFETY 1 Keep all sparks and flames away from batter ies as gas given off by electrolyte is explo sive 2 Avo...

Page 16: ...allow anyone else to use this chipper until such information has been reviewed Annually review this information before the season start up Make these periodic reviews of SAFETY and OPERATION a standard practice for all of your equipment We feel that an untrained operator is unqualified to use this machine A sign off sheet is provided for your record keeping to show that all personnel who will be w...

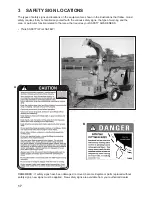
Page 17: ...r authorized dealer 3 SAFETY SIGN LOCATIONS The types of safety signs and locations on the equipment are shown in the illustrations that follow Good safety requires that you familiarize yourself with the various safety signs the type of warning and the area or particular function related to that area that requires your SAFETY AWARENESS Think SAFETY Work SAFELY A B E E B G B ...

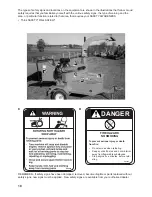
Page 18: ...tions that follow Good safety requires that you familiarize yourself with the various safety signs the type of warning and the area or particular function related to that area that requires your SAFETY AWARENESS Think SAFETY Work SAFELY D C Z94012 FIRE HAZARD NO SMOKING To prevent serious injury or death from fire Do not smoke when refueling Keep sparks flames and hot material away from flammable ...

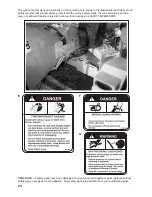
Page 19: ...re available from your authorized dealer The types of safety signs and locations on the equipment are shown in the illustrations that follow Good safety requires that you familiarize yourself with the various safety signs the type of warning and the area or particular function related to that area that requires your SAFETY AWARENESS G B E E E D F A B G G ...

Page 20: ...gns are available from your authorized dealer The types of safety signs and locations on the equipment are shown in the illustrations that follow Good safety requires that you familiarize yourself with the various safety signs the type of warning and the area or particular function related to that area that requires your SAFETY AWARENESS Z94008 B B G G ...

Page 21: ...tection hard hat safety glasses safety shoes and gloves are recommended during assembly installation operation adjustment maintaining repairing or plugging Do not al low long hair loose fitting clothing or jewellery to be around moving parts Turn machine off stop and disable engine remove ignition key and place in your pocket set park brake and wait for all moving parts to stop before servicing ad...

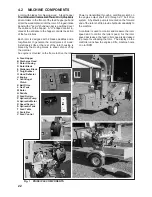
Page 22: ...me to drive the rotor Fig 1 PRINCIPLE COMPONENTS A Feed Hopper B Discharge Hood C Rotor Housing D Rotor Blade E Stationary Blade F Twig Breaker G Hood Deflector H Engine J Centrifugal Clutch K Belt Drive L Gas Tank M Rotor N Paddle O Feed Rollers P Hydraulic Pump Q Hydraulic Motor R Speed Sensor S Hydraulic Tank T Feed Table U Panic Bar V Feed Control Power is transmitted through a centrifugal clu...

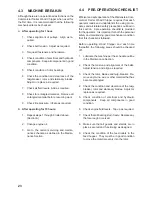
Page 23: ...l Trailer Wood Chipper requires that each operator reads and understands the using proce dures and all related safety precautions outlined in this section A pre operation checklist is provided for the operator It is important for both the personal safety and maintaining good mechanical condition that this checklist is followed Before operating Wood Chipper and each time thereafter the following ar...

Page 24: ...l continue to run START Turn fully clockwise to the last spring loaded detent position to en gage the starter solenoid and start the engine Release the key when the engine starts and it will return to the RUN position b Choke This sliding lever controls the position of the choke Slide the lever to the right to open the choke and to the left to close it c Throttle This sliding lever controls the po...

Page 25: ...ss from all sides Pull the control all the way out to engage the feeding system Push in slightly to the first detent to stop the feeding system Push the control all the way in to reverse the feeding system Fig 3 HYDRAULIC FEED CONTROL LEVER Feeding Neutral Stop Reversing Left Side Right Side Control Schematic ...

Page 26: ...achine for detailed operating instructions This panel displays the parameters monitored by the control ler Depress the title works on the front of the panel to select the display for the engine oil life machine hours and rotor RPM b Panic Bar Activated This light is illuminated when the Panic Bar is activated and goes out when it is reset c Roller Roller Hood Closed This light is illuminated when ...

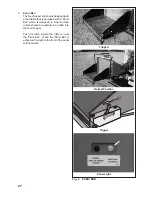
Page 27: ...ic Bar which is designed to stop the feed rollers should an operator be pulled into the feed hopper Push the latch toward the roller to reset the Panic Bar When the Panic Bar is activated the light on the front of the panel will illuminate Fig 6 PANIC BAR Tripped Normal Position Trigger Panel Light ...

Page 28: ...Top Programming Button Increases value c Bottom Programming Button Decreases value d Mode Button Pages through modes and display Press and hold for 10 seconds to reset Oil Use Hour counter when in oil use mode 3 Programming Upper RPM Limit Ceiling 1 Press mode button twice Digital readout will display current upper limit setting This represents the RPM at which the auto feed wil re start the feed ...

Page 29: ... 38 HP gas 60 Kohler 25 HP diesel 50 5 Programming Lower RPM Limit Floor 1 Press mode button four times Digital readout will display current lower limit set ting This represents the RPM at which the Auto feed will suspend the feed rolls completely 2 Machine indicator will flash Increase or decrease setting using program buttons Kohler 38 HP gas 985 RPM Kohler 25 HP diesel 985 RPM Fig 10 READOUT NO...

Page 30: ...d Troubleshootings Hints a For heavier brush decrease the upper flow percentage for slower feed speed b For lighter brush increase the uppler flow percentage for faster feed speed c If the unit is stalling before the feed rolls stop increase the rotor floor setting d If you prefer more aggressive feeding with faster feed and more stops increase the lower flow percentae e If the rotor RPM is not re...

Page 31: ...are clear of the working area 2 Make sure there is enough room and clearance to safely back up to the ma chine 3 Slowly back the tow vehicle until the jaws on the hitch and ball are aligned 4 Lift the hitch and place the jaws over the ball on the hitch 5 Flip the latch to lock the jaws around the ball 6 Install the retainer to secure the jaws 7 Attach the safety chain securely to the truck frame t...

Page 32: ...rness for the lights 9 Route the harness and cables across the hitch to prevent snagging Be sure to pro vide slack for turning 10 Pull out the lock pin and pull up to place jack frame in its storage place Install an chor pin 11 Reverse the above procedure when un hooking ...

Page 33: ...pairing or unplugging Do not run machine inside a closed building to prevent asphyxiation from engine exhaust Use care when feeding material into chipper Do not send metal bottles cans rocks glass or other foreign material into wood chipper If foreign material enters chipper stop machine turn engine off and place ignition key in your pocket and wait for all moving parts to stop before removing mat...

Page 34: ...allow it to warm g Gradually open the choke h Turn the discharge head to its desired position i Slowly increase the engine speed to engage the centrifugal clutch j Increase throttle setting to maximum speed for operation k Place material into hopper l Pull on the feeding lever to start the rollers and start to chip 6 Stopping a Stop feeding material into the hopper b Place feed lever in neutral c ...

Page 35: ...se a stick or branch to push any piece of material into the rollers or rotor that does not move on its own and stops in the hopper Do not take a chance with getting your hand caught in the feed rollers g Always wear personal protective equip ment PPE whenever operating the machine This includes but is not limit ed to protective shoes with slip resistant soles protective goggles or face shield heav...

Page 36: ...des The rotor is equipped with 2 blades placed at 180 to each other to keep the rotor in balance If one needs to be changed both should be changed b Stationary blade Each machine is equipped with a station ary blade that acts as a stop for the mov ing rotor blades WARNING Machine is shown with guard removed or rotor cover opened for illustrative purposes only Do not operate machine with guard remo...

Page 37: ...artment Open the rotor cover and check the condition of the breaker on a weekly basis Also check for any entangled material when the rotor cover is opened Remove this material prior to closing the cover and resuming work WARNING Machine is shown with guard removed or rotor cover opened for illustrative purposes only Do not operate machine with guard removed or cover Removed ...

Page 38: ... set the throttle to the 1 4 position when starting to prevent the clutch engaging and the rotor turning when starting Loosen the engine mounting bolts and slide the engine to the required position to set the belt tension Be sure to check that the pul leys are in alignment whenever the engine is moved WARNING Machine is shown with guard removed or rotor cover opened for illustrative purposes only ...

Page 39: ...nition key and place it in your pocket and wait for all moving parts to stop before unplugging d Pull the material out of the discharge hood Use a stick to poke loose any ma terial jammed into the discharge hood Do not allow anything to remain in this area e Severe plug Loosen the feed roller frame anchor nuts and raise the feed hopper Re move material from inside the roller compartment Clean out ...

Page 40: ...14 Cleaning Clean the machine frequently to prevent a build up of dust chips and trash on the frame A clean machine reduces the chance of rust ing 15 Clearance Itisrecommendedthattheclearancebetween the rotor and stationary blades be set and maintained at 1 32 to 1 16 inch 0 8 mm ot obtain the best performance Use the station ary blade mounting bolts to set the clearance asrequired Slideapieceof11...

Page 41: ...cutting effect as it meets the stationary blade Be sure to tighten the blade mounting bolts to their specified torque when re installing the blades to the rotor The stationary blade is designed with 4 sharp corners that can be utilized When the corner facing the rotor blade rounds over remove the blade and re install with a different corner facing the rotor blade Use the stationary blade to set th...

Page 42: ...stem to be part of the material feeding system A hydraulic pump is driven from the front engine stub shaft and is plumbed to the adjacent hydraulic tank A sensor on the rotor shaft measures the rotor speed The controller slows or stops the the feed roll ers until the shaft speed increases to the required RPM Avalve in the circuit controls and meters the amount of oil flowing to each feed roller hy...

Page 43: ...Central Processing Unit display speed sensor and electro hydraulic valve The CPU measures the rotor speed through the speed sensor and closes the valve when the rotor speed slows It also increases the flow when the rotor speed recovers back to operating RPM Display Sensor Fig 30 ELECTRICAL SYSTEM ...

Page 44: ...rollers should an operator be pulled into the hop per The feed table is designed with a latch in the center of the frame Release the latch when raising or lowering the gate Push on the Panic Bar to stop the feed rollers Move the latch toward the roller to reset the Panic Bar and start the roller Fig 31 PANIC BAR Up On Off Trigger ...

Page 45: ...to prevent slipping or tripping Oper ate only on level ground b Do not place hands or any body parts into the feed hopper during operation Use the feed rollers to move material into the rotor rather than your hands c Do not point discharge at people animals or buildings Rotor can expel wood chips fast enough to cause injury d Use care when feeding material into the chipper Do not send metal bottle...

Page 46: ...ore mov ing or transporting Fig 34 TRANSPORT CONFIGURATION When transporting the machine review and follow these instructions 1 Clear the area of bystanders espe cially small children 2 Check that all the lights and reflectors required by the highway authorities are in place clean and working 3 Insure that the machine is securely attached to the pick up with a me chanical retainer through the ball...

Page 47: ...nutes to dry the mois ture from inside the machine 6 Turn fuel valve off 7 Move the feed hopper intake gate up and lock 8 Touchupallpaintnicksandscratchestoprevent rusting 9 Removeignitionkeyandstoreinasecureplace 10 Remove the battery and store it in a cool dry area on wooden blocks or a wooden pallet Charge it monthly to maintain an adequate charge 11 It is best to store the machine inside If th...

Page 48: ... maintenance or service function make sure all safety shields and de vices are installed before placing unit in serv ice 5 SERVICE AND MAINTENANCE 5 1 SERVICE 5 1 1 FLUIDS AND LUBRICANTS 1 Grease Use an SAE multipurpose high temperature greasewithextremepressure EP performance Also acceptable is an SAE multipurpose lithium base grease 2 Engine Oil Use an SAE 10W30 or 10W40 multi viscosity oil meet...

Page 49: ...on normal operating conditions Severe or unusual con ditions may require more frequent lubrication or oil changes 8 Hours or Daily 1 Check engine oil level 2 Check fuel level 3 Check oil level in hydraulic tank Fig 37 FUEL TANK Fig 38 SIGHT GLASS Fig 36 DIP STICK ...

Page 50: ...ss of blades a Rotor b Stationary Remove sharpen or change edge as required 40 Hours or Weekly 1 Check rotor drive belt tension Move the engine to set the belt tension Fig 39 ROTOR DRIVE SYSTEM Fig 40 AIR CLEANER Fig 41 BLADES Stationary Rotor a b ...

Page 51: ...51 Fig 42 DRAIN PLUG Fig 44 OIL FILTER 100 Hours or Monthly 1 Change engine oil 2 Check tire pressure 3 Change engine oil filter Fig 43 TIRES Typical ...

Page 52: ...52 Front Rear Fig 45 BEARINGS Fig 46 AIR CLEANER 100 Hours 4 Grease rotor bearings 5 Replace engine air cleaner IMPORTANT Do not over grease ...

Page 53: ...53 Fig 47 FEED ROLLER 6 Grease feed roller bearings 7 Grease the feed roller pivot Left Side Right Side 6 6 7 ...

Page 54: ...54 Annually 1 Replace in line fuel filter 2 Replace hydraulic filter 3 Clean machine Fig 50 MACHINE Fig 48 FUEL FILTER Fig 49 HYDRAULIC FILTER ...

Page 55: ...RVICED BY MAINTENANCE 8 Hours or Daily CK Engine Oil Level CK Fuel Level CK Hydraulic Oil Level 40 Hours or Weekly CK Rotor Drive Belt Tension CL Air Cleaner CK Blade Sharpness 100 Hours or Monthly CH Engine Oil CK Tire Pressure CH Engine Oil Filter G Rotor Bearings R Engine Air Cleaner G Feed Roller Bearings G Feed Roller Pivot Annually R In Line Fuel Filter R Hydraulic Filter CL Machine ...

Page 56: ...view the Operator s Manual for the en gine 2 Place all controls in neutral stop engine and remove ignition key and wait for all moving parts to stop before maintaining 3 Remove the cover over the air cleaner 4 Remove the filter from the engine 5 Use an air house to blow the dust and de bris out of the filter 6 Install filter 7 Install and secure the cover Fig 51 AIR CLEANER ...

Page 57: ...rain plug 5 Remove the drain plug and allow the oil to drain for 10 minutes 6 Install and tighten the drain plug 7 Dispose of the used oil in an approved container 8 Remove engine oil filter 9 Apply a light coat of oil to the O ring and install the replacement filter Snug up by hand and then tighten 1 2 turn 10 Fill the crankcase with the specified oil 11 Run the engine for 1 2 minutes and check f...

Page 58: ...should deflect approximately 1 inch 25 mm when pushed on with about 10 lbs force to be properly tensioned 5 To adjust belt tension a Loosen engine mounting bolts b Move the engine to the required posi tion to set belt tension c Set pulley alignment d Tighten mounting bolts to their speci fied torque 6 To replace belt a Move engine to its loosest position b Replace belt c Set pulley alignment d Tig...

Page 59: ...59 7 Lay a straight edge across the pulley faces to check the align ment Adjust alignment if pulley faces vary more than 1 32 inch 8 MM Fig 54 PULLEY ALIGNMENT ...

Page 60: ...ator s manual or contact your local engine dealer Vibration while running Driveline vibration Check drive belts or pulleys for bad spots or wear Inspect rotor for broken or missing chipper knives Repair if required Check rotor to see if it wobbles Check to see if rotor is assembled correctly 6 TROUBLE SHOOTING The Wallenstein Commercial Trailer Wood Chipper is designed with blades on a rotor to cu...

Page 61: ...Controller isn t working Check electrical system Charge battery Replace controller Sensor not working Check sensor and set to 2 mm 3 16 inch clearance Replace sensor Rotor stalls Feed rollers not stopping Controller not sensing rotor speed Check sensor electrical and hydraulic systems PROBLEM CAUSE SOLUTION ...

Page 62: ...ize 30 Number of Rotor 2 Knives Knife Type Hardened tool steel Rotor Weight 180 lbs Feeding System Self feed Mounting System Trailer Dimensions 63 W x 88 L x Hopper Folded 91 H Hopper Opening 25 by 25 Discharge Hood 360 Rotation Discharge Hood 72 Height Rated RPM 1280 Weight 1355 lbs 7 SPECIFICATIONS 7 1 MECHANICAL SPECIFICATIONS SUBJECT TO CHANGE WITHOUT NOTICE ...

Page 63: ... 72 110 155 215 390 570 850 9 19 33 53 80 115 160 290 420 630 17 36 63 100 155 220 305 540 880 1320 12 27 45 75 115 165 220 400 650 970 8 8 N m lb ft Bolt Torque Bolt Diameter A 10 9 N m lb ft M3 M4 M5 M6 M8 M10 M12 M14 M16 M20 M24 M30 M36 5 3 6 10 25 50 90 140 225 435 750 1495 2600 4 2 2 4 7 18 37 66 103 166 321 553 1103 1917 1 8 4 5 9 15 35 70 125 200 310 610 1050 2100 3675 1 3 3 3 7 11 26 52 92...

Page 64: ...renches Place one wrench on the connector body and with the second tighten the swivel nut to the torque shown The torque values shown are based on lubricated connections as in reassembly Tube Nut Size Torque Recommened Size Across Value Turns To Tighten OD Flats After Finger Tightening in in N m lb ft Flats Turn 3 16 7 16 8 6 1 1 6 1 4 9 16 12 9 1 1 6 5 16 5 8 16 12 1 1 6 3 8 11 16 24 18 1 1 6 1 2...

Page 65: ...orting 10 Safety Sign Locations 12 Service and Maintenance 43 Maintenance 51 Service 43 Specifications 57 Bolt Torque 58 Hydraulic Fitting Torque 59 Mechanical 57 T Trouble Shooting 55 I Index 60 Introduction 1 O Operation 16 Attaching Unhooking 26 Controls 19 Control Unit Operation Programming 23 Field Operation 28 Machine Break In 18 Machine Components 17 Pre Operation Checklist 18 Storage 42 To...

Reviews: