background image

I

GB

F

D

E

RU

P

CZ

PL

SK

H

8

fumes have had time to evaporate. 

17

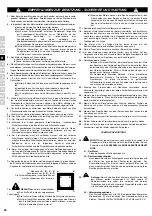
-

Replace worn exhaust pipes.

18

-

Before starting the engine, always check that the blade, blade bolts and

all cutting parts are not worn or damaged. Replace any worm or dama-
ged blade or bolts an entire set at a time, to keep the machine in balance.

19

-

Do not run the engine in a confined space where fumes containing car-
bon monoxide can accumulate.

20

-

Only use the grass cutter in daylight or good artificial light

21

-

Do not stop or start suddenly on an incline. Slow down on inclines and
on close turns to avoid tipping over or loss of control. Be very careful if
you are turning on an incline.

22

-

Land-related risks :

- If the area is a steep incline : never trim going up or down the slope, but

follow a line at right ongles to the slope.

- If the area is covered with natural or man-made obstacles, such as

rocks, loose stones, tree trunks, bottles, pieces of metal, stakes, and all
types of foreign objects, these may become dangerous projectiles and
put undue pressure on the cutting tool. They should therefore be avoi-
ded.

- Beware of slipping on sloping or wet ground.

23

-

Never use scrub-cutters if housing protector covers are defective, or
without the safety mechanism in use.

24

-

Never modify the engine speed settings, and do not over-rev the
engine. 

25

-

Make sure that the cutting equipment is not engaged when going over
gravel or earth paths, and when transporting the equipment in general.

26

-

Avoid cutting near residential areas, pathways and roads or parking

areas.

27

-

Never allow children or people unfamiliar with these instructions to use
this grass cutter.

28

-

Never cut pulling the machine towards you.

29

-

When transporting the grass cutter other than under its own power, the
engine must be switched off.

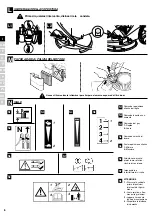
SPECIFIC MAINTENANCE

30

-

IMPERATIF 

Check before use that the cooling air intake area

and engine cylinder are clean and free from any impurity, 

FAI-

LURE TO COMPLY WHITH THIS REQUIREMENT WILL
RENDER THE GUARANTEE NULL AND VOID.

31

-

The engine

See the manufacturer's maintenance handbook.

32

-

The scrub-cutter

After each use, carefully clean the housing of the cutting equip-
ment and the engine case. Check the state of the cutting blade,
which must always be sharp in order to have as clean a cut as
possible and to allow the machine to work at its best.

33

-

Attention :

If you sharpen the blade, make sure that the blade

remains perfectly balanced. After 25 hours of use, lubricate all
moving parts and front and rear wheels. Regularly check all
screws, nuts and bolts for tightness.

34

-

Gear box

Check the oil level every hundred hours at least. Level should be
2.5 cm (1") below the top edge, when the cap is removed. Grade
of oil : SAE 10W-30, class SG or SF.

1

-

This machine must only be used in accordance with this manual's ins-
tructions. The manufacturer accepts no liability in the event of non-
observance of these instructions.

2

-

In the following cases, switch off the motor and disconnect the spark
plug: 

a)

Before clearing any clogged parts

b)

Before cleaning, servicing or repairing the machine.

c)

After hitting an unusual object. Inspect the machine for damage (par-

ticularly the cutter). Repair, if necessary, before restarting or re-using
the machine. 

d)

If the machine begins to vibrate abnormally, check the whole machine
immediately to discover the cause: remedy the problem, seeking
expert assistance if necessary.

3

-

Switch off the motor in the following cases:

a)

Before refuelling

b)

Before removing the ejection deflector for cleaning.

4

-

Switch off the motor, disconnect the spark plug and use thick gloves
when changing or sharpening the blade.

5

-

On completing the work, always reduce the motor to idling speed before
switching it off (lever 1): then close the fuel tap.

6

-

To ensure that your machine operates properly and safely:

a)

Ensure that all the nuts, bolts and screws are tight

b)

Check the condition of the ejection deflector regularly

c)

Replace any worn or damaged parts

d)

Check for oil or petrol leaks.

7

-

Never store the machine with petrol in the tank in any building where
petrol fumes may encounter a naked flame, a spark or a strong heat
source. Allow the motor to cool before storing the machine in any enclo-
sed place. 

8

-

To reduce the risk of fire, remove any plant debris or other flammable
material from the motor or the exhaust.

9

-

Never lift or tilt the machine while the motor is running. 

10

-

Never use the brush cutter on slopes steeper than 20%.

11

-

Only use genuine replacement blades.

12

-

Wear appropriate protective clothing when operating the machine, par-
ticularly safety shoes, long trousers and safety goggles.

13

-

Carefully inspect the area to be cleared and remove any stones, sticks,
wire and other objects liable to be thrown out by the machine. 

14

-

The brush cutter must be used with the front shutter and the side
deflector fitted. The font shutter may only be removed for heavy work
provided that the safety instructions and the security perimeter descri-
bed in the following section are strictly observed.

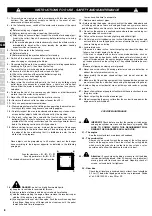
15

-

Before starting to clear an area, mark out the perimeter of the danger
zone according to the instructions below. Place warning signs around
the edge of the zone indicating that it is forbidden to enter the area
while work is in progress.

Since objects can be projected up to 40 metres, mark out the danger
zone according to the diagram opposite, as detailed in the following
paragraph:

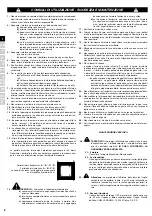
Area for clearance =

A' - B' - C' - D'

Security perimeter =

A - B - C - D

The shaded strips must be at least 40 metres wide

16

-

DANGER

- petrol is a highly flammable liquid. 

a) 

keep fuel in containers reserved for this use;

b)

always refuel out of doors and do not smoke while refueling ;

c)

add fuel before starting the engine. Never remove the reservoir cap or
add fuel if the engine is running or still hot;

d)

if you spill petrol, do not start the engine. Push the machine away from
the spillage. Keep away all flames and heat sources until  the petrol
fumes have had time to evaporate. 

A

B

C

D

A’

B’

C’

D’

INSTRUCTIONS FOR USE - SAFETY AND MAINTENANCE

Summary of Contents for DR 51 VB6

Page 1: ...0500030024 12 2007 ...

Page 2: ...urante questa operazione c aggiungere carburante prima di avviare il motore Non rimuovere mai il coperchio del serbatoio e non aggiungere A B C D A B C D benzina quando il motore funziona o è ancora caldo d se la benzina è fuoriuscita non cercare di avviare il motore ma spostare la sfrondatrice dalla zona in cui si trova la ben zina pertanto evitare di creare una fonte di infiammazione finché i va...

Page 3: ...va del gas 13 Leva di regolazione dell altezza del taglio 14 Leva d innesto d avanzamento 15 Leva lenta rapida d avanzamento PIASTRA D IDENTIFICAZIONE DELLA MACCHINA A Potenza nominale B Massa in chilogrammi C Numero di serie D Anno di fabbricazione E Tipo di motozappatrice F Nome e indirizzo del costruttore G Identificazione CE H Velocità massima del motore A2 A1 Capovolgere il manubrio evitando ...

Page 4: ...riore fissa Oppure G MESSA IN MARCIA DEL MOTORE ARRESTO DEL MOTORE F1 x3 F4 F3 F5 F2 B C Ruota anteriore girevole E PREPARAZIONE E1 Super o sin plomo Capacidad en gasolina PIENO DI BENZINA 1 5 L E2 PIENO D OLIO E LIVELLO Olio raccomandato k manuale motore Capacità dell olio 0 65 L ...

Page 5: ...r affilare ed equilibrare la vostra lama ogni 20 ore Vedere K1 K2 K3 K4 H REGOLAZIONE DEL CAVO D INNESTRO H1 H2 H3 J REGOLAZIONE ALTEZZA DEL TAGLIO REGOLAZIONE VELOCITÀ DEL LAVORO Lavori leggeri Lavori impegnativi 1 2 3 4 MANUTENZIONE SMONTAGGIO DELLA CINGHIA K1 K2 K3 K4 K K5 K6 K7 K8 ...

Page 6: ... altezza del taglio Comando del gas 1 Rapido 2 Lento Scala regolazione altezza 1 Minimo 2 Massimo ATTENZIONE 1 Staccare la candela prima di qualsiasi intervento di ripara zione 2 Lama rotativa atten zione alle proiezioni 3 Leggere il manuale d uso e manutenzione 4 Rispettare le distanze di sicurezza 2 1 1 2 N1 Comando innesto avan zamento N2 Comando velocità di lavoro N4 Allontanare mani e piedi l...

Page 7: ...va del freno ad azione mantenuta al manubrio 51 cm Espulsione laterale Mediante le ruote posteriori con catena e cinghia Centralizzata e azionata al manubrio 120 100 80 55 CARATTERISTICHE TECNIQUE MOTORE Peso Potenza acustica Pressione acustica al posto di guida Misura di vibrazione Regime maxi Velocità di avanzamento min max Ruota anteriore Arresto della lama Larghezza del taglio Trazione Altezza...

Page 8: ...following cases switch off the motor and disconnect the spark plug a Before clearing any clogged parts b Before cleaning servicing or repairing the machine c After hitting an unusual object Inspect the machine for damage par ticularly the cutter Repair if necessary before restarting or re using the machine d If the machine begins to vibrate abnormally check the whole machine immediately to discove...

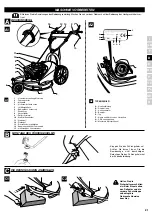
Page 9: ...ord 12 Throttle 13 Cutting height adjuster 14 Forward clutch handle 15 Slow fast forward handle MACHINE IDENTIFICATION PLATES A Nominal power B Weight in kilograms C Serial number D Year of manufacture E Type of cultivator F Manufacturer s name and address G EC identifier H Maximum motor speed A2 A1 Turn the handlebar round without damaging the cables position it inside the machine and set in plac...

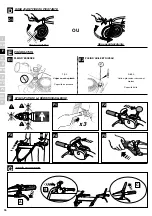
Page 10: ...LING Fixed front wheel OR G USE OF THE SCRUB CUTTER STOPPING THE ENGINE F1 x3 F4 F3 F5 F2 A B C Swivelling front wheel E PRÉPARATION E1 Super or lead free Petrol capacity PETROL 1 5 L E2 OIL FILLER AND GAUGE Recommended oilk see the motor manual Oil capacity 0 65 L ...

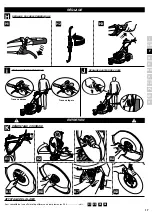
Page 11: ...ended that you have the blade sharpened and balanced after every 20 hours use See K1 K2 K3 K4 H ADJUSTING THE CLUTCH CABLE H1 H2 H3 J ADJUSTING THE CUTTING HEIGHT ADJUSTING THE WORKING SPEED Light work Heavy work 1 2 3 4 MAINTENANCE REMOVING THE BELT K1 K2 K3 K4 K K5 K6 K7 K8 ...

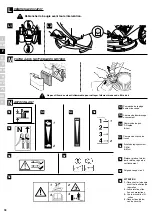
Page 12: ... N7 N6 N8 Cutting height control Accelerator 1 Fast 2 Slow Scale for setting blade height 1 Mini 2 Max WARNING 1 Disconnect the spark plug before any main tenance or repair work 2 Lame rotative atten tion aux projections 3 Read the user s manual 4 Keep safety distan ces 2 1 1 2 N1 Forward movement clutch control N2 Operating speed control N4 Rotating blade keep hands and feet away Risk of severing...

Page 13: ...d or swivel Automatic through permanent action safety arch on handlebars 51 cm Lateral ejection Rear wheels with chain and belt Centralised and controlled at handlebar 120 100 80 55 TECHNICAL SPECIFICATIONS Acoustic level Acoustic pressure at driving position Vibration level Maximum engine Velocity min max Front wheel Stopping of blade Cutting width Traction Cutting height Transmission Reducing ge...

Page 14: ...port au bord supérieur après le bouchon Qualité huile SAE 10W 30 Classe SG ou SF 1 Cette machine doit toujours être utilisée suivant les recommandations indiquées dans ce manuel Le non respect de ces consignes désenga gerait la responsabilité du constructeur 2 Arrêter le moteur et déconnectez le capuchon de la bougie dans les cas sui vants a avant de nettoyer les points obstrués b avant tout contr...

Page 15: ...te de gaz 13 Manette d embrayage d avancement 14 Manette de réglage de hauteur de coupe 15 Manette lente rapide d avancement PLAQUE D IDENTIFICATION DE LA MACHINE A Puissance nominale B Masse en kilogrammes C Numéro de série D Année de fabrication E Type de la motobineuse F Nom et adresse du constructeur G Identification CE H Vitesse maxi moteur A2 A1 Retourner le guidon en évitant d abi mer les c...

Page 16: ...vant fixe OU G UTILISATION DE LA DÉBROUSSAILLEUSE ARRÊT DU MOTEUR F1 x3 F4 F3 F5 F2 A B C Roue avant pivotante E PRÉPARATION E1 Super ou sans plomb Capacité en essence PLEIN D ESSENCE 1 5 L E2 PLEIN D HUILE ET NIVEAU Huile a préconiser k manuel moteur Capacité huile 0 65 L ...

Page 17: ...conseillé de faire affuter et équilibrer votre lame toutes les 20 h Voir K1 K2 K3 K4 H RÉGLAGE DU CÂBLE D EMBRAYAGE H1 H2 H3 J RÉGLAGE HAUTEUR DE COUPE RÉGLAGE VITESSE DE TRAVAIL Travaux légers Travaux denses 1 2 3 4 ENTRETIEN DÉMONTAGE COURROIE K1 K2 K3 K4 K K5 K6 K7 K8 ...

Page 18: ...Commande de réglage hauteur de coupe Commande de gaz 1 Rapide 2 Lent Échelle de réglage hauteur 1 Mini 2 Maxi ATTENTION 1 Déconnecter la bougie avant tout entretien de réparation 2 Lame rotative atten tion aux projections 3 Lire le manuel d utili sation 4 Respect des distan ces de sécurité 2 1 1 2 N1 Commande d embrayage avancement N2 Commande vitesse de travail N4 Éloigner pieds et mains lame rot...

Page 19: ...vier de frein à action maintenue au guidon 51 cm Éjection latérale Par les roues arrières avec chaîne et courroie Centralisé et commandé au guidon 120 100 80 55 CARACTÉRISTIQUES TECHNIQUES MOTEUR Poids Puissance acoustique Pression acoustique au poste de conduite Mesure de vibration Régime maxi Vitesse d avancement min max Roue avant Arrêt de la lame Largeur de coupe Traction Hauteur de coupe Tran...

Page 20: ...ein 16 GEFAHR Benzin ist hochentzündbar a Den Kraftstoff in eigens vorgesehenen Tanks lagern b Den Tank nur im Freien auffüllen Während des Auftankens nicht rauchen c Kraftstoff nachfüllen bevor der Motor angelassen wird Niemals den Kraftstofftankdeckel entfernen oder Auftanken wenn der Motor in Betrieb oder noch warm ist A B C D A B C D EMPFEHLUNGEN ZUR BENUTZUNG SICHERHEIT UND WARTUNG d Niemals ...

Page 21: ...stellhebel Schnitthöhe 14 Kupplungshebel für Fahrantrieb 15 Steuerung des Varioantriebes TYPENSCHILD A Nominalleistung B Gewicht in kg C Seriennummer D Baujahr E Typ F Name und Adresse des Herstellers G CE Kennzeichnung H Maximale Motordrehzahl A2 A1 Klappen Sie den Führungsholm auf Achten Sie darauf dass Sie die Bowdenzüge nicht beschädigen Befestigen Sie den Führungsholm mit der Knebelverbindung...

Page 22: ...rad ODER G DEN MOTOR ANLASSEN MOTORSTOPP F1 x3 F4 F3 F5 F2 A B C Schwenkbares Vorderrad E VORBEREITUNG E1 Super oder Bleifrei Fassungsvermögen des Kraftstofftanks KRAFTSTOFF AUFFÜLLEN 1 5 L E2 ÖL AUFFÜLLEN UND ÖLSTAND Empfohlenes Ölk siehe Motorhandbuch Fassungsvermögen des Öltanks 0 65 L ...

Page 23: ... das Messer alle 20 Std schärfen und auszuwuchten zu lassen Siehe K1 K2 K3 K4 H EINSTELLEN DES KUPPLUNGSBOWDENZUGES H1 H2 H3 J EINSTELLEN DER SCHNITTHÖHE EINSTELLEN DER ARBEITSGESCHWINDIGKEIT Leichte arbeiten Hohes Gras 1 2 3 4 WARTUNG AUSBAU DES KEILRIEMENS K1 K2 K3 K4 K K5 K6 K7 K8 ...

Page 24: ...6 N8 Kupplungsgriff Schnitthöhenverstellung Gashebel 1 Schnell 2 Langsam Skala der Höheneinstellung 1 Minimal 2 Maximal ACHTUNG 1 Vor jeder Wartung und Reparatur die Zündkerze abklem men 2 Drehmesser Vorsicht Schleudergefahr 3 Das Bedienungshandbuch lesen 4 Sicherheitsabstände einhalten 2 1 1 2 N1 Kupplungsgriff Fahrantrieb N2 Regelung der Arbeitsgeschwindigkeit N4 Hände und Füße fernhalten Drehen...

Page 25: ... zentrales Vorderrad Motorstopp durch Sicherheitshebel am Führungsholm 51 cm Seitlicher Auswurf Hinterradantrieb mit Kette und Keilriemen Zentrale Schnitthöheneinstellung am Führungsholm 120 100 80 55 TECHNISCHE DATEN MOTORE Gewicht Schallpegel Schallpegel am Führungsholm Vibrationsmessung Max Drehzahl Fahrgeschwindigkeit min max Vorderrad Messerstopp Schnittbreite Antrieb Schnitthöhe Getriebe Var...

Page 26: ...esente guía De no cumplir dichas consignas el constructor des cartará cualquier responsabilidad 2 Pare el motor y desconecte el capuchón de la bujía en los siguientes casos a antes de limpiar los puntos obstruidos b antes de comprobar limpiar o arreglar la desbrozadora c después de haberse chocado contra un objeto ajeno Compruebe que la desbrozadora no haya sufrido desperfec tos en particular el ó...

Page 27: ...cilla de gas 13 Manecilla de regulación de altura de corte 14 Manecilla de desembrague de avance 15 Manecilla de avance lenta rápida PLACA DE IDENTIFICACION DE LA MAQUINA A Potencia nominal B Masa en kilos C Número de serie D Año de fabricación E Tipo de motobinadora F Nombre y dirección del constructor G Identificación CE H Velocidad máxima motor A2 A1 Devolver el manillar evitando estro pear los...

Page 28: ...oda dianteira fixa O G ARRANQUE DO MOTOR PARO DEL MOTOR F1 x3 F4 F3 F5 F2 A B C Roda dianteira giratória E PREPARACION E1 Super o sin plomo Capacidad en gasolina LLENADO DE GASOLINA 1 5 L E2 LLENADO DE ACEITE Y NIVEL Aceite preconizado k guía motor Capacidad aceite 0 65 L ...

Page 29: ...INA Se recomienda afilar y equilibrar su hoja cada 20h Ver K1 K2 K3 K4 H REGLAJE DEL CABLE DE EMBRAGUE H1 H2 H3 J REGLAJE ALTURA DE CORTE REGLAJE VELOCIDAD DE TRABAJO Obras ligeras Obras densas 1 2 3 4 MANTENIMIENTO DESMONTAJE CORREA K1 K2 K3 K4 K K5 K6 K7 K8 ...

Page 30: ...reglaje altura de corte Mando de marcha 1 Rápido 2 Lento Escala de reglaje altura 1 mínima 2 máxima ATENCION 1 Desconecte la bujía previamente a cual quier mantenimiento de reparación 2 Cuchilla rotativa cui dado con las proyec ciones 3 Léase la guía de utili zación 4 Respete las distancias de seguridad 2 1 1 2 N1 Mando de embrague avance N2 Mando velocidad de tra bajo N4 Aleje los pies y las mano...

Page 31: ...nca de frenado con acción mantenida en el manillar 51 cm Eyección lateral Por las ruedas traseras con cadena y correa Centralizada y mandada desde el manillar 120 100 80 55 CARACTERISTICAS TECNICAS MOTOR Peso Potencia acústica Presión acústica en el puesto de condución Medida de vibración Régimen máx Velocidad de avance min max Rueda delantera Paro de la cuchilla Ancho de corte Tracción Altura de ...

Page 32: ... проведении любых иных операций с топливом запрещается курить в заливку топлива производите перед запуском двигателя апрещается снимать крышку топливного бака или заполнять него при работающем или горячем двигателе г запрещается запускать двигатель если топливо переливается или разлито уберите кусторез из зоны где разлито топливо не приближайтесь к ней с источниками искрения открытого пламени или ...

Page 33: ... газа 13 6ычаг включения движения вперед 14 6ычаг регулировки высоты подстригания 15 6ычаг медленного быстрого движения вперед А А А A О А Ь АЯ О О Ь B А А О А А C О D О У А E О О У Ь А О А F А А А О О Я G О О А А А Ь АЯ О О Ь А Я A2 A1 оверните руль стараясь не повредить кабели поместите его внутрь машины и зафиксируйте О А У А О О C 1 13 2 E A H B G F D C KW mn 1 Kg 15 12 10 11 5 6 4 8 7 9 3 14 ...

Page 34: ... колесо G О Ь О А У О О О А О А А Я F1 x3 F4 F3 F5 F2 A B C ращающееся переднее колесо E О О О А А О E1 ысокооктановый или не содержащий свинца Bмкость бензобака 1 5 L E2 А Я Ь У О Ь 6екомендуемое масло k см руководство по эксплуатации двигателя мкость масляного бака 0 65 L ...

Page 35: ...А О А 6екомендуется производить заточку и балансировку лезвий через каждые 20 часов эксплуатации 9м K1 K2 K3 K4 H У О А О А Я H1 H2 H3 J У А О А О А У А О А А О О О егкая работа яжелая работа 1 2 3 4 О О УM А О А Я K1 K2 K3 K4 K K5 K6 K7 K8 ...

Page 36: ...зки Акселератор 1 быстрая скорость 2 медленная скорость 6егулировка высоты 1 Cин 2 Cакс У M 1 еред началом технического обслуживания или ремонта необходимо извлечь свечу зажигания 2 9облюдайте осторожность выброс острых предметов 3 рочитайте руководство по эксплуатации 4 9облюдайте безопасное расстояние 2 1 1 2 N1 Управление передним сцеплением N2 Управление рабочей скоростью N4 ращающееся лезвие ...

Page 37: ...иксированное или вращающееся Автоматический с защитной аркой на рукоятке постоянного действия оковой выброс на 51 см адние колеса с цепью или ремнем центральной рукояткой управления 120 100 80 55 А А А Ь Cасса Акустическая мощность вуковое давление в рабочем состоянии Уровень вибрации Cаксимальный режим двигателя Обороты мин макс ереднее колесо Остановка лезвий Iирина резки 9ила тяги ысота резки е...

Page 38: ...sta operação c acrescentar carburante antes de ligar o motor Nunca retirar a tampa do depósito nem acrescentar gasolina quando o motor A B C D A B C D CONSELHOS DE UTILIZAÇÃO SEGURANÇA E MANUTENÇÃO está em funcionamento ou ainda quente d Se a máquina transbordou não tentar ligar o motor mas sim mudar a máquina do lugar e evitar criar uma fonte de inflama ção até que os vapores da gazolina se tenha...

Page 39: ...rolador automático 12 Manete do gaz 13 Manete de regulação do corte 15 Maneta lenta rãpida do avanço PLACA DE IDENTIFICAÇÃO DA MÁQUINA A Potência nominal B Massa em kilogramas C Número de série D Ano de fabricação E Tipo da máquina de roçar mato F Nome e endereço do constructor G Identificação CE H Velocidade maxi motor A2 A1 Voltar o guiador com cuidado de maneira a evitar de danificar os cabos p...

Page 40: ... dianteira fixa OU G ARRANQUE MOTOR DESLIGAR O MOTOR F1 x3 F4 F3 F5 F2 A B C Roda dianteira giratória E PREPARAÇÃO E1 Super ou sem chumbo Capacidade gazolina DEPÓSITO DE GAZOLINA 1 5 L E2 ENCHER O DEPÓSITO DE ÓLEO E NÍVEL Óleo preconizado k manual motor Capacidade óleo 0 65 L ...

Page 41: ...dar aguçar e calibrar a sua lâminas às 20 horas de funcionamento Ver K1 K2 K3 K4 H REGULAÇÃO DO CABO DE EMBRAIAGEM H1 H2 H3 J REGULAÇÃO ALTURA DE CORTE REGULAÇÃO VELOCIDADE DE TRABALHO Trabalhos leves Trabalhos intensos 1 2 3 4 MANUTENÇÃO DESMONTAGEM CORREIA K1 K2 K3 K4 K K5 K6 K7 K8 ...

Page 42: ...N8 Comando do regulamento da altura do corte Comando do gaz 1 Rápido 2 Lento Escada de ajuste altura 1 Mínima 2 Máxima ATENÇÃO 1 Desligar a vela antes de qualquer acto de reparação 2 Lámina rotativa cui dado com as protec ções 3 Ler as instruções 4 Respeitar as distân cias de segurança 2 1 1 2 N1 Comando de avanço da embraiagem N2 Comando velocidade de trabalho N4 Afastar pés e mãos lâmina rotativ...

Page 43: ... Mantendo a alavanca do travão apertada contra o guiador 51 cm Ejecção lateral Pelas rodas de trás com cadeado e correia Centralizada e comendada no guiador 120 100 80 55 CARACTERÍSTICAS TÉCNICAS MOTOR Peso Potência acústica Potência acústica o posto de condução Medida de vibração Régime maxi Velocidade de avanço mín máx Roda de frente Paragem da lámina Largura do corte Tracção Altura de corte Tra...

Page 44: ...ření hladiny oleje nejméně každých 100 hodin Nezbytná hladina 25 milimetrů v návaznosti na horní okraj pod zátkou Kvalita oleje SAE 10W 30 Třída SG nebo SF 1 Tento stroj je nutno používat vždy jen v souladu s doporučeními v této příručce Nedodržením těchto pokynů dojde ke zrušení odpovědnosti výrobce 2 Vypněte motor a odpojte svíčku v následujících případech a před čištěním zablokovaných míst b př...

Page 45: ...1 Spouštěcí lano s automatickým navíjením 12 Páčka plynu 13 Páčka spojky pro pojezd 14 Páčka nastavení výšky sečení 15 Páčka pro pomalý rychlý pojezd IDENTIFIKAČNÍ ŠTÍTEK STROJE A Nominální výkon B Hmotnost v kilogramech C Sériové číslo D Rok výroby E Typ plečky F Jméno a adresa výrobce G Identifikace ce H Maximální rychlost motoru A2 A1 Otočte řidítka pozor na poškození kabelů a umístěte je dovni...

Page 46: ...vné přední kolo NEBO G POUŽITÍ VYŽÍNAČE ZASTAVENÍ MOTORU F1 x3 F4 F3 F5 F2 A B C Otočné přední kolo E PŘÍPRAVA E1 Super nebo bezolov natý benzín Objem nádrže PLNĚNÍ PALIVA 1 5 L E2 PLNĚNÍ OLEJE A KONTROLA HLADINY Olej stanovte podle příručky k motoru Objem nádrže 0 65 L ...

Page 47: ...NOŽE Doporučujeme nechat nabrousit a vyvážit nůž každých 20 h Viz K1 K2 K3 K4 H NASTAVENÍ KABELU ZAPOJENÍ H1 H2 H3 J NASTAVENÍ VÝŠKY SEČENÍ NASTAVENÍ PRACOVNÍ RYCHLOSTI Lehké porosty Husté porosty 1 2 3 4 ÚDRŽBA DEMONTÁŽ ŘEMENU K1 K2 K3 K4 K K5 K6 K7 K8 ...

Page 48: ...vládání nastavení výšky sečení Ovládání plynu 2 rychle 3 pomalu Měřítko nastavení výšky 1 Mini 2 Maxi POZOR 1 Před jakoukoli údržbou či opravou odpojte svíčku 2 Otočný nůž pozor na odlétávající předměty 3 Přečtěte si návod k použití 4 Dodržujte bezpečnou vzdálenost 2 1 1 2 N1 Ovládání pojezdu N2 Ovládání pracovní rych losti N4 Nepřibližujte se rukama a nohama otočný nůž může způsobit pořezání N6 D...

Page 49: ...ax 1 přední kolo pevné nebo otočné Brzdnou pákou na řidítkách 51 cm Boční výhoz Zadními koly s řetězem a řemenem Nastavovaná na řidítkách 120 100 80 55 TECHNICKÉ VLASTNOSTI MOTOR Hmotnost Akustický výkon Akustický tlak na místě řidiče Naměřené vibrace Maximální režim Rychlost pojezdu min max Přední kolo Zastavení nože Délka střihu Trakce Výška střihu Převodovka Redukční skříň ...

Page 50: ...ch z paliwem powstrzymać się od palenia c dolać paliwa przed uruchomieniem silnika Nigdy nie zdejmować korka zbiornika paliwa ani nie uzupełniać paliwa przy pracującym silniku lub A B C D A B C D gdy jest jeszcze gorący d nie uruchamiać silnika w przypadku przelania i rozlania paliwa odsu nąć ścinacz krzewów od miejsca rozlania paliwa nie wzniecać ani nie powodować powstawania iskier płomieni nie ...

Page 51: ...tycznym zwijaczem 12 Manetka prędkości 13 Manetka jazdy do przodu 14 Manetka regulacji wysokości cięcia 15 Manetka prędkości wolno szybko TABLICZKA ZNAMIONOWA URZĄDZENIA A MOC ZNAMIONOWA B CIĘŻAR W KILOGRAMACH C NUMER SERYJNY D ROK PRODUKCJI E TYP OPIELACZA SAMOBIEŻNEGO F NAZWA I ADRES PRODUCENTA G IDENTYFIKACJA CE H MAKSYMALNA PRĘDKOŚĆ SILNIKA A2 A1 Odwrócić kierownicę tak by nie usz kodzić kabli...

Page 52: ...łe LUB G UŻYWANIE ŚCINACZA KRZEWÓW WYŁĄCZENIE SILNIKA F1 x3 F4 F3 F5 F2 A B C Koło przednie obrotowe E PRZYGOTOWANIE E1 Super lub bezołowiowa Pojemność zbiornika paliwa UZUPEŁNIANIE PALIWA 1 5 L E2 UZUPEŁNIANIE POZIOMU OLEJU Zalecany olej k instrukcja obsługi silnika Ilość oleju 0 65 L ...

Page 53: ...Ostrzenie noża oraz równoważenie noża należy przeprowadzać co 20h Patrz K1 K2 K3 K4 H REGULACJA LINKI SPRZĘGŁA H1 H2 H3 J REGULACJA WYSOKOŚĆ CIĘCIA REGULACJA PRĘDKOŚCI PRACY Praca lekka Praca ciężka 1 2 3 4 CZYSZCZENIE DEMONTAŻ PASKA K1 K2 K3 K4 K K5 K6 K7 K8 ...

Page 54: ... N8 Sterowanie regulacją wysokości cięcia Sterowanie przyspiesze niem 1 Szybko 2 Wolny Skala regulacji wysokości 1 Min 2 Maks UWAGA 1 Odłączyć świecę przed przystąpieniem do naprawy 2 Ostrze rotacyjne nie bezpieczeństwo wyr zucania 3 Przeczytać instrukcję obsługi 4 Zachować bezpieczny dystans 2 1 1 2 N1 Sterowanie sprzęgłem postępu N2 Sterowanie prędkością pracy N4 Odsunąć stopy i ręce nóż rotacyj...

Page 55: ...brotowe Za pomocą dźwigni hamulca przy kierownicy 51 cm Wyrzucanie boczne Na tylne koła za pomocą łańcucha oraz paska Zcentralizowana i ze sterowaniem przy kierownicy 120 100 80 55 DANE TECHNICZNE SILNIK Waga Moc akustyczna Ciśnienie akustyczne na stanowisku pracy Pomiar wibracji Maksymalna prędkość obrotowa PRĘDKOŚĆ PRACY min maks Koło przednie Zatrzymanie noża Szerokość cięcia Napęd Wysokość cię...

Page 56: ...ch z paliwem powstrzymać się od palenia c dolać paliwa przed uruchomieniem silnika Nigdy nie zdejmować korka A B C D A B C D zbiornika paliwa ani nie uzupełniać paliwa przy pracującym silniku lub gdy jest jeszcze gorący d nie uruchamiać silnika w przypadku przelania i rozlania paliwa odsu nąć ścinacz krzewów od miejsca rozlania paliwa nie wzniecać ani nie powodować powstawania iskier płomieni nie ...

Page 57: ...ätným navíjaním 12 Plynová páka 13 Páka na zapnutie posunu 14 Ovládač na nastavenie výšky rezu 15 Páka na pomalý rýchly posun dopredu IDENTIFIKAČNÝ ŠTÍTOK STROJA A Nominálny výkon B Hmotnosť v kilogramoch C Sériové číslo D Rok výroby E Typ motorovej plečky F Názov a adresa výrobcu G Značka ce H Max rýchlosť motora A2 A1 Otočte riadidlá pričom dbajte na to aby ste nepoškodili káble riadidlá vložte ...

Page 58: ...é koleso ALEBO G POUŽÍVANIE KROVINOREZU VYPNUTIE MOTORA F1 x3 F4 F3 F5 F2 A B C Otáčacie predné koleso E PRÍPRAVA E1 Super alebo bezolov natý benzín Množstvo benzínu PLNENIE PALIVOVEJ NÁDRŽE 1 5 L E2 PLNENIE OLEJA A MERANIE MNOŽSTVA Odporúčaný olej k manuál motora Množstvo olej 0 65 L ...

Page 59: ...ČEPELE Čepeľ sa odporúča ostriť a vyvažovať každých 20 h Pozri K1 K2 K3 K4 H NASTAVENIE SPÚŠŤACIEHO KÁBLA H1 H2 H3 J NASTAVENIE VÝŠKY REZU NASTAVENIE RÝCHLOSTI REZANIA Ľahké terény Husté terény 1 2 3 4 ÚDRŽBA ODMONTOVANIE REMEŇA K1 K2 K3 K4 K K5 K6 K7 K8 ...

Page 60: ... výšky rez Plynová páka ventil 2 Rýchly 3 Pomalý Stupnica na nastavenie výšky 1 Min 2 Max POZOR 1 Pred akoukoľvek údržbou a opravou odpojte sviečku 2 Čepeľ sa otáča a môžu od nej odskako vať úlomky 3 Prečítajte si návod na použitie 4 Dodržiavajte bezpeč nostnú vzdialenosť 2 1 1 2 N1 Ovládač na zapnutie posunu N2 Ovládanie rýchlosti reza nia N4 Ruky a nohy držte v dostatočnej vzdialenosti pretože b...

Page 61: ...eso v strede Pomocou brzdovej páky ktorá sa musí pridržať na riadidlách 51 cm Bočné vyhadzovanie Zadnými kolesami pomocou reťaze a remeňa Centralizovaná a ovláda sa z riadidiel 120 100 80 55 TECHNICKÉ VLASTNOSTI MOTOR Hmotnosť Akustický výkon Akustický tlak na mieste vodiča Meranie vibrácii Maximálny výkon Rýchlosť pri posune dopredu min max Predné koleso Zastavenie čepele Šírka rezu Ťah Výška rez...

Page 62: ...SF osztály 1 A gépet mindig a kézikönyvben leírt ajánlások szerint kell használni Az előírások be nem tartásának következményiért a gyártó nem tehető fele lőssé 2 Állítsa le a motort és vegye le a gyertyakupakot az alábbi esetekben a az eltömődések tisztítása előtt b a bozótvágó minden ellenőrzése tisztítása vagy javítása előtt c idegen tárggyal való ütközés után Ellenőrizze hogy a bozótvágó nem s...

Page 63: ...s csévéléssel 12 Gázkar 13 Előrehaladást kapcsoló kar 14 Vágási magasság beállító kar 15 Lassú gyors előrehaladás kar A GÉP ADATTÁBLÁJA A NÉVLEGES TELJESÍTMÉNY B TÖMEG KILOGRAMMBAN C SOROZATSZÁM D GYÁRTÁSI ÉV E A MOTOROS KAPA TÍPUSA F A GYÁRTÓ NEVE ÉS CÍME G EK AZONOSÍTÁS H MOTOR MAXIMÁLIS SEBESSÉG A2 A1 Fordítsa vissza a kormányrudat ügyelve arra hogy ne tegye tönkre a vezetékeket és helyezze a g...

Page 64: ...első kerék VAGY G A BOZÓTVÁGÓ HASZNÁLATA A MOTOR LEÁLLÍTÁSA F1 x3 F4 F3 F5 F2 A B C Elforduló első kerék E ELŐKÉSZÍTÉS E1 Szuper vagy ólommentes Üzemanyagtartály térfogat ÜZEMANYAG FELTÖLTÉS 1 5 L E2 OLAJFELTÖLTÉS ÉS OLAJSZINT Ajánlott olaj motor kézikönyv Olajtartály térfogat 0 65 L ...

Page 65: ...teltével javasoljuk a vágószerszám élezését és kiegyensúlyozását Lásd K1 K2 K3 K4 H A KUPLUNGBOWDEN BEÁLLÍTÁSA H1 H2 H3 J VÁGÁSI MAGASSÁG BEÁLLÍTÁSA A MUNKASEBESSÉG BEÁLLÍTÁSA Könnyű munkák Sűrűben végzett munkák 1 2 3 4 KARBANTARTÁS ÉKSZÍJ LESZERELÉSE K1 K2 K3 K4 K K5 K6 K7 K8 ...

Page 66: ...4 N5 N7 N6 N8 Vágási magasság beállítás Gázadagolás 2 Gyors 3 Lassú Magasságállító skála 1 Legkisebb 2 Legnagyobb FIGYELEM 1 Minden beavatkozás előtt kapcsolja ki a gyújtógyertyát 2 Forgó kés ügyeljen a kivetődő tárgyakra 3 Olvassa el a kezelési útmutatót 4 Tartsa be a biztonsági távolságokat 2 1 1 2 N1 Előrehaladást kapcsoló kar N2 A munkasebesség vezérlése N4 Tartsa távol a lábát és kezeit a for...

Page 67: ...duló A tolókaron behúzva tartott fékezőkar segítségével 51 cm Oldalsó kivetődés Hátsó kerekek lánc és ékszíj A tolókaron szabályozott és központosított 120 100 80 55 MŰSZAKI JELLEMZŐK MOTOR Súly Akusztikus teljesítmény Akusztikus nyomás a kezelőállásnál Rezgésmérés A motor legnagyobb fordulatszáma Előrehaladási sebesség min max Első kerék A vágóeszköz leállítása Vágási szélesség Hajtás Vágási maga...

Page 68: ......
Reviews: