background image

25

English

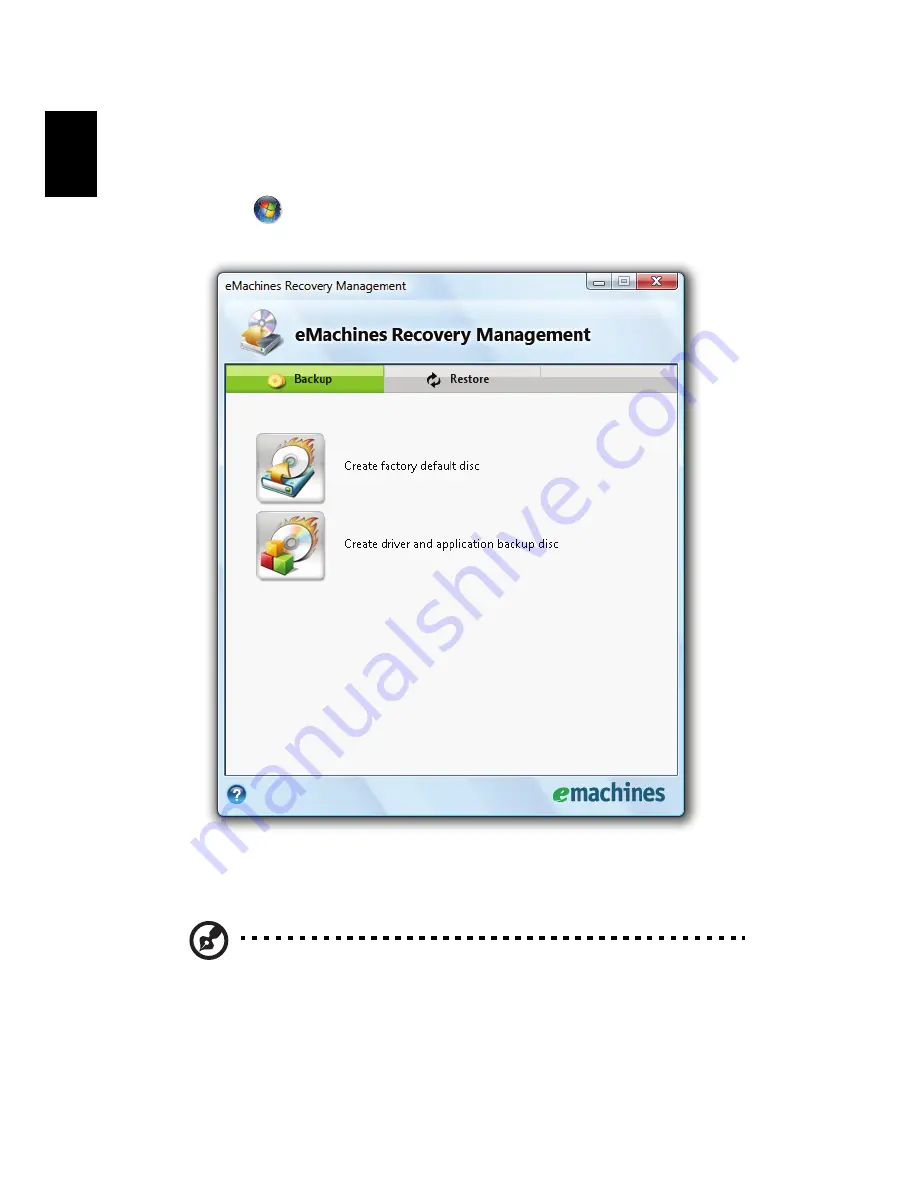
Burn backup discs

From the Backup page of eMachines Recovery Management, you can burn the 
factory default image or back up drivers and applications. 
1

Click on 

 Start, All Programs, eMachines.

2

eMachines Recovery Management opens to the Backup page.

3

Select the type of backup (factory default or drivers and applications) you 
would like to burn to disc.

4

Follow the instructions on screen to complete the process.

Note: Create a factory default image when you want to burn a 
bootable disc that contains your computer's entire operating 
system as it was delivered to you from the factory. If you wish to 
have a disc that will allow you to browse the contents and install 
selected drivers and applications, create a drivers and application 
backup instead — this disc will not be bootable.

Summary of Contents for 250-1162

Page 1: ...eMachines Series Generic User Guide...

Page 2: ...number serial number purchase date and place of purchase information in the space provided below The serial number and model number are recorded on the label affixed to your computer All correspondenc...

Page 3: ...by unplugging all power cords from the power supplies CAUTION for Accessibility Be sure that the power outlet you plug the power cord into is easily accessible and located as close to the equipment op...

Page 4: ...even exposure risk from lithium battery pack Your device and its enhancements may contain small parts Keep them out of the reach of small children Using electrical power This product should be operat...

Page 5: ...lug is damaged cut or frayed liquid was spilled into the product the product was exposed to rain or water the product has been dropped or the case has been damaged the product exhibits a distinct chan...

Page 6: ...The capacity and lifetime of the battery will be reduced if the battery is left in hot or cold places such as in a closed car in summer or winter Always try to keep the battery between 15 C and 25 C 5...

Page 7: ...evice are magnetic Metallic materials may be attracted to the device and persons with hearing aids should not hold the device to the ear with the hearing aid Do not place credit cards or other magneti...

Page 8: ...ing your device while flying in aircraft is prohibited Switch off your device before boarding an aircraft The use of wireless teledevices in an aircraft may be dangerous to the operation of the aircra...

Page 9: ...i ion and Small Sealed Lead Pb rechargeable batteries weighing up to 2 lbs we recommend that you take it to a participating collection center For a list of locations go to www rbrc org or Call 1 800 8...

Page 10: ...g or throbbing stiffness or tightness coldness or weakness If you have these symptoms or any other recurring or persistent discomfort and or pain related to computer use consult a physician immediatel...

Page 11: ...ing drapes shades or blinds using a task light changing the display s viewing angle using a glare reduction filter using a display visor such as a piece of cardboard extended from the display s top fr...

Page 12: ...ew computer For more on how your computer can help you to be more productive please refer to the eMachinesSystem User Guide This guide contains detailed information on such subjects as system utilitie...

Page 13: ...er to magnetic fields Do not expose the computer to rain or moisture Do not spill water or any liquid on the computer Do not subject the computer to heavy shock or vibration Do not expose the computer...

Page 14: ...of used batteries according to local regulations Recycle if possible Cleaning and servicing When cleaning the computer follow these steps 1 Turn off the computer and remove the battery pack 2 Disconne...

Page 15: ...xiii Taking care of your battery pack xiv Cleaning and servicing xiv Touchpad 1 Touchpad basics with two click buttons 1 Using the keyboard 2 Lock keys and embedded numeric keypad 2 Windows keys 3 Hot...

Page 16: ...USB 19 Installing memory 20 BIOS utility 21 Boot sequence 21 Enable disk to disk recovery 21 Password 21 Using software 22 Playing DVD movies 22 Power management 23 eMachines Recovery Management 24 Bu...

Page 17: ...Index 41...

Page 18: ...ouchpad is the same as clicking the left button Note1 When using the touchpad keep it and your fingers dry and clean The touchpad is sensitive to finger movement hence the lighter the touch the better...

Page 19: ...F11 When Num Lock is on the embedded keypad is in numeric mode The keys function as a calculator complete with the arithmetic operators and Use this mode when you need to do a lot of numeric data entr...

Page 20: ...M Minimizes all windows R Open the Run dialog box T Cycle through programs on the taskbar U Open Ease of Access Center X Open Windows Mobility Center BREAK Display the System Properties dialog box SHI...

Page 21: ...computer in Sleep mode Fn F5 Display toggle Switches display output between the display screen external monitor if connected and both Fn F6 Screen blank Turns the display screen backlight off to save...

Page 22: ...t Gr and then press the 5 key at the upper center of the keyboard Note Some fonts and software do not support the Euro symbol Please refer to www microsoft com typography faq faq12 htm for more inform...

Page 23: ...rs on the screen The computer s power management system automatically blanks the screen to save power Press any key to turn the display back on If pressing a key does not turn the display back on thre...

Page 24: ...r s parallel port or a USB port and the corresponding port on the printer I want to restore my computer to its original settings without recovery CD DVDs Note If your system is the multilingual versio...

Page 25: ...he system 2 While the eMachines logo is showing press Alt F10 at the same time to enter the recovery process 3 Refer to the onscreen instructions to perform system recovery Important This feature occu...

Page 26: ...ra fully charged battery pack available as backup Contact your dealer for details on ordering a spare battery pack Maximizing the battery s life Like all other batteries your computer s battery will d...

Page 27: ...of the battery is adversely affected by the following usage patterns Using the computer on constant AC power with the battery inserted If you want to use constant AC power you are advised to remove t...

Page 28: ...g enables you to start the next day with a fully charged battery Checking the battery level The Windows power meter indicates the current battery level Rest the cursor over the battery power icon on t...

Page 29: ...outlet are available 1 Plug the AC adapter into the computer and then connect to the mains power supply 2 Save all necessary files 3 Resume work Turn off the computer if you want to recharge the batte...

Page 30: ...the computer Moving around When you are just moving within short distances for example from your office desk to a meeting room Preparing the computer Before moving the computer close and latch the di...

Page 31: ...on the battery by putting the computer in Sleep mode Press Fn F4 or close the display cover whenever you are not actively using the computer To resume open the display if closed then press and release...

Page 32: ...re between outside and room temperature Setting up a home office If you frequently work on your computer at home you may want to purchase a second AC adapter for use at home With a second AC adapter y...

Page 33: ...cords that are appropriate for the country to which you are traveling Spare fully charged battery packs Additional printer driver files if you plan to use another printer Proof of purchase in case you...

Page 34: ...otect your computer from unauthorized access Setting these passwords creates several different levels of protection for your computer and data Supervisor Password prevents unauthorized entry into the...

Page 35: ...s Enter When the User Password is set and the password on boot parameter is enabled a prompt appears at boot up Type the User Password and press Enter to use the computer If you enter the password inc...

Page 36: ...ces to the computer read the following section Built in network feature The built in network feature allows you to connect your computer to an Ethernet based network To use the network feature connect...

Page 37: ...r then lift up and remove the memory cover 3 a Insert the memory module diagonally into the slot then b gently press it down until it clicks into place 4 Replace the memory cover and secure it with th...

Page 38: ...sequence in the BIOS utility activate the BIOS utility then select Boot from the categories listed at the top of the screen Enable disk to disk recovery To enable disk to disk recovery hard disk reco...

Page 39: ...ding the first time after which the last region code set will remain permanent Recovering your hard disk does not reset the number of times the region code has been set Refer to the table below for DV...

Page 40: ...to the computer and video memory If no activity is detected for a period of time called an inactivity timeout the computer stops some or all of these devices in order to conserve energy This computer...

Page 41: ...DVD 2 Restore Restore system to factory default Reinstall applications drivers Password settings This chapter will guide you through each process Note This feature is only available on certain models...

Page 42: ...efault or drivers and applications you would like to burn to disc 4 Follow the instructions on screen to complete the process Note Create a factory default image when you want to burn a bootable disc...

Page 43: ...einstall applications and drivers for your eMachines system 1 Click on Start All Programs eMachines 2 Switch to the restore page by selecting the Restore button 3 You can choose to restore the system...

Page 44: ...previously burned backup discs you will need to insert the first backup disc and enable the F10 Boot Menu 1 Turn on your computer and insert the first system recovery disc into the optical disc drive...

Page 45: ...estore is complete Do this before rebooting your computer Note Actual product specifications may vary If you prefer to set the boot priority for long term use you should select the Boot submenu 1 Turn...

Page 46: ...C key to enter the Exit submenu press the ENTER key to Exit Saving Changes Press the ENTER key again to select Yes The system will reboot 7 When you reboot Windows will be installed from the recovery...

Page 47: ...ical order together with the recommended course of action Error messages Corrective action CMOS battery bad Contact your dealer or an authorized service center CMOS checksum error Contact your dealer...

Page 48: ...lish If you still encounter problems after going through the corrective measures please contact your dealer or an authorized service center for assistance Some problems may be solved using the BIOS ut...

Page 49: ...e of the following measures Reorient or relocate the receiving antenna Increase the separation between the device and receiver Connect the device into an outlet on a circuit different from that to whi...

Page 50: ...ntains among other information the FCC Registration Number and Ringer Equivalence Number REN for this equipment Upon request you must provide this information to your telephone company If your telepho...

Page 51: ...vidual PSTNs provided in different countries the approval does not of itself give an unconditional assurance of successful operation on every PSTN termination point In the event of problems you should...

Page 52: ...pment shall go on hook for a period of not less than 30 seconds between the end of one attempt and the beginning of the next call attempt 4 Some parameters required for compliance with Telecom s Telep...

Page 53: ...T NICHT DEM STRAHLL AUSSETZEN PRODUCTO L SER DE LA CLASE I ADVERTENCIA RADIACI N L SER INVISIBLE AL SER ABIERTO EVITE EXPONERSE A LOS RAYOS ADVARSEL LASERSTR LING VED BNING SE IKKE IND I STR LEN VARO...

Page 54: ...eden United Kingdom Estonia Latvia Lithuania Poland Hungary Czech Republic Slovak Republic Slovenia Cyprus and Malta Usage allowed in the countries of European Union as well as Norway Switzerland Icel...

Page 55: ...l for harmful interference to co channel Mobile Satellite systems 3 High power radar are allocated as primary users of the 5 25 to 5 35 GHz and 5 65 to 5 85 GHz bands These radar stations can cause in...

Page 56: ...ass IV Screen tilt angle 85 0 Design screen illuminance Illuminance level 250 250cos lx where 85 Color Source D65 Reflection class of LCD panel positive and negative polarity Ordinary LCD Class I Prot...

Page 57: ...40 English...

Page 58: ...er xiv computer caring for xiii cleaning xiv disconnecting 13 keyboards 2 moving around 13 security 17 setting up a home office 15 taking home 14 traveling internationally 16 traveling on local trips...

Page 59: ...startup 6 troubleshooting 30 S safety CD or DVD 36 modem notices 33 scroll lock 2 security keylock 17 passwords 17 speakers hotkey 4 troubleshooting 6 T touchpad 1 hotkey 4 using 1 travel internationa...

Reviews: