Elvox 46340.F04 Operation Manual Download Page 19


19


EN 


CCTV 

Step 3: Select a required file or checkmark “All” to select all data files. Click Backup button to pop up Backup 
information window. 

Step 4: In the backup information interface, user can check the relevant options for backing up files. These options 
include storage Media, backup player and save file type. Then click Start button to start backup. 


10. Remote 

Surveillance 

In order to view the DVR from a network it must be connected to a LAN/WAN or internet. The network setup should be 
done accordingly.   

10.1    Access DVR on LAN 

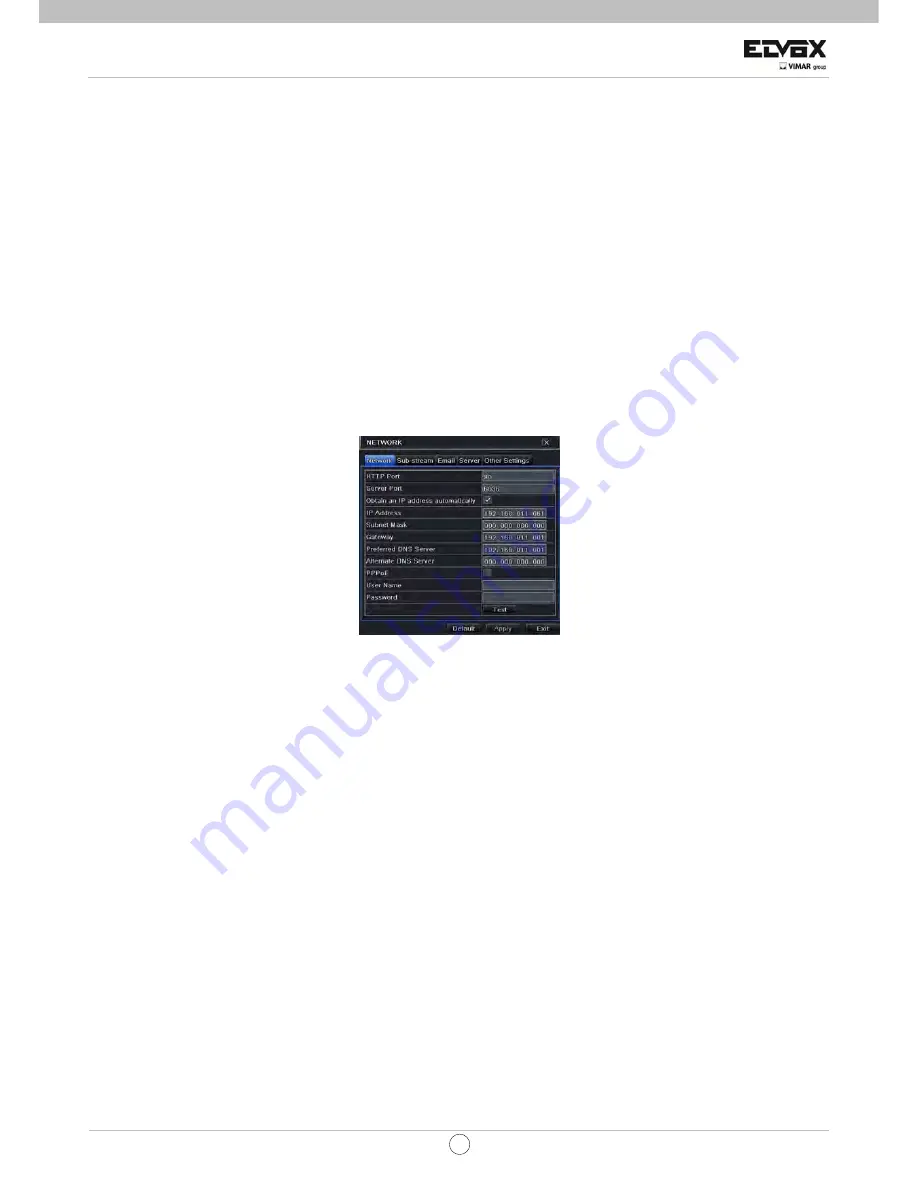
Please enter into Menu

Æ

Setup 

Æ

Network Setup as shown below: 

 Input IP address, Subnet, Gateway. If using DHCP, please enable DHCP in both the DVR and the router. Enter into     

Menu 

Æ

 Information 

Æ

 Network, and user can check the network settings of the DVR. 

 Enter into Record Setup to set network video parameters like resolution, frame rate etc. 

 Open IE on a computer on the same network. Input the IP address of the DVR in IE address bar and press enter. If 

HTTP port is not 80, add the port number after IP address. 

 IE will download ActiveX component automatically. Enter the username and password in the subsequent window 


10.2    Access DVR on WAN 

1. Connect the DVR to internet through router or virtual server 

Please enter into Menu

Æ

Setup 

Æ

Network Setup as shown above. 

 Input IP address, Subnet, Gateway. If using DHCP, please enable DHCP in both the DVR and the router. 

 Forward IP address and port number in Virtual Server setup of the router or virtual server. Configure the firewall to 

allow accessing the DVR. (If the user has enabled the UPnP function in both the DVR and router, he can skip this step. 
Please refer to the relevant chapter for more details.) 

 Open IE browser, input IP address, or dynamic domain name and enter. If HTTP port is not 80, add the port number 

after IP address or domain name. 

 IE will download ActiveX automatically. Then a window pops up and asks for user name and password. Input name 

and password correctly, and enter to view. 


2. Connect the DVR to Internet through PPPoE   

 Enter into the DVR’s Main Menu

Æ

Setup

Æ

Network interface to enable PPPoE and then input user name and 

password received from your ISP. Next, click ‘Apply’. The DVR will connect to the server and would give a confirmation 
message.  

 If users want to utilize dynamic domain name, please apply for a domain name in a DNS server supported by the 

DVR or router. Then add to the DVR or router. 

 When accessing the remote interface of DVR, user can input WAN IP/domain name to access directly (user can enter 

into Main menu

Æ

Information

Æ

Network interface to check IP address). The browser will download Active X control 

 The following steps are the same as the connection way above. 


Summary of Contents for 46340.F04

Page 1: ...ale per il collegamento e l uso Installation and operation manual 46340 F04 46340 F08 46340 F16 DVR con tecnologia HD SDI FullHD Real Time 4 canali HD SDI technology FullHD Real Time 4 channel DVR TVCC CCTV ...

Page 2: ...l coperchio superiore Passaggio 2 Svitare e rimuovere la protezione dal pannello anteriore Collegare poi i cavi di alimentazione e dati Quindi inserire il masterizzatore DVD con il supporto nell alloggiamento con le viti dell alloggiamento rivolte verso il supporto e avvitare con forza 2 Collegamenti 2 1 Vista posteriore del DVR a 4 canali 1 Uscita relè Collegamento a un allarme esterno 8 Porta di...

Page 3: ...so audio 7 Messa a terra 15 Collegamento all HDD per il backup 8 Collegamento alla tastiera A è TX B è TX 2 3 Vista posteriore del DVR a 16 canali 1 Ingressi segnale video HD SDI 9 Collegamento allo speed dome Y è TX Z è TX 2 Ingressi allarme per il collegamento dei sensori 10 Uscita CVBS 3 Collegamento al dispositivo per la visualizzazione ad alta definizione 11 Uscita audio collegamento al sound...

Page 4: ...mentazione 4 Assistente di impostazione z Quando il dispositivo è avviato compare un assistente di installazione È possibile impostare ora rete gestione registrazione e disco Fare clic sulla casella con il nome del dispositivo apparirà una tastiera come di seguito rappresentata Supporta l inserimento di numeri lettere dell alfabeto e simboli Fare clic sul pulsante Shift per inserire lettere maiusc...

Page 5: ...e del manuale utente del DVR Se l utente non desidera impostare l Assistente fare clic sul pulsante Esci per uscire 5 Login Dopo essere usciti dall impostazione Assistente si può fare il login sul DVR Avviso Questo DVR può visualizzare le opzioni su monitor VGA HDMI o BNC in un dato momento nel tempo se c è una visualizzazione di un immagine live senza opzioni di menu verificare se c è una visuali...

Page 6: ...rovvedere all impostazione di tutti i parametri di registrazione prima della registrazione stessa Ci sono quattro tipi di modalità di registrazione 7 1 Registrazione manuale L utente può premere il pulsante REC sul panello anteriore dopo aver terminato l impostazione del sistema Fare clic di nuovo su questo pulsante per interrompere la registrazione Oppure premere il pulsante REC sul telecomando P...

Page 7: ...ore e dall ora giorno o notte è possibile regolare tale valore a seconda delle condizioni effettive Fare clic sull icona per impostare l area come area di rilevamento Fare clic sull icona per cancellare l area di rilevamento impostata Fare clic sull icona per eseguire il test della sensibilità in base alle condizioni in loco Una volta rilevato il movimento si visualizza un icona con una figura Far...

Page 8: ...rincipale per riprodurre la registrazione L utente può effettivamente interagire facendo clic sui pulsanti sullo schermo 8 2 Riproduzione per ricerca oraria Passaggio 1 Accedere a MenuÆCercaÆscheda Ricerca oraria Passaggio 2 Selezionare data e canali su lato destro e premere il pulsante Cerca Una data il cui bordo sia evidenziato indica la presenza di dati Passaggio 3 Impostare l orario di inizio ...

Page 9: ...i e i canali sul lato destro Passaggio 3 Premere il pulsante Cerca per ricercare un immagine registrata Passaggio 4 Una volta identificata l immagine di un allarme l utente può fare doppio clic sull immagine per riprodurre la registrazione Si può bloccare l immagine facendo clic sul pulsante Blocca Fare clic sul pulsante Salva per copiare l immagine sull HDD Fare clic su Salva tutto per copiare tu...

Page 10: ...server virtuale Accedere a MenuÆImpostazione ÆImpostazioni di rete come illustrato sopra Inserire l indirizzo IP la sottorete e il gateway Se si utilizza DHCP abilitare DHCP su DVR e router Inoltrare l indirizzo IP e il numero di porta nella Impostazioni server virtuale del router o del server virtuale Configurare il firewall per consentire l accesso al DVR se l utente ha abilitato la funzione UPn...

Page 11: ...iter Step1 Unscrew and Open the top cover Step2 Unscrew and take the barrier out of the front panel Then connect the power and data cables Finally put the DVD with the holder into the case let the screw holes of the case aim at the holder s and screw them firmly 2 Connections 2 1 Rear view for 4 ch DVR 1 Relay Output Connect to external alarm 8 Network port 2 Connect to external sensor 9 Connect U...

Page 12: ...USB devices 14 Audio input 7 Grounding 15 Connect to HDD for backup 8 Connect to keyboard A is TX B is TX 2 3 Rear view for 16 ch DVR 1 HD SDI video signal inputs 9 Connect to speed dome Y is TX Z is TX 2 Alarm Inputs for connecting sensors 10 CVBS output 3 Connect to high definition display device 11 Audio output connect to the sound box 4 VGA output connect to monitor 12 Talk Connect to micropho...

Page 13: ...dow Step2 Click OK Then the unit will power off after a while Step3 Disconnect the power 4 Setup Wizard z After the device starts a setup wizard pops up You can set up time network record and disk management Click Device name box to popup a keyboard as follows It supports digits alphabets and symbols as inputs Click Shift button to input Capital letters and symbols click Shift button again to retu...

Page 14: ... relevant sections of DVR User Manual If you don t want to setup Wizard please click Exit button to exit 5 Login After you exit the wizard setup you can login to the DVR Notice This DVR can only display options on either VGA HDMI monitor or BNC monitor at a given point of time if there is live image display without menu options please check if there is display on other device monitor or long press...

Page 15: ...7 Recording Setup A user needs to install and format a HDD and set all the recording parameters before recording There are four kinds of record modes 7 1 Manual Recording A user can press REC button on the front panel after quitting system setup Press this button again to stop recording Or press REC button on remote controller Click it again to stop Or click REC button on the tool bar with mouse C...

Page 16: ...ty is influenced by color and time day or night you can adjust its value according to the practical conditions Click icon to set the whole area as detection area Click icon to clear the set detection area Click icon to test the sensitivity as per the local conditions Once motion is sensed it displays a figure icon Click icon to save the setting Click icon to exit the current interface Step 5 Enter...

Page 17: ...This unit supports four kinds of playback 8 1 Live Playback Click Play button on the main menu bar to playback the record User can do concrete operation by clicking the buttons on screen 8 2 Playback by Time Search Step 1 Enter into MenuÆSearchÆTime Search tab Step 2 Select date and channels on the right hand side and press Search button A date with highlighted borderline indicates presence of dat...

Page 18: ... 2 Select data and channels on the right hand side Step 3 Press Search button to search for a recorded image Step 4 Once an alarm image has been identified the user can double click the image to play the recording You can lock the image by clicking Lock button Click Save button to copy the image on the HDD Click Save All to copy all images on the HDD Note In order to take images on alarm the snaps...

Page 19: ...e enter into MenuÆSetup ÆNetwork Setup as shown above Input IP address Subnet Gateway If using DHCP please enable DHCP in both the DVR and the router Forward IP address and port number in Virtual Server setup of the router or virtual server Configure the firewall to allow accessing the DVR If the user has enabled the UPnP function in both the DVR and router he can skip this step Please refer to th...

Page 20: ......

Page 21: ...Via Pontarola 14 a 35011 Campodarsego PD Italia Tel 39 049 920 2511 Fax 39 049 920 2603 www elvox com S6I 46340F04 1 RL 00 13 03 ELVOX Campodarsego Italia ...

Reviews: