background image

User Manual ET1902L, ET2202L, ET2402L, ET2702L 

16

16 


Gesture Support 

TouchPro PCAP technology enables several gestures that support single and multiple touches. Refer to the Microsoft website at 

http://msdn.microsoft.com/en-us/library/dd940543 on the various gestures that are supported in Windows 7,


10 and later OS versions.


Video 

A display’s native resolution is its width and height measured in pixels. Generally, for best performance, an image displayed on this monitor will look best 
when your computer’s output resolution matches this monitor’s native resolution, which is 1280 x 1024 for the 1902L and 1920 x 1080 for the 2202L, 2402L 
and 2702L monitors


For computer output at non-

native resolutions, the monitor will scale the video to its panel’s native resolution. This involves stretching or compressing the 

input image as needed in the X and Y 

dimensions to fit the display’s native resolution. An unavoidable byproduct of the scaling algorithms is a loss of 

fidelity when the computer’s output video image is scaled by the monitor to fit the display. This loss of fidelity is most apparent when viewing feature-rich 
images at close distances (e.g., images containing small-font text).


Your touch monitor will likely not require video adjustments. However, for analog VGA video, variations in video graphic card outputs may require user 
adjustments through the OSD to optimize the quality of the touch 

monitor’s displayed image. These adjustments are stored by the touch monitor. Also, to 

reduce the need for adjustments 

for different video mode timings, the monitor correctly scales and displays some of the video industry’s most common 

video timing modes. Refer to the technical specifications for this monitor at http://www.elotouch.com for a list of these Preset Video Modes.


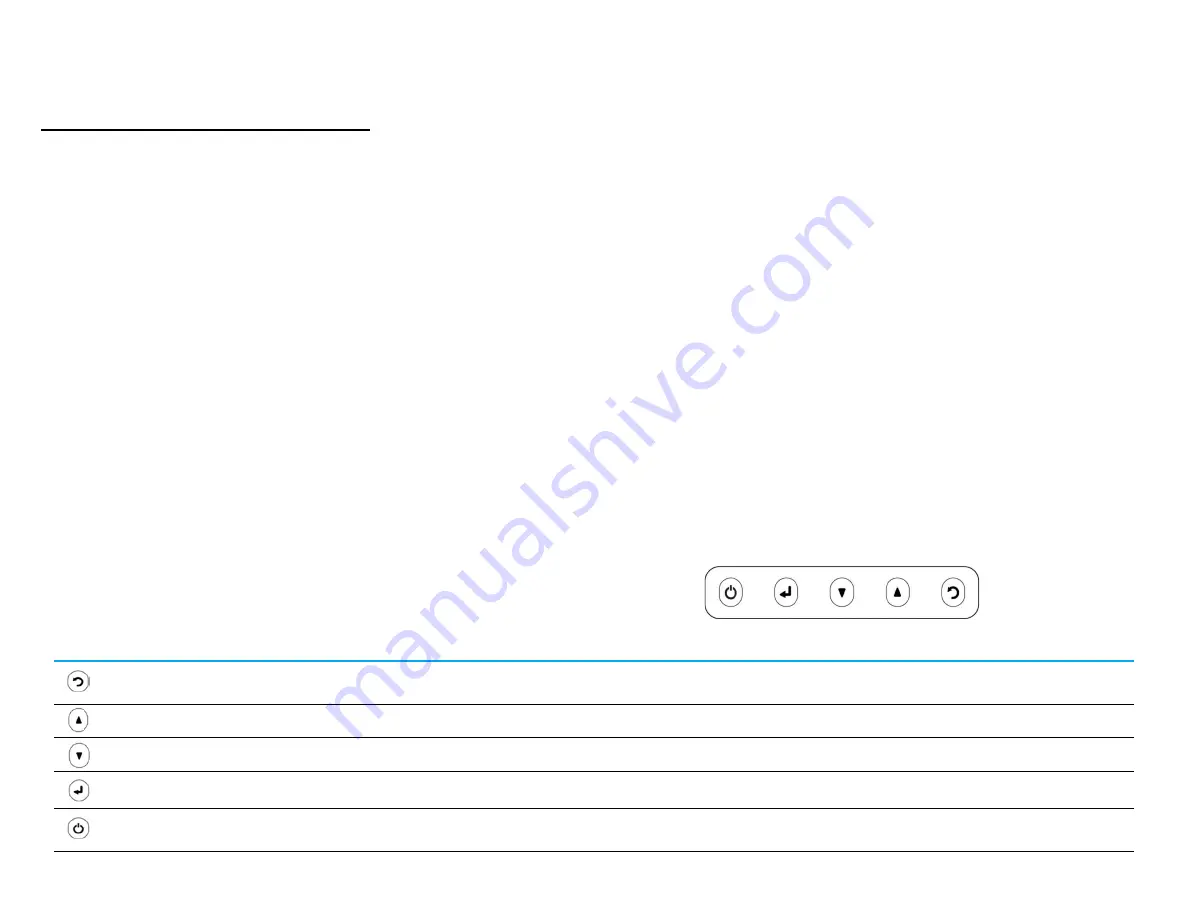
On-Screen Display (OSD) 

Five OSD buttons are located on the rear of the monitor. These can be used 
to adjust various parameters. The buttons and their functionalities are:


Button


Function when OSD is not displayed


Function when OSD is displayed


Display OSD Main menu 

Return to previous OSD menu 


Display OSD Audio submenu


       Decrease value of selected parameter/select previous menu item


Display OSD Luminance submenu


Increase value of selected parameter/select next menu item


Display Video Priority submenu 

Select parameter for adjustment/select submenu to enter 


Power key 

Power on/off display 

Summary of Contents for E125695

Page 1: ...USER MANUAL Elo Touch Solutions ET1902L ET2202L ET2402L ET2702L UM600162 Rev G...

Page 2: ...mation in this document is subject to change without notice Elo Touch Solutions Inc and its Affiliates collectively Elo make no representations or warranties with respect to the contents herein and sp...

Page 3: ...6 Table of Contents Section 1 Introduction 4 Section 2 Installation 5 Section 3 Mounting 8 Section 4 Operation 14 Section 5 Technical Support 20 Section 6 Safety Maintenance 22 Section 7 Regulatory In...

Page 4: ...monitor s performance are Plug Play compatibility remote on screen display OSD controls and flexible mounting options The monitor is intended for use with a self check in registration or point of info...

Page 5: ...king the Touch Monitor Open the carton and verify that the following items are present Touch monitor with stand Quick Install Guide VGA cable HDMI cable USB cable Audio cable Power brick Europe power...

Page 6: ...HDMI VGA input connector and the other end to your HDMI VGA video source Tighten the video cable s screws on the VGAconnector for best performance 2 Connect the USB touch cable between the monitor s U...

Page 7: ...HID drivers If the monitor is used with the Windows XP operating system follow the steps below to install the Windows XP touch driver To download the latest touch drivers 1 Visit www elotouch com Supp...

Page 8: ...ear VESA Mount A four hole 100 x 100 mm mounting interface for M4 screws is provided on the rear of the monitor Remove the stand using a Phillips screwdriver to access the mounting interface The VESA...

Page 9: ...User Manual ET1902L ET2202L ET2402L ET2702L 9 16 Base Mount The VESA FDMI compliant counting is coded VESA MIS E C ET1902L ET2202L base mounting options are shown below...

Page 10: ...User Manual ET1902L ET2202L ET2402L ET2702L 10 16 ET2402L ET2702L base mounting options shown below...

Page 11: ...nal Your monitor comes with four pheripheral ports located at the top bottom left and right sides of the monitor To mount an MSR remove one of the pheripheral port covers with your finger tips and ins...

Page 12: ...nd following all applicable building code standards Ensure the unit is mounted to a solid structure and surface such as a support beam or wall Attach the other bracket to the monitor using the four M4...

Page 13: ...Optional handles can be installed on 02 Series monitors as shown below Please note that it is not recommended to use handles to carry the touch monitor Damage to the touch monitor will occur if the t...

Page 14: ...n disconnect the AC power cable from the monitor when long periods of disuse are planned Touch No calibration is required for projected capacitive touch technology Your touch monitor can support up to...

Page 15: ...ches When connected to Windows XP computers the touch monitor detects only single touches No additional drivers are required for this technology to work with Windows 7 or 10 as it uses Windows HID dri...

Page 16: ...most apparent when viewing feature rich images at close distances e g images containing small font text Your touch monitor will likely not require video adjustments However for analog VGA video variat...

Page 17: ...pixel increments Default centered applicable for VGA input video only Aspect Ratio Switches the scalingmethodbetweenFull Scalingand MaintainAspectRatio Default FullScaling Full Scaling Scales the X an...

Page 18: ...on the VGA and HDMI connectors This adjustmentselects which ofthose inputportsshould be giventhepriority fordisplay Theoptionsare VGAPriority HDMI Priority Default HDMI Priority Audio Audio menu enab...

Page 19: ...conds to enable disable the OSD Locking feature When OSD Locking is enabled pressing any of the Menu Up Down or Select keys will have no effect Press and hold the Menu and buttons simultaneously for t...

Page 20: ...ress any key move the mouse touch the touchscreen to see if the image reappears Check thatthe signal sourcedeviceis turnedon Check that that there are no loose cable connections Monitor displays the O...

Page 21: ...ance See this user manual s last page for worldwide technical support phone numbers Technical Specifications visit www elotouch com products for technical specifications for this device Technical Supp...

Page 22: ...he following tips will help keep your touch monitor functioning at an optimal level Disconnect the AC power cable beforecleaning To clean the display unit cabinet use a clean cloth lightly dampened wi...

Page 23: ...reasonable protection against harmful interference in a residential installation This equipment generates uses and can radiate radio frequency energy and if not installed and used in accordance with t...

Page 24: ...specific factors 1 To meet emission and immunity requirements the user must observe the following a Use only the provided I O cables to connect this digital device with any computer b To ensure compli...

Page 25: ...User Manual ET1902L ET2202L ET2402L ET2702L 25...

Page 26: ...llowing certifications and marks have been issued or declared for this monitor Canada CUL IC China CCC Europe CE United Kingdom UKCA Korea KCC Taiwan BSMI United States FCC UL Japan VCC International...

Page 27: ...Diphenyl Ethers PBDE Plastic Parts O O O O O O Metal Parts X O O O O O Wire and Cable Assembly X O O O O O LCD Panel X O O O O O Touch Screen Panel X O O O O O PCBA X O O O O O Software CD etc O O O...

Page 28: ...ditions listed below so that the use of this electronic information product will not result in any severe environmental pollution any bodily injury or damage to any assets Operating Temperature 0 40 C...

Page 29: ...ctrical Ratings Input 12 VDC 4 0 A Operating Conditions Temperature 0 40 C Humidity 20 80 non condensing Altitude 0 3 048 m Storage Conditions Temperature 20 60 C Humidity 10 95 non condensing Altitud...

Page 30: ...ication or repair of Products may at Seller s discretion take place either at Seller s facilities or at Buyer s premises If Seller is unable to modify repair or replace a Product to conform to the war...

Page 31: ...User Manual ET1903LM ET2203LM ET2403LM ET2703LM 31 f Notes...

Page 32: ...User Manual ET1903LM ET2203LM ET2403LM ET2703LM 32 f Notes...

Page 33: ...oming Events Press Releases Software Drivers Touch Monitor Newsletter To find out more about our extensive range of Elo touch solutions go to www elotouch com or call the office nearest you Americas T...

Reviews: