Elo TouchSystems AMM17TK Manual Download Page 20

18


  User’s Guide

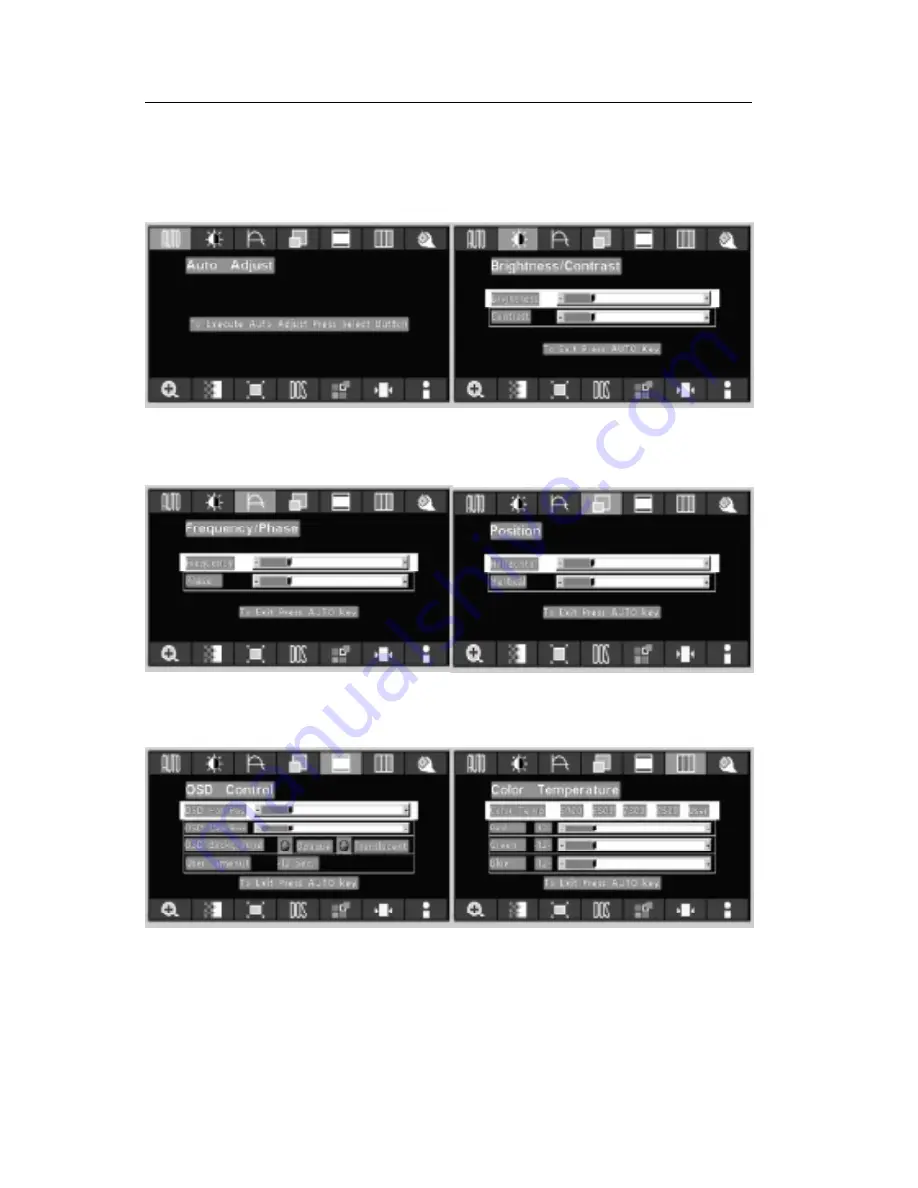
OSD Scren Basic Section (VGA)

For OSD display, push “Menu”.  For selecting Icon, push “Up”

or “Down”

Push the select button to execute the Auto

Setup function

Push “Up” or “Down” button to select between

“Brightness” or “Contrast” then push “Select”

Use “Left” or “Right” button to adjust

Push “Up” or “Down” button to select between

“Frequency” or “Phase” then push “Select”

Use “Left” or “Right” button to adjust

Push “Up” or “Down” button to select between

“Horizontal” or “Vertical” then push “Select”

Use “Left” or “Right” button to adjust

Push “Up” or “Down” button to select between

“OSD Hor. Pos.”, “OSD Ver. Pos.”, “OSD

Background”, or “User Timeout” then push “Select”

Use “Left” or “Right” button to adjust

Push “Left” or “Right” to select Color Temp between

“5000”, “6500”, 7300”, “9500”, or “User” then push

“Select”

If “User” were slected, push “Up” or “Down” button to

select between “Red”, “Green”, or “Blue” then push

“Select”

Use “Left” or “Right” button to adjust

Summary of Contents for AMM17TK

Page 1: ...Revision Control WARNIN G The title WARNING is used to inform the users of possible causes that could inflict the injury death or property damage to the patients CAUTION The title CAUTIO N is used to...

Page 2: ...ipment dose cause harmful interference to radio or television reception which can be determined by turning the equipment off and on the user is encouraged to try to correct the interference by one or...

Page 3: ...n 13 Power Management System 13 Connecting the Power Cord 14 DDC 14 15 Installation 14 15 Installation for Video Play Back 16 User Controls 17 Basic OSD Operation VGA 18 20 Basic OSD Screen Section C...

Page 4: ...or 2000 press right button on a Mouse to execute the Pop up menu 2 Press Properties to execute the Display Properties 3 Press Setting and change the resolution to 1280 x 1024 4 Press Apply or OK to s...

Page 5: ...requency information To change the resolution to its factory recommended preset 1 On a Windows NT 4 0 press right button on a Mouse to execute the Pop up menu 2 Press Properties to execute the Display...

Page 6: ...24 2 Push the APPLE icon on the upper left corn and execute Control Panel Monitors Sound Select Thousands for the Color Depth Select 1280X1024 60Hz 70Hz 72Hz or 75Hz for the Resolution 60Hz recommende...

Page 7: ...ble to properly function even in case of upgrade video cards or software because of the wide auto scanning compatibility range without requiring to buy a new monitor The internal microprocessor digita...

Page 8: ...the monitor in future AMM17TK AMM18TK AMM19TK LCD Monitor and two video cable 1 VGA HDDB15cable 1 DVI Dcable AC Power cord AC Adapter Floppy Disk for test pattern and set up User Manual Registration...

Page 9: ...ocuments Tested and certified by NEMKO in accordance with EN60601 1 Indicates protective earth ground For indoor use only DC power control switch Regulatory Compliance This monitor has been tested to...

Page 10: ...transport and storage Temperature range within 20 to 60 Relative humidity range 10 to 90 Atmospheric pressure range within 500 to 1060hPa Manufacture information CARDIANAL INC 205 Ace Techno Tower 19...

Page 11: ...ithasnofan For optimum performance do not block the cooling vents Whileunpackingthemonitor inspectitandotherpackagecontentsforshipping damage that could cause a fire or shock hazard Immediately repor...

Page 12: ...der to optimize the best viewing position you can adjust the tilt of the monitor by using both of your hands to hold the edges of the monitor as shown in the figure below The moni tor can be adjusted...

Page 13: ...shock hazard Do not cover the slots or openings of the monitor for proper heat dissipation Always put the monitor in a place where there is adequate ventilation Avoid placing the monitor against a br...

Page 14: ...for vertical frequency or the sync signal polarities are different from the default modes Mode Resolution H V H Freq KHz V Freq Hz Clock Freq MHz 1 640 350 31 5 70 25 175 2 640 350 37 9 85 31 5 3 640...

Page 15: ...he vertical sync signal is restored Off Mode The monitor goes into power off mode when the vertical and horizontal sync signals are off for about 10 seconds In this mode the screen goes off and the po...

Page 16: ...se the VGA cable that provides D SUB 15P connector and connect to the 15 pin connector on the VGA controller card 2 Connect the DC power to the DC power connector on the monitor 3 If use with USB hub...

Page 17: ...dard Installation with sound board or sound source To install the monitor for input output sound please follow the steps as given below Steps 1 Connect sound source ex sound output from sound card sou...

Page 18: ...then connect the other end to the monitor video input port 4 For S video plug one end of the S video cable into the video out port on the video equipment then connect the other end to the monitor S vi...

Page 19: ...r OSD menu then can use as moving upward in the OSD menu 6 Select Down To move downward in the OSD menu Switch PC display to Video display and vice versa by one touch when OSD menu is not activated 7...

Page 20: ...hen push Select Use Left or Right button to adjust Push Up or Down button to select between Horizontal or Vertical then push Select Use Left or Right button to adjust Push Up or Down button to select...

Page 21: ...ight button to adjust Push Up or Down button to select between 640 Mode or 720 Mode Use Left or Right to choose the correct mode then push Select button Push Up or Down button to select between Analog...

Page 22: ...ser s Guide Push the select button to execute Recall Factory Default Push the select button to execute Information OSD Scren Basic Section VGA For OSD display push Menu For selecting Icon push Up or D...

Page 23: ...n to select between OSD Hor Pos OSD Ver Pos OSD Background or User Timeout then push Select Use Left or Right button to adjust Push Left or Right to select Color Temp between 5000 6500 7300 9500 or Us...

Page 24: ...djust Push the select button Use Left or Right button to adjust Push the select button Use Left or Right button to adjust Push the select button Use Left or Right button to adjust Push Up or Down butt...

Page 25: ...MM19TK 23 Push the select button to execute Recall Factory Default Push the select button to execute Information OSD Scren Basic Section C Video or S Video For OSD display push Menu For selecting Icon...

Page 26: ...t n e c u l s n a r T r o e u q a p O n e e w t e b e s o o h C t u o e m i T r e s U e m i t g n i r a e p p a n e e r c s D S O t e S p m e T r o l o C r o l o c r o f r e s U r o 0 0 5 9 0 0 3 7 0...

Page 27: ...r o l o C r o l o c r o f r e s U r o 0 0 5 9 0 0 3 7 0 0 5 6 0 0 0 5 n e e w t e b e s o o h C p m e t d e R d e R e c n a l a B n e e r G n e e r G e c n a l a B e u l B e u l B e c n a l a B S M P...

Page 28: ...p a r g f o n o i t a c i f i c e p s e h t f i k c e h C e b y a m h c i h w e c n a i l p m o c n i s i r o t i n o m d n a h c t a m s i m y c n e u q e r f l a n g i s t u p n i e h t g n i s u a...

Page 29: ...5 H z U P to 8 5 H z a t 1 0 2 4 x 7 6 8 m o d e a n d up to 7 5 H z a t 1 2 8 0 x 1 0 2 4 D is pla y S ize H x V 1 3 6 x 1 0 9 3 4 5 0 m m x 2 7 6 4 8 m m B rig h tn e s s C o n tra s t R a dt io G r...

Page 30: ...le s B rightne ss 2 0 0 c d m 2 S ta nd a rd C o ntra st R a tio 2 5 0 1 Typ G ra y S c a le s U p to 2 5 6 ste p s S ig n a l In p u t C o n n e c t o r V id e o D B 9 1 5 p in D igita l D V I N T S...

Page 31: ...S c a le s B rightne ss 2 5 0 c d m 2 S ta nd a rd C o ntra st R a tio 5 0 0 1 Typ G ra y S c a le s U p to 2 5 6 ste p s S ig n a l In p u t C o n n e c t o r V id e o D B 9 1 5 p in D igita l D V I...

Page 32: ...T M D S D ata0 5 S hie ld 4 T M D S D ata4 1 2 T M D S D ata3 20 T M D S D ata5 5 T M D S D ata4 1 3 T M D S D ata3 22 T M D S D ata5 6 D D C C lo ck 1 4 5 V P ow er 22 T M D S C lo ck S hie ld 7 D D...

Page 33: ...without prior authorization Buyer will be responsible for packaging and shipping the defective goods to the Advan Service Facility with shipping charges prepaid Limitation of Warranty Monitor For thr...

Page 34: ...tion of Advan s product s by Advan any authorized dealer or any other person Technical Assistance For technical assistance please call 510 490 1005 between 8 00 a m and 5 00 p m PST Monday through Fri...

Page 35: ...IntelliTouchTouchscreen system consists of a touchscreen and an electronic touchscreen controller The touchscreen may be a flat spherical or cylindrical andisinstalledoverthefaceof the LCD The touchsc...

Page 36: ...hardware as described in the Quick start or Touchmonitor installation 3 Start your computer 4 Insert theWindows or Windows NTdriver disk into diverAor B 5 Browse for setup exe in the directory to whi...

Page 37: ...AMM17TK AMM18TK AMM19TK 35...

Reviews: