background image

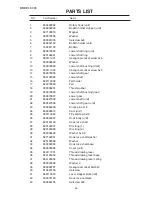
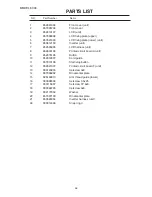
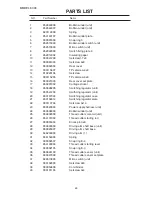
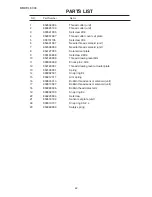
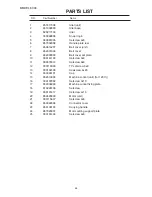
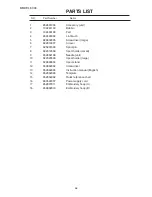
  NO.           Part Number

Name

PARTS LIST

66

MODEL 8300

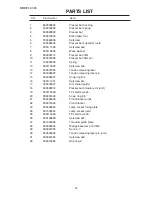
Base (unit)
Rubber foot
Adjusting screw
Adjusting screw spring
Rubber foot
Snap ring
Base lid
Setscrew
Base lid (1)
Base cover
Setscrew 4x6
Setscrew 3x4
Sheet cover
Setscrew 3x8
Carriage plate (unit)
Cover lid (2)
Setscrew 3x6
Cover lid
Setscrew 6x35
Base lid (3)
Adjusting screw (unit)

1
2
3
4
5
6
7
8
9
10
11
12
13
14
15
16
17
18
19
20
21

852617300
830150003
820350004
820351005
605074008
813123004
850151017
810220106
832146002
851053103
000101426
000101127
850147205
000066727
850627101
850169007
000078319
850156001
000127107
851071015
717618000

Summary of Contents for 8300 - LEAFLET

Page 1: ...SERVICE MANUAL PARTS LIST MODEL 8300 ...

Page 2: ...ION UNIT 18 REPLACING THREADER PLATE AND ADJUSTMENT 19 REPLACING THREAD CUTTER 20 21 ADJUSTING HEIGHT OF EMBROIDERY FOOT P 22 CONNECTOR CONNECTION DIAGRAM 23 REPLACING PRINTED CIRCUIT BOARD A 24 REPLACING TOUCH PANEL 25 TOUCH SCREEN CALIBRATION 26 REPLACING PRINTED CIRCUIT BOARD F 27 ADJUSTING OF THE SOLENOID 28 ADJUSTING UPPER SHAFT RELEASE CAM AND CLUTCH RELEASE ARM 29 ADJUSTING THREAD CUTTER SO...

Page 3: ...packaging with factory equipped documentation 4 This manual subject to revisions without notice The recipients is responsible for updating the information provided by FGAG BERNINA Steckborn Switzerland Protection of Electrical Components against Electrostatic Discharge When carrying out service work on computerized machines or when handling circuit boards the service technicians must be in an ESD ...

Page 4: ...HOOTING PROCEDURE N G O K O K N G ELECTRIC QUICK CHECK END CORRECT IT START BASIC CHECK MECHANICAL ELECTRICAL CAN T JUDGE ELECTRIC QUICK CHECK ADJUSTMENT SEWING CHECK REPLACE PARTS IS NEEDLE SET OK IS POWER SUPPLY OK IS THREADING OK ...

Page 5: ...2 Lift the habdle up and remove the Screw 3 Remove the top cover To attach 2 Follow the above procedure in reverse Replacing th top cover Top Cover Handle To remove 1 Remove the Cap and Screw and remove the Face Cover Cap Screw Face cover To attach 2 Follow the above procedure in reverse A B C A B C A B C B C B C ...

Page 6: ...e Cap and Screw 2 Raise the Carrying Handle and remove the Screw 3 Lay the machine on its back and remove Screws 2 pcs gold color then remove the Belt cover Cap Screw Screw Screw Belt cover To attach 4 Attach the Belt Cover with Screws 5 Attach the Cap Handle A B C D E E D C B A B D A B A E C D D ...

Page 7: ...300 Changing External Parts 3 Base Cover Replacing the base cover To remove 1 Remove Screws 4 pieces to remove the base cover Screws Base cover To attach 2 Follow the above procedure in reverse A B A B A B A A A ...

Page 8: ...ew 2 pcs and remove the Base Lid 3 Remove Screw 2 pcs and remove the Bed cover Screw Base lid Screw Bed cover To attach 4 Follow the above procedure in reverse Replacing base Lid 2 To remove 1 Remove Screws 4 pieces and remove the Lid 2 Screw Base lid 2 To attach 2 Follow the above procedure in reverse A B C D C B A A B B A A B C A A A B D D ...

Page 9: ... printed circuit board A 5 Insert the X Y Motor Cords between the printed cuircuit board A and Arm Be sure the cords are not caught between the Joint Bosses of the arm and base Tighten Screws 4 pieces temporarily Joint boss 6 Attach the Extension Accessory table Extension table Accessory 7 Tighten Screws while aligning the extension table base unit and free Arm Note Attach the embroidery hoop with...

Page 10: ... Screws 3 turns 5 Disconnect the each connector and remove the front cover Note Disengage the Hooks to remove the Front cover Screw Arm thread guide Lower Screw Screw Screw Hooks 2 spots To attach 6 Follow the above procedure in reverse Note See pages 19 Diagram for Connectors Connection Changing External Parts 6 Front Cover Front cover A B C A B C D E D E H H E B A C D F ...

Page 11: ...External Parts 7 Rear Cover 1 Remove the face cover and belt cover 2 Loosen Screw and remove the rear cover To attach 3 Follow the above procedure in reverse Rear cover To remove A B C D Rear cover Carriage Handwheel A B C D ...

Page 12: ...e cover and loosen Screw move the Needle bar supporter to the right or left until the needle comes to the center of the Needle plate hole 3 Tighten the Screw 4 Attach the face cover Screw Needle bar supporter Needle Nedle plate hole The needle should be positioned at the center of the needle plate hole A B C D A B C D A B A C D ...

Page 13: ...e plate and Bobbin holder 3 Lower the needle bar at its lowest position by turning the handwheel toward you 4 Raise the needle bar 1 8 mm up from the lowest position 5 Loosen the Screws of lower shaft gear turn the Lower shaft gear until the tip of rotary hook meets with the right side of the Needle Tighten screw 2 pieces of the lower shaft gear 6 Attach the Bobbin holder Needle plate presser foot...

Page 14: ...f the needle eye with the Upper surface of the hook race 6 Tighten the Screw Be sure that the Groove on the needle bar is facing right in the front 7 Attach the Bobbin holder Needle plate and presser foot 8 Attach the face cover Needle 3 2 3 6 mm Top of the needle eye Hook race body The standard distance between the top of the needle eye and the upper surface of the hook race should be in the rang...

Page 15: ... clearance between the test pin and the Tip of rotary hook to 0 1 to 0 05mm by moving the Rotary hook set plate up or down Tighten the Screws firmly 5 Check the rotary hook driver gear and the lower shaft gear backlash If gears mesh or engage tightly or loosely check Adjusting Backlash between Hook Drive Gear and Lower Shaft Gear See page 14 Note Do not move the rotary hook set plate in a lateral ...

Page 16: ...er than 0 8 mm or the gears do not turn smoothly adjust the backlash as follows Adjustment procedure 1 Remove the bed cover See page 4 and loosen the Screw 2 Turn the Lower shaft bushing Eccentric in the direction B when the play at shuttle hook tip is too small 3 Turn the Lower shaft bushing Eccentric in the direction A when the play at shuttle hook is too large 4 Tighten Screw securely after adj...

Page 17: ...he up position 3 A If the needle stops higher than 14 2 mm loosen Screw and turn the Upper shaft shield plate in the direction of A B If the needle stops lower than 14 2 mm loosen Screw and turn the Upper shaft shield plate in the direction of B 4 Place the right side of the Upper shaft shield plate in the center of the slit of the Upper shaft sensor and tighten Setcrew 5 Press the Start Stop butt...

Page 18: ...g turn the lead screw in the direction B 4 If the thread tension is less than 51g turn the lead screw in the direction A C Pulling direction Pulling speed 110 mm Sec C Bobbin Thread Tension The standard bobbin thread tension should be 9 to 11 grams measured with a 50 polyester thread being pulled at approximately 50 mm sec in the direction of arrow Adjust the bobbin thread tension by turning the a...

Page 19: ...oot lifter set the thread tension dial at 9 and loosen the Screw 3 While pushing the tension release plate 1 in direction B press the tension release plate 2 to disk holder tighten the Screw 4 Raise the presser foot lifter turn the thread tension dial at 9 to 0 make sure the tension disks should open 1 0 mm at any dial setting 5 Lower the presser foot lifter turn the thread tension dial 9 to 0 mak...

Page 20: ...hread tension unit To remove 1 Remove the front cover unit see page 8 2 Remove Screws and 3 Remove the thread tension unit To attach 3 Follow the above procedure in reverse Note After the replacement adjust Thread Tension Release Machanism and Solenoid A B A B ...

Page 21: ...sert Threader supporter plate Pin Hook Adjusting threader plate position Fig 2 1 When the Hook is slightly touching the needle eye loosen Screw and adjust the Threader plate as shown If the hook position is too high or too low Fig 3 1 Remove the face cover 2 If the hook is too high loosen the Screw and lower the Setting position plate If the hook is too low loosen Screw to slide up the Setting pos...

Page 22: ...r 3 Remove setscrews B then remove the thread cutter unit To attach Insert the pin C and pin E into the thread cutter hole and attach the thread cutter unit with the screw B After attaching the thread cutter unit check the driving arm 1 function 1 Lower the needle bar at its lowest position by turning the handwheel 2 Push the driving arm 1 down and insert the pin D into the ditch of the cutter dri...

Page 23: ...tter size S 3 Press I 10 times Press OK key 4 Press Color change key 4 A F 126x110mm Mode Jog ST 2 AB AB G H I J K L M N O P Q R S T U V W X Y Z A B C D E F AB B Gothic Edit A a A A Font LM Mode S 5 Set the hoop and start sewing The thread should be cut automatically each time after letter I is finished 1 2 3 3 4 ...

Page 24: ...plate and top cover unit See page 3 2 Remove the face plate unit See page 3 3 Lower the Needle and lower the presser foot lifter 4 Insert the 1 2 mm Feeler gauge between the Embroidery Foot P and the Needle plate 5 While pressing the Presser bar actuator down against the upper shaft cam loosen the Screw and push it down in the direction of arrow then tighten Screw again 6 Reattach the face plate a...

Page 25: ...d detection sensor Red Bobbin winder sensor Black Upper shaft sensor Black Printed circuit board F Black Remaining bobbin thread sensor Blue Switching power supply White X Motor Blue Y Motor White Thread cutter switch Black Thread cutter solenoid Red Solenoid for thread tension Red Remaining bobbin thread solenoid Blue Lamp White Needle thread solenoid White Inverter White DC Motor White 8 1 2 3 4...

Page 26: ...page 8 2 Pull out the connectors of printed circuit board F LCD Harness Inverter and Touch panel 3 Remove Screws 6 pcs and the Printed circuit board A with the Card guide To attach 4 Follow the above procedure in reverse 1 2 1 2 3 3 Setscrew Printed circuit board A Card guide 2 1 1 1 3 1 ...

Page 27: ...it against the Ribs A B C Fix the Touch panel with the Fixing plate bottom while press it against the Touch panel and tighten screws 5 Place the Fixing plate top and secure it with Screws while pressing the Fixing plate top against the Touch panel Fixing plate Top Screw Fixing plate Bottom Touch panel connector LCD Harness Printed circuit board F Touch panel Inverter 6 5 8 7 2 7 3 7 1 1 7 2 2 1 2 ...

Page 28: ...g mode Power switch Start Stop button 2 The LCD screen will show the Adjusting mode Adjusting mode 3 Press the Start Stop button again Caution Do not press any keys in this mode 4 The LCD screen will show the Special adjusting mode Special adjusting mode 5 Press the TTP Adjust key Caution Do not press the Self Check or Clear Set key which are only for the factory use 6 Press the cross with the tip...

Page 29: ...ve 1 Remove the front cover See page 8 2 Pull out the connector from the printed circuit board A Mainboard See page 25 3 Remove Screws 2 pieces and remove the Printed circuit board F Start Stop To attach 4 Follow the above procedure in reverse 12 A B A A B ...

Page 30: ... 4 Tighten the setscrew 1 6mm The plunger is drawn in direction of Arrow To check 1 Turn the power switch on while pressing the Start Stop button Do not release the button until the LCD screen shows the adjusting mode 2 Press the Solenoid key 3 Lower the presser foot lifter and make sure the disk holder shut and open automatically when press the keys 4 Press the OK key 5 Turn the power off A A A B...

Page 31: ... B e 5 Loosen the screw C 0 on the upper shaft cam i While pressing the clutch pin u against the point X o on the upper shaft cam i tighten the screw C 0 6 Attach the bobbin winder unit w then tighten setscrew A q 7 Attach the front cover unit and the rear cover q Screw A w Bobbin winder unit e Screw B r Clutch release arm t Clutch ring y Gap 1 mm u Clutch pin i Upper shaft cam o Point X 0 Screw C...

Page 32: ...nd the thread cutter solenoid q by moving the thread cutter solenoid setting plate 3 Tighten screws w 4 Attach the belt cover and base q Thread cutter solenoid w Screws e 2 0mm Adjusting thread cutter solenoid The standard clearance between the plunger and the thread cutter solenoid should be 2 0 mm e q w ...

Page 33: ...ease the button unitl the LCD screen shows the adjusting mode e 3 Press Solenoid key 4 Turn the hand wheel to lower the needle bar at its lowest position 5 Loosen the screw and adjust the switch so the driving arm should be lowered as illustrated in fig 2 when the key r is pressed 6 Tighten the screw 7 Press the OK key Turn the power switch OFF 8 Attach the needle plate bed cover and the free arm ...

Page 34: ...lever base 3 The height of the thread drawing lever from the surface of bobbin holder should be 4 1 mm If not see page 31 to adjust the height 4 Check the clearance between the thread drawing lever and the surface of the bobbin holder The clearance should be 1 5 mm when the plunger is pulled If not loosen screws B and adjust the solenoid to set the clearance Screw A 4 1mm 1 5mm Surface of bobbin h...

Page 35: ...of the thread drawing lever by moving the thread drawing lever 3 Tighten the hexagonal socket bolt 4 Attach the needle plate Standard height of the thread drawing lever from the surface of bobbin holder should be 4 1 mm Thread drawing lever View A View A Tread drawing lever Surface of the bobbin holder 4 1mm Hexagonal socket bolt ...

Page 36: ...creen shows the adjusting mode 1 Power switch 2 Start stop button 3 The LCD screen will show the adjusting mode 3 Adjusting mode 4 Press the Foot UD key 5 Loosen the screw A Move the switch bracket to adjust its position so that the LCD screen shows H when the foot is raised and shows L when the foot is lowered 6 Press the OK key 7 Turn the power switch off and then attach the top cover Adjusting ...

Page 37: ... each time you press the key 4 Box 5 Press the MEM1 key and the value will be shown in the box 5 under the MEM1 and will be stored in the memory 5 Box 6 Wind another bobbin to 10 3 mm diameter and insert it into the bobbin holder Press the Key several times The same value will be shown in the box 4 under the Key each time you press the key 7 Press the MEM2 key and the value will be shown in the bo...

Page 38: ...printed circuit board A Main board 4 Remove Screw 5 Remove Screws 2 pieces and replace the motor 6 Attach the motorand tighten Screws 2 pieces slightly Adjusting motor belt tension 1 Adjust the Belt deflection to about 5 0 mm by pressing the middle of the motor belt with your finger with approximately 200 grams of pressure A 10 A B B B B C D Pressure 200 grams Deflection 5 mm D C 10 ...

Page 39: ... inside 3 Turn the power switch ON to return the carriage to the home position 4 Remove Screws 3 pieces and remove the Carriage plate unit To attach 5 Attach the Carriage plate unit and tighten screws temporarily 6 Adjust the top surface of the carriage plate and the Arm surface are parallel and the same level securely tighten Screws 7 Attach the cover cap A B C D D C E C A A B D E C C ...

Page 40: ...Turn the power OFF and then remove the base unit 3 Loosen Screw and adjust dimension Y to 2 5 mm by moving the Y Sensor attaching plate 4 Loosen Screw to adjust Dimension X 1 to 69 0 mm and Dimension X 2 to 2 5 mm by moving the X Shield plate 5 Tighten Screws and 6 Attach the base To adjust X and Y sensors A B C D E F G A D D G A C F E B ...

Page 41: ...n the power switch OFF 6 If the needle position shifts in Y direction loosen the screw and move the Y sensor fixing plate to adjust the needle position 7 If the needle position shifts in X direction loosen Screw through the sheet cover fixing plate hole and adjust the X shield plate position 8 Turn the power ON and select pattern No 1 then check the start position 9 Return the carriage to the home...

Page 42: ...e moves to the starting position 7 Insert a piece of paper between the thread tension disks as shown so that the needle thread sensor will not work 8 Run the machine and loosen Screws 2 pieces and move the X Motor to detect the quitest position while the carriage is moving in lateral direction then tighten Screws 9 Run the machine and loosen Screws 2 pieces and move the Y Motor to detect the quite...

Page 43: ...from going out of adjustment 5 Remove Screws 2 pieces and take out Switching power supply To attach 6 Follow the above procedurte in reverse 7 Move the Idler to adjust the Belt deflection to about 4 0 mm by pressing the middle of the Timing belt with your finger with approximately 100 grams of pressure A B 11 C D E F G H Caution If the fuse on the switching power supply is blown critical electroni...

Page 44: ...42 Model 8300 Apply a few drops of high quality sewing machine oil to the points indicated by the arrows Oiling ...

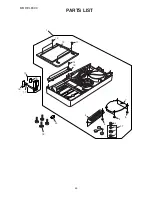
Page 45: ...PARTS LIST 43 MODEL 8300 1 2 3 4 5 6 7 7 7 8 9 10 11 12 13 17 17 19 20 21 22 28 29 24 27 31 32 33 34 26 35 36 37 38 38 30 15 39 16 18 23 25 26 26 14 ...

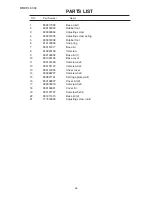
Page 46: ...00081005 857505000 Needle plate unit Needle plate Hook cover plate supporter Rotation stopper Hook cover plate release button Hook cover plate holder spring Setscrew 2x2 2 Bobbin threader holder lever Setscrew Hook cover plate Needle plate positioning pin Hexagonal socket screw 4x4 Nut Needle plate nut set plate Extension table lid Caution card Setscrew Face plate unit Needle plate set plate right...

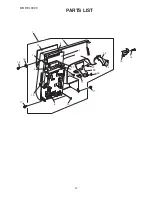
Page 47: ...PARTS LIST 45 MODEL 8300 1 2 3 4 5 6 7 8 9 11 10 6 8 ...

Page 48: ...003 852068001 853603306 830013003 830190005 000161103 000080901 000081005 822020503 1 2 3 4 5 6 7 8 9 10 11 Top cover unit Top cover unit Top cover Reference chart Top cover compartment unit Top cover hinge Washer Setscrew 3x6 Setscrew 4x25 Setscrew 4x8 Spool holder Large ...

Page 49: ...PARTS LIST 47 MODEL 8300 1 2 7 4 5 6 7 8 9 3 10 11 12 13 14 15 16 17 18 19 20 21 22 23 24 25 26 27 28 30 31 32 33 34 35 38 37 39 36 48 43 41 40 46 37 49 50 51 52 53 45 44 47 49 42 54 29 ...

Page 50: ...ever unit Detection lever spring Presser foot lifter sensor bracket Snap ring 2 5 Setscrew 1 7x6 Insulating paper Photo interrupter unit Setscrew 4x6 Setscrew 3x6 Setscrew 4x8 Setscrew 4x12 Presser foot lifter sensor unit Micro switch unit Switch fixing plate Presser foot lifter sensor unit 852005154 751014006 000111902 830609703 857602008 751047008 000111201 857037006 751016008 000097602 85350912...

Page 51: ...PARTS LIST 49 MODEL 8300 1 2 3 4 5 6 7 12 9 10 11 8 13 5 5 6 14 10 15 16 17 6 6 19 10 22 23 18 20 21 ...

Page 52: ... 6 7 8 9 10 11 12 13 14 15 16 17 18 19 20 21 22 23 Clutch solenoid unit Solenoid set plate Solenoid unit Spring pin 3x20 ACP Snap ring E 4 Setscrew 3x4 Clutch base plate unit Clutch base plate Clutch starting lever Snap ring E 3 Clutch arm 2 Clutch arm Clutch arm 2 spring Connect rod Upper shaft sensor set plate unit Upper shaft sensor set plate Printed circuit board P unit Setscrew 4x8 Clutch rel...

Page 53: ...PARTS LIST 51 MODEL 8300 18 32 20 19 3 6 7 8 9 10 11 12 13 14 15 16 4 5 1 2 22 31 28 17 31 21 23 24 25 26 27 31 29 30 ...

Page 54: ...nit Front bracket Lamp socket fixing plate Lamp socket unit TP setscrew 2x8 Setscrew 3x5 Threader guide plate Wedge base lamp 12V 5W Nut 4 3 7 Tension releasing lever pin unit Setscrew 4x8 Grip ring 6 1 2 3 4 5 6 7 8 9 10 11 12 13 14 15 16 17 18 19 20 21 22 23 24 25 26 27 28 29 30 31 32 852009004 830030006 830029002 830810042 763048006 830586035 000111500 000116608 830035115 822072005 102222009 00...

Page 55: ...PARTS LIST 53 MODEL 8300 2 3 4 5 6 7 8 9 10 33 13 15 16 17 14 18 19 20 21 22 23 24 25 26 27 28 29 25 30 31 1 32 11 12 34 34 ...

Page 56: ...103 37 Upper shaft rear metal Upper shaft timing gear Spring pin 3x20 Spring pin 3x30 Clutch ring Clutch spring Belt wheel Snap ring 8 Handwheel Timing belt Belt wheel unit Upper shaft releasing cam Cushion 1 2 3 4 5 6 7 8 9 10 11 12 13 14 15 16 17 18 19 20 21 22 23 24 25 26 27 28 29 30 31 32 33 34 850165003 854639201 000078319 000110901 000111706 829042007 000038605 639095000 000101703 830095010 ...

Page 57: ...PARTS LIST 55 MODEL 8300 6 7 23 15 20 21 8 9 10 10 11 11 8 9 10 10 12 14 13 16 17 18 19 13 25 22 13 24 1 2 3 4 5 5 5 26 27 28 29 30 31 30 32 33 13 34 35 36 37 38 39 40 40 41 42 43 ...

Page 58: ...ace shaft base Cover unit Thread drawing lever Thread drawing lever base Thread drawing lever spring Washer 2 Hexagonal socket bolt 2x3 Setscrew Lever stopper plate left Hook race set plate Setscrew 3x8 1 2 3 4 5 6 7 8 9 10 11 12 13 14 15 16 17 18 19 20 21 22 23 24 25 26 27 28 29 30 31 32 33 34 35 36 37 38 39 40 41 42 43 854629002 846632003 627190010 000070506 000081005 846652102 102261103 8206720...

Page 59: ...PARTS LIST 57 MODEL 8300 1 2 3 4 5 6 7 8 13 10 11 12 13 13 14 15 16 17 17 18 19 20 21 22 13 9 ...

Page 60: ...850524004 000014306 1 2 3 4 5 6 7 8 9 10 11 12 13 14 15 16 17 18 19 20 21 22 Front cover unit Front cover LCD unit LCD fixing plate upper LCD fixing plate lower unit Inverter unit LCD harness unit Printed circuit board A unit Button Card guide Start stop button Printed circuit board F unit Setscrew 3x8 Ornamental plate Arm thread guide lower Setscrew 3 5x25 Setscrew TP 4x8 Setscrew 3x8 Washer Orna...

Page 61: ...PARTS LIST 59 MODEL 8300 18 19 20 21 22 22 22 23 11 1 24 3 4 5 6 7 8 9 10 11 14 12 15 15 15 13 16 13 17 2 11 25 26 27 11 28 29 30 31 32 33 34 35 36 37 38 39 40 39 39 11 34 ...

Page 62: ...Driving arm shaft base unit Driving arm shaft base Driving arm 1 Spring Snap ring E 4 Thread cutter starting lever Snap ring E 3 Thread cutter sensor unit Thread cutter sensor set plate Micro switch unit Setscrew 2x8 Cord binder Setscrew 3x4 852643006 852644007 823119008 854140107 000001609 852615009 852510003 852042009 852014002 000041209 000081005 853002309 000115607 810220106 000115205 85302100...

Page 63: ...PARTS LIST 61 MODEL 8300 1 2 3 3 4 5 6 7 8 9 10 11 12 5 13 14 3 16 17 18 19 3 20 21 3 22 23 15 ...

Page 64: ...read cutter unit Setscrew 4X8 Thread cutter cover set plate Setscrew 3X4 Needle thread solenoid unit Needle thread solenoid unit Solenoid set plate Setscrew 2 6X4 Thread drawing leverArm Knock pin 2 5X8 Thread drawing lever actuator plate Spring Snap ring E4 Arm spring Bobbin thread sensor solenoid unit Bobbin thread sensor solenoid unit Bobbin thead detect arm Snap ring E3 Setscrew Sensor set pla...

Page 65: ...PARTS LIST 63 MODEL 8300 1 2 3 4 5 6 5 5 7 8 9 9 10 10 11 14 12 13 15 16 17 18 5 19 20 21 23 22 24 25 17 ...

Page 66: ...10 Machine socket fixing plate Setscrew Setscrew 4x16 Motor unit Setscrew 4x8 Connector cover Carrying handle Motor setting support plate Setscrew 4x6 1 2 3 4 5 6 7 8 9 10 11 12 13 14 15 16 17 18 19 20 21 22 23 24 25 851617008 851039000 625217100 000002806 000081005 857002002 853614207 852031304 832099009 000161103 000078319 000115009 000104108 653006101 852513006 000107802 852036000 810220106 000...

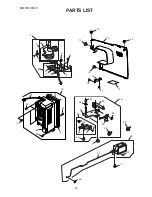
Page 67: ...PARTS LIST 65 MODEL 8300 1 2 3 4 5 6 7 8 8 9 8 10 11 12 13 14 15 16 17 18 19 20 21 ...

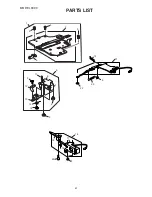
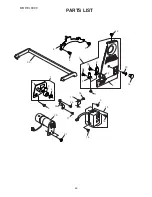
Page 68: ...x4 Sheet cover Setscrew 3x8 Carriage plate unit Cover lid 2 Setscrew 3x6 Cover lid Setscrew 6x35 Base lid 3 Adjusting screw unit 1 2 3 4 5 6 7 8 9 10 11 12 13 14 15 16 17 18 19 20 21 852617300 830150003 820350004 820351005 605074008 813123004 850151017 810220106 832146002 851053103 000101426 000101127 850147205 000066727 850627101 850169007 000078319 850156001 000127107 851071015 717618000 ...

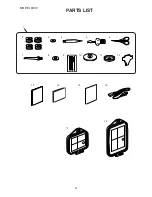
Page 69: ...PARTS LIST 67 MODEL 8300 1 2 3 4 5 6 7 8 9 10 11 12 13 14 15 17 18 16 ...

Page 70: ...arge Spool stand Screwdriver Instruction manual English Template Quick reference chart Power supply cord Embroidery hoop A Embroidery hoop B 1 2 3 4 5 6 7 8 9 10 11 12 13 14 15 16 17 18 852801004 102261103 102403109 802424004 820832005 822814007 625031500 822019509 852802108 822020503 829803004 653802002 852864005 852852000 852854002 653524007 852807011 850802010 ...

Reviews: