background image

- 9 - 

5. Operations


5.1 Turn on the RF Modulators Power 

Once all AV & RF connections have been done and the RF Modulator has been connected 

to the system correctly, the power to the RF Modulator can be turned on. The AV devices 

and all displays can be turned on. 


5.2 Adjusting the RF Modulator 

1.


Press the mode key to select the RF Modulators AV input A. The LED indicator for AV 

input device A is lit up. The channel number is shown on the channel display. 

2.


Use the up and down key to select the desired channel. (

The last channel selected 

will be stored in the memory, even if the power goes out.

3.


Repeat steps 1 & 2 for the other two AV input devices B and C for channel selection.  

4.


Ensure each display (TV) has been tuned into the correct AV devices RF Channel on 

the RF Modulator. 


6. Troubleshooting 

Please read this instruction manual carefully before using the AV system. If you still have 

difficulties using the RF Modulator, please refer to the following, which will guide you on 

how to solve most common problems. 


1.


No image or sound 
a)


Make sure the power switch is in the “ON” position. (Check AV devices/Displays) 

b)


Check the connections, to ensure all of the connectors and plugs are in the 
correct input/output. (e.g. Yellow Video RCA Output to Yellow Video RCA Input)  

c)


Make sure the RF Modulator and the display (TV) are on the same channel. 

2.


Interruptions in image and sound  
a)


Make sure the RF Modulator and the display (TV) are using a free channel. 

b)


Shorten the signal transmission medium between the RF Modulator and Display 
(TV). If possible keep the coaxial cable away from other cables, especially mains 
wiring to avoid interference. 

c)


Please allow 2 channel spacing to inhibit interference for channel selection, it is 
preferred that a channel higher or lower be skipped between A, B or C inputs. 
This is to avoid co-channel interference. Example: RF Channel 23 is AV device 
input A, for AV device input B, the channels 22 and 24 must be skipped. So 
channels 21 or 25 would be the correct channels to use. 


If you experience difficulties in installing, setting or using the camera, consult the 

dealer or an experienced RF/TV technician for help. 


Summary of Contents for BPAVM3

Page 1: ...Model BPAVM3 Mini UHF RF Modulator With 3 Audio Video Inputs Instruction Manual Warranty Included Before operating this product please read the manual thoroughly Website www jonsa com au...

Page 2: ...or near a swimming pool and the like 8 Mounting of the product should only follow the manufacturer s instructions and should only use a mounting accessory recommended by the manufacturer 9 This produ...

Page 3: ...aters stoves or other electrical products including amplifiers that produce heat Note This device has been tested and found to comply with the limits for a class B digital device pursuant to the FCC R...

Page 4: ...RF Modulators Power 9 5 2 Adjusting the RF Modulator 9 6 Troubleshooting 9 6 1 No Picture or Sound 9 6 2 Interference in the Image and Sound 9 7 Specifications 10 8 Warranty 10 12 9 Notes 13 15 1 Int...

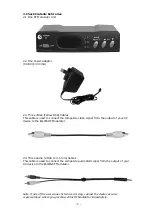
Page 5: ...o signal from the output of your AV device to the ELLIES RF Modulator 2 4 Three Audio 2 RCA to 3 5 mm Cables This cable is used to connect the composite audio L R signal from the output of your AV dev...

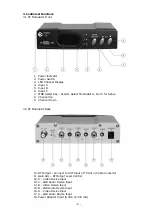
Page 6: ...ulator A B or C for Setup 8 Channel Up 9 Channel Down 3 2 RF Modulator Back 10 RF Output Connect to UHF Input of TV Set or Cable Converter 11 Gain Adj RF Output Level Control 12 C Video Device Input 1...

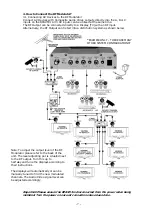
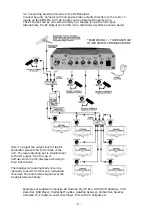
Page 7: ...n below EXAMPLE ONLY THERE ARE MANY OTHER SYSTEM CONFIGURATIONS Important Please ensure the BPAVM3 is disconnected from the power when being installed Turn the power on once all connections have been...

Page 8: ...NFIGURATIONS Examples of suitable Composite AV Devices Pay TV Box HDD DVD Recorder VHS Recorder DVD Player Digital Set Top Box Satellite Receiver Camcorder Security Cameras Hi Fi System Laser Disc Pla...

Page 9: ...e you on how to solve most common problems 1 No image or sound a Make sure the power switch is in the ON position Check AV devices Displays b Check the connections to ensure all of the connectors and...

Page 10: ...Box Dimensions BPAVM3 132 L x 102 W x 32 D mm BPAVM3 Operating Temperature 10 60 Celsius SPECIFICATIONS ARE SUBJECT TO CHANGE WITHOUT NOTICE 8 Warranty The warranty repair card for this product is fea...

Page 11: ...11...

Page 12: ...12...

Page 13: ...___________________________________________ _____________________________________________________________ _____________________________________________________________ ________________________________...

Page 14: ...___________________________________________ _____________________________________________________________ _____________________________________________________________ ________________________________...

Page 15: ...___________________________________________ _____________________________________________________________ _____________________________________________________________ ________________________________...

Page 16: ......

Reviews: