


Rev.052114-JA
4
www.elitescreens.com
Red 12V
Green 0V
C. 5-12 volt trigger cable
12
12V trigger cable
E. 2 x AAA Batteries
D. Bubble leveler
A. IR remote
B. Wall box switch
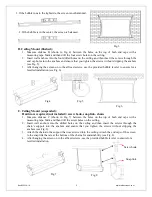
Screen material tension adjustment
(4mm Allen Wrench required and not included)
Remove the weight bar end cap to expose the
adjustment tension knob (see Fig. 9). Insert your
4mm Allen Wrench to push in the adjustment
tension knob, turn clockwise and your screen will
gain more tension. Turn the Allen Wrench counter
clockwise and the screen will lose tension. Please
note this adjustment is not necessary as the tension
of the screen has been preset by the factory for best
performance. Please contact Elite Screens for
assistance to avoid damaging the screen and voiding
your warranty at
Accessories included for Spectrum Tab-Tension Series
Screen operation
Electric Current
: The screen operates on AC110V @ 60hz
1. Plug the screen’s power cord into a power outlet.
2. Once the screen’s has power, you’ll be able to control it using any of the 3 methods described below.
Control System for Spectrum Tab Tension Series
1. 5-12V Trigger
(
Item C, Fig. 10
)
:
The built-in 5-
12V trigger input allows your screen to
synchronize its drop & rise with the projector’s
triggering output. The screen deploys when the
projector powers up and will retract when the
projector powers down. The 5-12 volt adaptor
connects to your projector’s trigger output via a
separate cable that may or may not be provided by
the manufacturer of the projector. The trigger
feature will not work without an output cable from
the projector, but it can be tested by connecting the
Red (+) and Green (-) cable to a 9-volt battery.
Push
Tension Knob
3 Prong Power Cable
RJ-45 Input
5-12 Volt Trigger Cable
Fig.9
Fig.10


