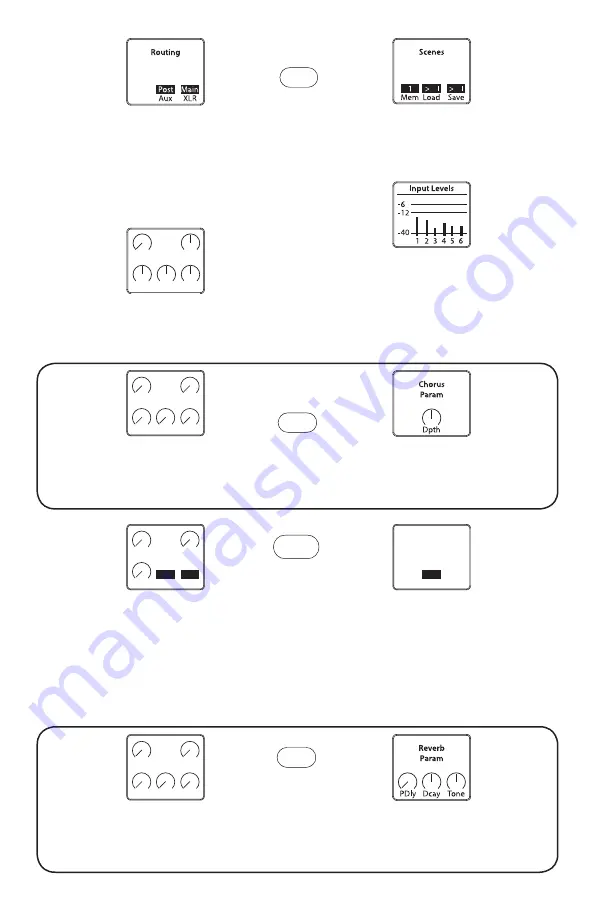
Elite Acoustics Engineering D6-8 MKII Quick Manual Handbook Download Page 4

System

“System” :


“Input Levels”

Displays a bar graph for each 

channel’s input level.  Adjust the 

channel’s “Gain” pot to set desired 

level.

“System” :


“Routing”

Assign “Pre” or “Post” fader i.e., “Main 

Mix” Channel 1 through Channel 6, 

signals to the Aux Sends.  You can also 

select either “Main” mix or “Aux” mix as 

the source for the XLR outputs.

“Reverb” :


“Reverb Sends”

Adjust the Reverb level of each

of the 5 channels.

“Delay” :


“Delay Param”

Adjust “Modulation,” “Feedback,” 

“Time Offset,” “BPM” Delay Time, and 

“Level” of the delay.

“Chorus” :


“Chorus Sends”


Adjust the Chorus level of each of 

the 5 channels.

“Chorus” :


“Chorus Param”


Adjust the Depth of the Chorus for 

each of the 5 channels.

“System” :  “Scenes”

Save and Recall up to 10 mixes i.e., 

scenes.

“Reverb” :  “Reverb Param”

Adjust the Decay and Tone of the 

Reverb.

“Reverb” :  “Delay Routes”

Assign a channel to the delay.  Note 

that this is an “insert” type effect and 

is intended for a selectable single 

channel.  It precedes the Reverb and 

Chorus effects.

Reverb

Reverb

Sends

Ch1

Ch2 Ch3

Ch4

Ch56

Delay

Delay

Param

Mod

Fbck TimX BPM

Lvl

1

120

Delay

Route

Chan

1

Chorus

Chorus

Sends

Ch1

Ch2 Ch3

Ch4

Ch56

Xlr Out

Eq

Hi

LowM

idF

Mid

LCut

“System” :  “XLR out EQ”

Setting for EQ for the XLR outputs 

when it is SET on “MAIN outputs” 

Summary of Contents for D6-8 MKII

Page 1: ...Quick Start Guide Registration Card 1 Speaker Handle Grip The Bluetooth word mark and logos are registered trademarks owned by Bluetooth SIG Ing and any use of such marks by Elite Acoustics Designs I...

Page 2: ...LCD shows a level bar graph for each channel Adjust rear panel Gain control until the display shows 12dB for Guitar and Mic 5A Adjust Master Volume for desired output level 6 Set Mic Mix EQ and Rever...

Page 3: ...h of the 5 channels sent to the Aux Outputs Aux Aux Pan Adjust the panning between Aux Send 1 and Aux Send 2 for each of the 5 channels Main Page 2 Main Pan Adjust the stereo panning for each of the 5...

Page 4: ...s Sends Adjust the Chorus level of each of the 5 channels Chorus Chorus Param Adjust the Depth of the Chorus for each of the 5 channels System Scenes Save and Recall up to 10 mixes i e scenes Reverb R...

Page 5: ...ap E L I T E A C O U S T I C S For Maximum Battery Life Recharge after every use Use recharge battery at least once a month Do not leave power switch in the ON position when it is not in use Keep unit...

Page 6: ...input Instrument In 13 1 4 TRS inputs Line In 14 1 4 TRS inputs Mic In 15 XLR for Microphone Input Channel 2 Gain 9 Gain level control Mute 10 Mute Channel PAD 11 Fixed attenuation to reduce input lev...

Page 7: ...7 1 4 balance TRS input Aux Aux Send Level 18 Aux output level control Aux Send 1 19 1 4 balance TRS output Aux Send 2 20 1 4 balance TRS output Monitor Output Connect with extra speakers monitors Mon...

Page 8: ...k d Bi Color Charge LED should be lit Charge time can vary from 5 to 6 hours e Once it is fully charged LED Bi Color will turn off 2 When unit is powered with AC adaptor Battery Switch should be in DI...

Page 9: ...s CH1 2 Input jacks mic XLR 1 4 Line 1 4 Instrument CH3 4 mic XLR 1 4 Line CH5 6 Left Right stereo input 1 4 TRS AUX in 1 8 jack Right channel output 1 4 XLR Direct Out Chan 1 2 or Main Mix outputs DC...

Page 10: ...alteration or attempted repair by unauthorized personnel and is limited to failures arising during normal use that are due to defects in material or workmanship in the product Any implied warranties...

Reviews: