2.4
Extracting version
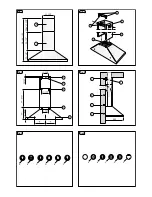
Connect the flange
Y
to the discharge opening with a connecting tube.
Thread the upper connector
E
to the inside of the lower connector
F
;
hang the two connectors inserting them vertically on the cooker hood
locking the lower connector
F
to the wall using the drill holes
B
(fig. 3),
unthread the upper connector
E
towards the top, locking it in with the
supplied screws in the drill holes
G
of the bracket
Z
(fig. 2) previously
affixed to the wall via the drill holes
A
(fig. 3).
3.
USE
3.1.
If the apparatus is equipped with the following controls (fig.5):
A) LIGHT
B) OFF
C) SPEED I
D) SPEED II
E) SPEED III
F) AUTOMATIC STOP TIMER - 15 minutes
The “automatic stop timer” delays stopping of the hood, which will
continue functioning for 15 minutes at the operating speed set at the
time this function is activated.
3.2
If the apparatus is equipped with the following controls (fig.6):
A) OFF
B) SPEED I
C) SPEED II
D) SPEED III
E) LIGHT

