Read this Manual carefully before installation and keep it for future reference.
Page 1: ...Read this Manual carefully before installation and keep it for future reference...
Page 2: ...hould be prevented Otherwise may cause damage on product 4 Please do not remove and disassemble any internal parts of Dome video camera by self in order to avoid normal usage being impacted There is n...
Page 3: ...etup 9 2 5 Control Options 9 2 5 1 Dome Addr Setup 9 2 5 2 Control Option Operation 10 2 6 Camera Options 10 2 6 1 Zoom and Focus 10 2 6 2 Camera Exposure 11 2 6 3 Others 13 2 7 Function Programming 1...
Page 4: ...Operation Manual of P T Z Dome Camera 3 Chapter 3 Short cut Operations and Specification of Dome Device 24 Chapter 4 Trouble Shooting of Dome Device 27...
Page 5: ...ed can be 0 1 to 55 degree per second 128 preset positions A fixed position that aimed by the dome camera which can be set and revised by user arbitrarily The maximum running speed when preset positio...
Page 6: ...ion running after self test of the dome device and auto enter function running when there is no transmission Dwell time can be set from 5 to 999 seconds Freeze video picture function frozen picture fu...
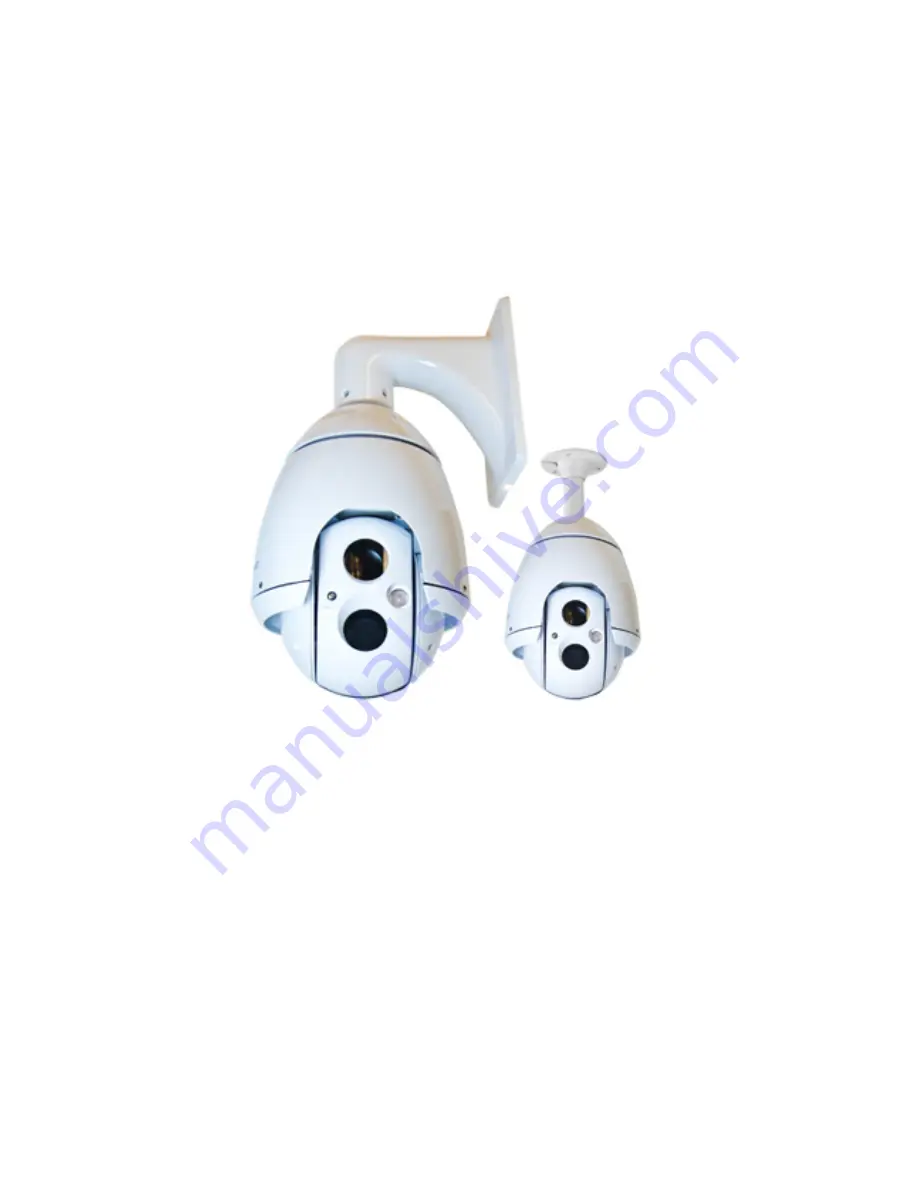
Page 7: ...int of light source characteristics developed a variable angle infrared light With the perspective of the size of the change in one machine simultaneously follow the changes to ensure the infrared lig...
Page 8: ...mber selection cursor Joystick Left or Right to select the number to be entered Press OPEN to confirm selection The selected number is displayed on the corresponding data bit Number of respective data...
Page 9: ...and execute PTZ and VectorScan etc 7 SYSTEM SETUP System setup Including restore default setup clear memory color system dome reset TITLE CAMERA xxxx PROTOCOL xxxx BAUDRATE xxxx DOME ID xxx VERSION x...
Page 10: ...u 3 Joystick left right to select programming position and press OPEN to confirm joystick left right again to select 0 9 or A Z Press OPEN to confirm selection Press CLOSE to exit or return to the pre...
Page 11: ...g the video ratio to lower the speed 2 6 Camera Options As the dome can support many type of cameras so the camera menu will be different with different cameras the following camera menu take Sony cam...
Page 12: ...TER SPEED AUTO 4 IRIS LEVEL AUTO 5 AGC LEVEL AUTO 6 BRIGHT LEVEL AUTO 7 SPOT AE OFF 8 WDR OFF 1 AE Mode Steps 1 Move the joystick up down to move the cursor to select AE Mode 2 Joystick left right to...
Page 13: ...2 SLOW SHUTTER OFF 3 SHUTTER SPEED AUTO 4 IRIS LEVEL AUTO 5 AGC LEVEL AUTO 6 BRIGHT LEVEL AUTO 7 SPOT AE OFF 8 WDR OFF 4 Iris IRIS works under Manual IRIS MD Steps 1 Joystick Up Down to move the curs...
Page 14: ...N Steps 1 Joystick Up Down to move the cursor to select Spot AE 2 Joystick Left right to set up the Spot AE 8 WDR OFF ON Needs support from camera Steps 1 Joystick up down to move the cursor to select...
Page 15: ...set position data you desire to save 3 Press OPEN to finalize your selection then the screen displays STORED and return to the previous menu level Or press CLOSE to return to the previous menu FUNCTIO...
Page 16: ...cursor to select Delete Preset Move the joystick left right or press OPEN to enter the Delete Preset 3 Press OPEN to confirm the selection and exit Press CLOSE to cancel the selection and exit ARE YOU...
Page 17: ...E PRESET 5 NAME _____________ 6 NAME DISPLAY OFF Name 1 Move the joystick up down to move the cursor to select the Name 2 Move the joystick left right or press OPEN to enter name editing menu Please r...
Page 18: ...n the selected Vectorscan track VECTORSCAN 1 NUMBER 1 2 PROGRAM A VECTORSCAN 3 RUN A VECTORSCAN 4 DELETE A VECTORSCAN PROGRAM VECTORSCAN 1 NAME NUM SP DWELL 1 2 3 4 16 IRIS CLOSE WHEN DONE DELETE A VE...
Page 19: ...ATTERN 3 RUN A PATTERN 4 DELETE A PATTERN 5 NAME ______ 6 NAME DISPLAY OFF IRIS OPEN TO BEGIN IRIS CLOSE WHEN DONE Fig 1 Fig 2 9 Joystick Up Down to move the cursor to select Name Display RUN A PATTER...
Page 20: ...0 3 PAN END POS 0 0 4 TILT START POS 0 0 5 TILT END POS 0 0 6 NAME ________ 7 NAME DISPLAY OFF 1 Number Joystick left right or press OPEN to select the sector number number range 1 8 2 Pan Start POS P...
Page 21: ...k Up Down to move the cursor to select MASK COLOR Joystick Left Right to move the cursor to select the Mask color 2 Mask Edit Joystick Up Down to move the curs or to select Mask Zone Joystick Left Rig...
Page 22: ...ne Preset VectorScan Pattern PanScan AutoScan Number Select the Number and press OPEN or move the joystick left right to enter Number editing Setup method referring to preset setup instruction Park Ti...
Page 23: ...OR SYSTEM NTSC 4 DOME RESET 5 IR MODULE SETUP Press open to save and exit or press close to exit Select the Action and move the joystick left right or press OPEN to enter Action Actionincludes None Pr...
Page 24: ...olor System 2 Joystick Left Right to select the PAL or NTSC 2 8 4 Dome Reset 1 Joystick Up Down to move the cursor to select Dome Reset 2 Joystick Left Right or press OPEN to reset the dome 2 8 5 IR M...
Page 25: ...3 Pan Tilt Control Set line scanning ending point 55 Background light compensation On Off 56 Day Night Auto Color 57 Camera related OSD Camera menu On Off Camera function OSD On Off 58 Digital zoom On...
Page 26: ...te Dome operation will be different due to controller s different specs Preset point setting Press No Shot ON Call Preset point Press No Shot ACK Clear Preset point Press No Shot OFF 2 Description of...
Page 27: ...eep a manual line scan speed three seconds above then through 51 SHOT ACK to save the speed as line scan speed use 52 SHOT ACK to enable the line scan Dwell time of line scanning between starting poin...
Page 28: ...ution Call 95 ACK to open 4 Problem description Distorted character or image Possible reason Interfered by exterior electronic signal noise or the camera is directed to the monitor screen Solution Gro...