20
Mounting
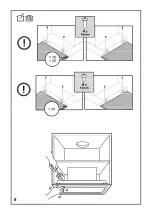
Before beginning installation:
•
Check that the product purchased is of a suitable size for
the chosen installation area.
• Remove the charcoal (*) filter/s if supplied (see also
relative paragraph). This/these is/are to be mounted only
if you want lo use the hood in the filtering version.
• Check (for transport reasons) that there is no other
supplied material inside the hood (e.g. packets with
screws (*), guarantees (*), etc.), eventually removing
them and keeping them.
In the case of the presence of panels and/or walls and/or
lateral wall units check that there is sufficient space to install
the hood and that access to the command panel is easy.
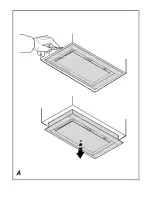
To remove the hood from the wall unit,
perform the
mounting steps in reverse order.
Caution!
Use suitable cut resistant gloves.
Start detaching the hood from the double-sided adhesive that
keeps it adherent to the bottom of the wall unit (see also Fig.
4)
Therefore, use a cutter that can be slipped between the sheet
metal of the hood and the bottom of the wall unit on the right
and left sides. Fig. A
Caution
! Otherwise, if you use force during extraction, the sheet metal of the hood could be irremediably distorted.
Operation
T1.
ON/OFF button “Automatic operation (sensor),
connection with
SNAP®
”
- see the function list in the next
paragraph
T2.
Suction
speed
(power) control button:
1
,
2
,
3
,
intensive
Note:
Intensive
speed lasts for about 5 minutes, then it
is automatically set to speed
3.
T3.
ON/OFF button (short press) and light intensity setting
(long press).
Filter Saturation Indicator
The hood signals when necessary to perform filter
maintenance:
Grease filter (every 40 hours of use):
all Leds with red light
Activated charcoal odour filter
(every 160 hours of
operation)
: all LEDs with red light, LEDs
L2
and
L3
blink
Reset Filter Saturation
After performing filter maintenance, press and hold buttons
T1
and T3
, Leds
L1
,
L2
and
L3
blink briefly in red and then turn
off for good.
Activation indicator for odour filter saturation with
activated charcoal
This indicator is normally disabled. To enable it, proceed
as follows:
With the hood off
, press and hold simultaneously
T1
and
T2
:
L1
turns on first, then
L2
and
L3
and after that,
when the buttons are released, the Leds
L2
and
L3
flash
briefly to indicate successful activation.
Disabling the LED for charcoal filter
saturation:
repeat the operation above; first the LEDs
L1
,
L2
and
L3
turn on simultaneously, then only
L1,
and after that,
when the buttons are released, the leds
L1, L2
and
L3
turn on
again to indicate successful disabling.
Automatic operation (sensor), connection to SNAP®
Caution!
We recommend running the
"Automatic operation
settings"
procedure (see below) before running the unit in
automatic mode connected to
SNAP®
.
Automatic operation (sensor)
The hood will turn on at the speed most suited to the cooking
conditions detected by its sensor.
To activate this function:
Press button
T1
briefly, LED
L1
will turn on white.
Automatic operation with SNAP®
Note:
SNAP®
is an auxiliary extraction unit which runs
together with the hood.
For further details, refer to the manual included with
SNAP®
To activate this function:
Press button
T1
briefly, LED
L1
will turn on orange.
Parameter setting for automatic operation
Parameter setting duly takes place
automatically
whenever
the hood is connected to the mains (for example: with the first
installation or after a power cut) or
manually
.
Note:
All the manual operations of calibration, selection,
setting and logical connection described below are possible
with the hood OFF and automatic operation OFF (
T1
OFF-
L1
OFF).


