background image


13 


Maintenance 

ATTENTION! 

Before performing any maintenance operation, isolate the hood from the electrical supply by switching off at the 

connector and removing the connector fuse.  

Or if the appliance has been connected through a plug and socket, then the plug must be removed from the socket. 


Cleaning 

Do not spray cleaners directly to the control while 

cleaning the Hood.

The cooker hood should be cleaned 

regularly (at least with the same frequency with which you 

carry out maintenance of the fat filters) internally and 

externally.  Clean using the cloth dampened with neutral 

liquid detergent. Do not use abrasive products. 

DO NOT 

USE ALCOHOL!


WARNING: 


Failure to carry out the basic cleaning recommendations of 

the  cooker  hood  and  replacement  of  the  filters  may  cause 

fire risks.  

Therefore, we recommend oserving these instructions. 

The manufacturer declines all responsibility for any damage 

to  the  motor  or  any  fire  damage  linked  to  inappropriate 

maintenance  or  failure  to  observe  the  above  safety 

recommendations. 


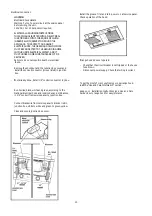
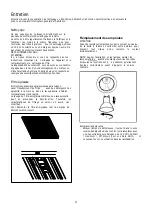
Grease Filter 

Traps cooking grease particles. 


The  filters  should  be  washed  frequently 

using  non 

aggressive detergents, either by hand or in the dishwasher, 

which must be set to a low temperature and a short cycle.  

When  washed  in  a  dishwasher,  the  grease  filter  may 

discolour slightly, but this does not  affect its filtering capacity. 

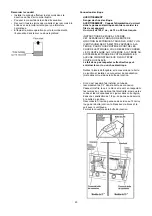
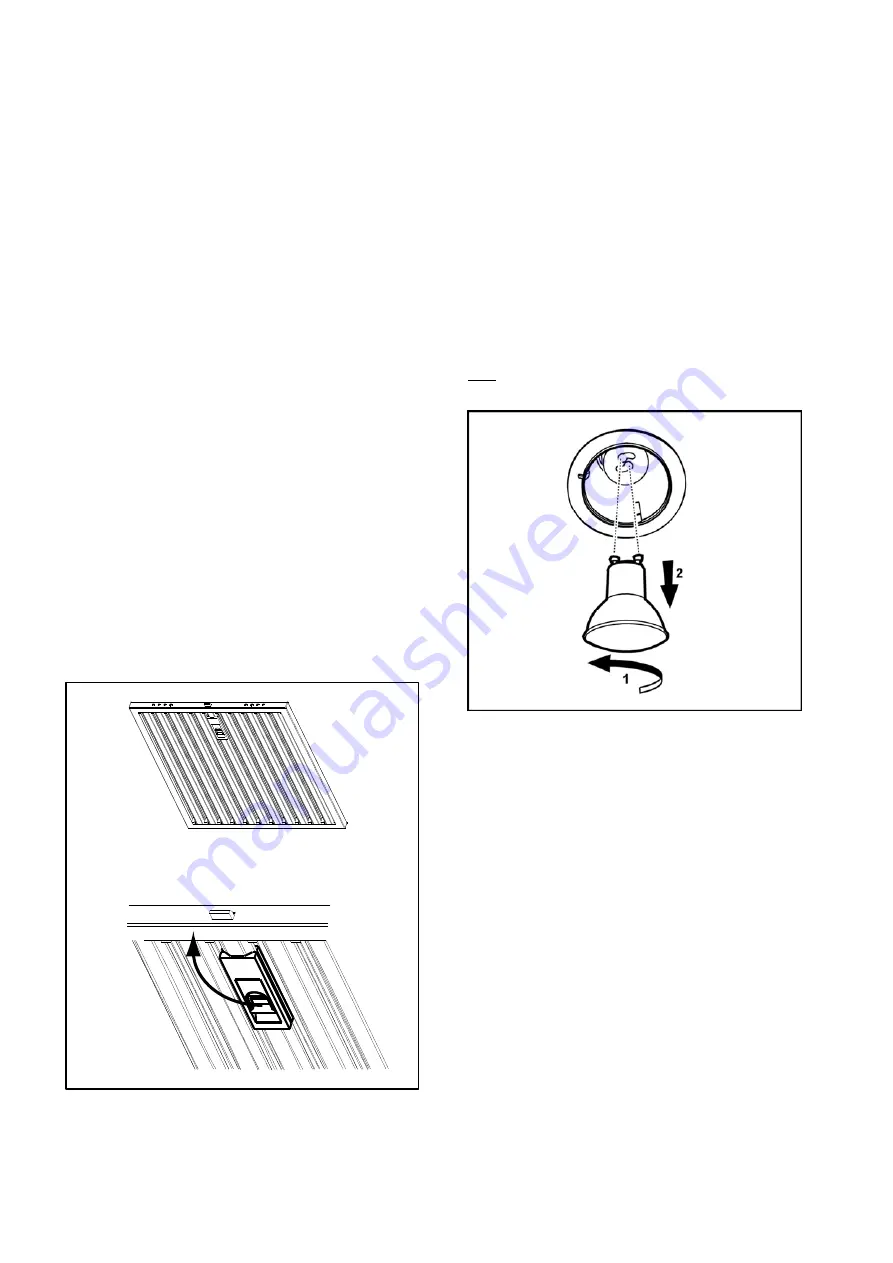
To remove the grease filter, pull the spring release handle. 

Replacing the light bulb 

CAUTION


Before  replacing  the  lamps,  switch  power  off  at  service 

panel  and  lock  service  panel  disconnecting  means  to 

prevent power from being switched on accidentally. 


NOTE:  Turn  off  the  lights  and  fan.    Allow  the  lights  to  

cool   before  handling.


If  new  lights  do  not  operate  be 

sure lights are inserted correctly before calling service. 


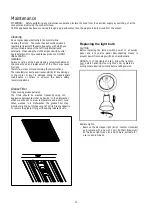
Replace Lights  

  Remove  the  damaged  light  (twist    counter  clockwise) 

and  replace  with  a  new  120  Volt,  50  Watt  (maximum) 

50°  halogen  light  made  for  a  GU10  base, 

suitable  for 

use in open luminarie.

Summary of Contents for EOR627SS

Page 1: ...Installation Guide Guide d utilisation d entretien et d installation Guía de instalación uso y mantenimiento READ AND SAVE THESE INSTRUCTIONS LISEZ CES INSTRUCTIONS ET CONSERVEZ LES READ AND SAVE THESE INSTRUCTIONS ...

Page 2: ...ontrols 12 Maintenance 13 Cleaning 13 Grease Filter 13 Replacing the light bulb 13 Warranty 14 APPROVED FOR RESIDENTIAL APPLIANCES FOR RESIDENTIAL USE ONLY READ AND SAVE THESE INSTRUCTIONS PLEASE READ ENTIRE INSTRUCTIONS BEFORE PROCEEDING INSTALLATION MUST COMPLY WITH ALL LOCAL CODES IMPORTANT Save these Instructions for the Local Electrical Inspector s use INSTALLER Please leave these Instruction...

Page 3: ... Solid State Speed Control Device WARNING TO REDUCE THE RISK OF A RANGE TOP GREASE FIRE a Never leave surface units unattended at high settings Boilovers cause smoking and greasy spillovers that may ignite Heat oils slowly on low or medium settings b Always turn hood ON when cooking at high heat or when flambeing food I e Crepes Suzette Cherries Jubilee Peppercorn Beef Flambe c Clean ventilating f...

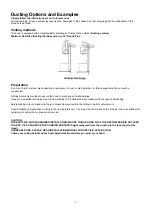
Page 4: ... power supply conduit at the range hood and at the junction box Copies of the standards listed may be obtained from National Fire Protection Association Batterymarch Park Quincy Massachusetts 02269 CSA International 8501 East Pleasant Valley Road Cleveland Ohio 44131 5575 Before installing the hood 1 For the most efficient air flow exhaust use a straight run or as few elbows as possible CAUTION Ve...

Page 5: ...ide 10 Wood screws 4 Assembly screws for Transition 2 assembly screws for integral blower spring clip 6 assembly screws for grease filters supporting frame 1 spring clip for integral blower installation 2 machine screws for integral blower installation 2 knobs for filter trim bracket 33 45 model only Parts not supplied Optional Accessories Hood liner Tools Materials required Wire nuts 10 rounded m...

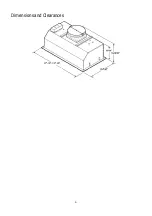
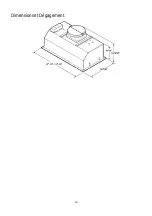
Page 6: ...6 Dimensions and Clearances 27 33 39 45 ...

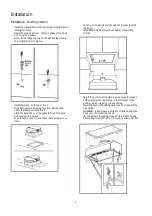
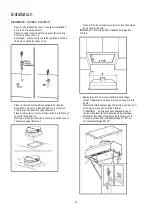
Page 7: ...ood to most types of walls ceilings However a qualified technician must verify suitability of the materials in accordance with the type of wall ceiling Before making cutouts make sure there is proper clearance within the ceiling or wall for exhaust vent Hood installation height above cooktop is the users preference The lower the hood is above the cooktop the more efficient the capturing of cooking...

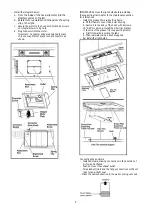
Page 8: ... hole of the hood and secure with 4 screws Tape to seal connection and check that damper moves freely Cut a hole in the bottom of the cabinet in order to settle the hood IMPORTANT Cabinet must be capable of supporting 100 lbs Adjust the position of the clasping side spring by means of the proper screw according to the thickness of the panel to which it is going to be anchored Insert the hood in th...

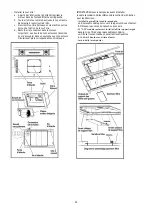
Page 9: ... blower housing b Secure it to the body of the hood with 6 screws 33 45 model only Install the Filter trim bracket in the mid of the grease filter suppeorting frame a First frontwards inserting the tabs b Then rearwards using 2 knobs supplied Connecting the ductwork Install ductwork making connections in the direction of airflow as illustrated Push duct over the exhaust outlet Wrap all duct joints...

Page 10: ...onnector cULus listed in junction box If not already done install 1 2 conduit connector in j box Run 3 wires black white and green according to the National Electrical Code and local codes and ordinances in 1 2 conduit from service panel to junction box Connect black wire from service panel to black or red in junction box white to white and green to green yellow Close and secure junction box cover...

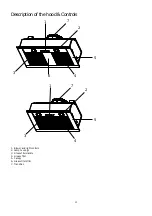
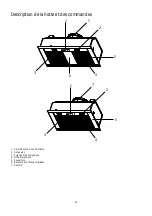
Page 11: ...11 Description of the hood Controls 1 Blower and light controls 2 Lamp housings 3 Grease filter Handle 4 Grease filter 5 Canopy 6 Grease filters trim 7 Transition 1 1 2 2 3 3 4 4 5 5 6 7 7 ...

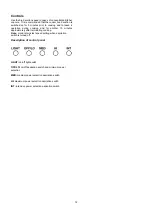
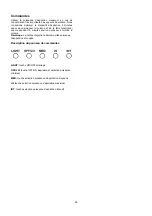
Page 12: ...ng cooking and for another 15 minutes approximately after terminating cooking Note Hood retains last speed setting when aspiration switch is turned off Description of control panel LIGHT on off light switch OFF LO on off aspiration switch and minimum power selection MED medium power selection aspiration switch HI maximum power selection aspiration switch INT intensive power selection aspiration sw...

Page 13: ...ity for any damage to the motor or any fire damage linked to inappropriate maintenance or failure to observe the above safety recommendations Grease Filter Traps cooking grease particles The filters should be washed frequently using non aggressive detergents either by hand or in the dishwasher which must be set to a low temperature and a short cycle When washed in a dishwasher the grease filter ma...

Page 14: ...r abrasive cleaning products pads and oven cleaner products WHO IS COVERED This warranty is extended to the original purchaser for products purchased for ordinary residential use in North America Including the United States Guam Puerto Rico US Virgin Islands Canada This warranty is non transferable and applies only to the original purchaser and does not extend to subsequent owners of the product T...

Page 15: ... APPAREILS DE TYPE RÉSIDENTIEL POUR UNE UTILISATION RÉSIDENTIELLE SEULEMENT LISEZ CES INSTRUCTIONS ET CONSERVEZ LES VEUILLEZ LIRE CES INSTRUCTIONS AU COMPLET AVANT DE COMMENCER L INSTALLATION DE L APPAREIL DOIT RESPECTER TOUS LES CODES EN VIGUEUR IMPORTANT Conservez ces instructions afin de pouvoir les remettre à l inspecteur électricien de votre région INSTALLATEUR Veuillez laisser ces instructio...

Page 16: ...ÈRES a Ne laissez jamais la cuisinière sans surveillance lorsqu elle est réglée à une haute température Les débordements par bouillonnement causent de la fumée et des débordements de gras qui peuvent s enflammer Faites chauffer l huile lentement à une température basse ou moyenne b Faites toujours fonctionner la hotte lorsque vous utilisez la cuisinière à une haute température ou que vous faites f...

Page 17: ...te et à la boîte de jonction Vous pouvez obtenir un exemplaire des normes indiquées en vous adressant à La National Fire Protection Association Batterymarch Park Quincy Massachusetts 02269 La CSA International 8501 East Pleasant Valley Road Cleveland Ohio 44131 5575 Avant d installer la hotte 1 Pour assurer la ventilation la plus efficace possible installez la conduite en ligne droite ou avec le m...

Page 18: ...allation 10 vis à bois 4 vis d assemblage pour le raccord 2 vis d assemblage pour clip à ressort de la soufflerie 6 vis d assemblage pour le châssis de support des filtres anti graisse 1 clip à ressort pour l installation de la soufflerie 2 vis machine pour l installation de la soufflerie 2 attaches pour le support garniture des filtres modèle 33 45 uniquement Pièces non fournies Accessoires en op...

Page 19: ...19 Dimensions et Dégagement 27 33 39 45 ...

Page 20: ... des plafonds Vous devez cependant demander à un technicien qualifié de vérifier la solidité des matériaux selon le type de mur ou de plafond Avant de couper assurez vous qu il y a un dégagement suffisant dans le plafond ou le mur pour passer la conduite de sortie Vous pouvez déterminer vous même la hauteur à laquelle vous installez la hotte au dessus de la cuisinière Plus la hotte est près de la ...

Page 21: ...n de la hotte et le fixer à l aide de 4 vis Mettre du ruban pour sceller le raccord et vérifier que le couvercle bouge librement Dans le fond de votre armoire faites le trou nécessaire afin d insérer la hotte IMPORTANT L armoire doit être capable de supporter 100 lbs Réglez la position du ressort latéral d accrochage suivant l épaisseur du panneau troué sur lequel il sera ancré Insérez la hotte à ...

Page 22: ...ccoupler dans un seul sens Les connecteurs circulaires et plats correspondant sont indiqués IMPORTANT Enlevez les ampoules avant d installer le cadre secondaire Faites référence à la section de l entretien pour les directives Installez le grase filtre le cadre secondaire un Soulevez le cadre pour couvrir le logement du ventilateur b Obtenez le au corps du capuchon avec 6 vis 33 45 modèle seulement ...

Page 23: ...VOUS PROTÉGER CONTRE LES CHOCS ÉLECTRIQUES VOUS DEVEZ RACCORDER LE FIL VERT JAUNE AU FIL DE MISE À LA TERRE DU SYSTÈME ÉLECTRIQUE DE VOTRE MAISON EN AUCUNE CIRCONSTANCE CE FIL DOIT ÊTRE COUPÉ OU ENLEVÉ Le fait de ne pas respecter cette directive peut entraîner la mort ou un choc électrique Retirez l alvéole défonçable et le couvercle de la boîte de jonction et installez un connecteur de canalisati...

Page 24: ...eur ne s est pas déclenché ou que le fusible n est pas grillé Débranchez l alimentation Vérifiez que les raccords électriques ont été effectués correctement Pour utiliser votre nouvelle hotte de façon optimale lisez la section intitulée Entretien et utilisation Gardez vos instructions d installations et d utilisation près de la hotte pour pouvoir vous y référer facilement ...

Page 25: ...n de la hotte et des commandes 1 Contrôles soufflerie et lumières 2 A mpoules 3 Poignée filtre anti graisse 4 Filtre anti graisse 5 Couverture 6 Garniture des filtres anti graisse 7 Raccord 1 1 2 2 3 3 4 4 5 5 6 7 7 ...

Page 26: ...nner encore pendant 15 minutes environ après avoir terminé la cuisson Remarque La hotte enregistre la dernière vitesse lorsque l aspiration est coupée Description du panneau de commandes LIGHT touche ON OFF éclairage OFF LO touche OFF ON aspiration et sélection puissance minimum MED touche selection puissance d aspriration moyenne HI touche selection puissance d aspiration maximum INT touche selec...

Page 27: ...nées Filtre à graisse Il retient les particules de graisse issues de la cuisson Laver fréquemment les filtres avec des détergents non agressifs à la main ou dans le lave vaisselle à faibles températures et cycle rapide Le lavage du filtre anti graisse métallique au lave vaisselle peut en provoquer la décolor ation Toutefois les caractéristiques de filtrage ne seront en aucun cas modifiées Pour dém...

Page 28: ... utilisation du propriétaire un entretien incorrect une utilisation de substances nettoyantes corrosives ou abrasives et produits de nettoyage pour four QUI EST COUVERT Cette garantie s étend à l acheteur original de produits achetés pour un usage domestique habituel en Amérique du Nord Y compris Etats Unis Guam Porto Rico les Iles virgin Américaines le Canada Cette garantie n est pas transférable...

Page 29: ...stitución de la bombilla 41 Garantía 42 APROBADO PARA APARATOS DE USO DOMÉSTICO SÓLO PARA USO DOMÉSTICO LEA Y GUARDE ESTAS INSTRUCCIONES ANTES DE CONTINUAR LEA LAS INSTRUCCIONES POR COMPLETO LA INSTALACIÓN DEBE CUMPLIR TODA LA NORMATIVA LOCAL IMPORTANTE guarde estas instrucciones para su uso por parte del inspector de electricidad local INSTALADOR entregue al propietario estas instrucciones junto ...

Page 30: ...o para el control de la velocidad ADVERTENCIA PARA REDUCIR EL RIESGO DE INCENDIO OCASIONADO POR GRASA a No deje nunca ninguna unidad externa desatendida y con valores de fuego altos La cocción puede causar humo o reboses de grasa que pueden prender fuego Caliente el aceite a fuego lento o medio b Encienda siempre la campana cuando cocine a una temperatura alta o cuando realice flameados Por ejempl...

Page 31: ...en la caja de conexiones Se pueden obtener copias de los estándares enumerados en National Fire Protection Association Batterymarch Park Quincy Massachusetts 02269 CSA International 8501 East Pleasant Valley Road Cleveland Ohio 44131 5575 Antes de instalar la campana 1 Para obtener una circulación del flujo de aire más eficaz utilice un tubo de tramo recto o el menor número posible de tubos acodad...

Page 32: ...ra la Transición 2 Tornillos de ensamblaje para la chaveta del ventilador integral 6 Tornillos de ensamblaje para el bastidor del soporte de los filtros de grasa 1 Chaveta para la instalac ión del ventilador integral 2 Tornillos de máquina para la instalación del ventilador integral 2 Pomos para la ménsula de asiento del filtro sólo pare el modelo de 33 45 Piezas no suministradas Accessorios opcio...

Page 33: ...33 Dimensiones y Espacios libres 27 33 39 45 ...

Page 34: ...techo No obstante un técnico cualificado debe comprobar la idoneidad de los materiales de acuerdo con el tipo de muro o techo Antes de efectuar ningún corte asegúrese de existe espacio libre adecuado en el techo o muro para la expulsión del aire La preferencia de la altura de instalación de la campana de los usuarios es por encima de la cocina Cuanto más cerca esté la campana de la cocina mas efic...

Page 35: ...a y ajústela con los 4 tornillos Encintar para sellar la conexión y controle que la válvula de registro se mueva libremente Hacer el la base del armario la abertura necesaria para acoger la campana IMPORTANTE El armario debe ser capaz de sostener 100 lb Regular la posicón del enganche laterale por medio de los tornillos destinados a este propósito considerando el espesor del panel horadado sobre e...

Page 36: ...ectados para unirse de un solo modo Conecte los conectores planos y redondeados como muestra la figura IMPORTANTE Quitar las bombillas antes de instalar el bastidor Consulte la sección de mantenimiento Instalar el bastidor del soporte de los filtros de grasa a Levante el marco para cubrir la carcasa del ventilador b Asegurelo al cuerpo de la campana con 6 tornillos Unicamente modelos 33 45 Instale...

Page 37: ...Y AMARILLO SIRVE COMO TOMA DE TIERRA PARA EL APARATO PARA PROTEGERSE DE DESCARGAS ELÉCTRICAS EL CABLE VERDE Y AMARILLO DEBE ESTAR CONECTADO AL CABLE DE TOMA A TIERRA DE SU SISTEMA DOMÉSTICO DE ELECTRICIDAD Y BAJO NINGUNA CIRCUNSTANCIA DEBE CORTARSE O ELIMINARSE De lo contrario podría tener como resultado una descarga eléctrica o la muerte Retire el pestillo extraíble y la tapa de la caja de conexi...

Page 38: ...Compruebe si el interruptor está desconectado o se han fundido los fusibles Desconecte el suministro eléctrico Compruebe si el cableado es correcto Para conseguir el funcionamiento más eficaz de la nueva campana extractora lea la sección Uso y mantenimiento Para disponer de una referencia sencilla siga las Instrucciones de instalación y la Guía de uso y mantenimiento ...

Page 39: ...ón de la campana y los controles 1 Panel de control 2 Lámparas 3 Manija para liberación filtro de grasa 4 Filtro de grasa 5 Vidrio de la campana 6 Asiento del filtro de grasa 7 Transición 1 1 2 2 3 3 4 4 5 5 6 7 7 ...

Page 40: ...òn por otros 15 minutos aproximadamente Nota La campana retiene la última velocidad utilizada cuando el switch de aspiración se apaga Descripción del panel de control LIGHT Botón ON OFF luces OFF LO Botón OFF ON aspiración y seleccción potencia mínima MED Botón selección potencia de aspiración media HI Botón selección potencia de aspiración máxima INT Botón selección potencia de aspiración intensi...

Page 41: ...cumplimiento de las normas de seguridad proporcionadas Filtro contra la grasa Retiene las partículas de grasa producidas cuando se cocina Los filtros deben lavarse con frecuencia con detergentes no agresivos manualmente o bien en lavavajillas a bajas temperaturas y con ciclo breve Con el lavado en el lavavajilla el filtro antigrasa metálico puede desteñirse pero sus características de filtrado no ...

Page 42: ...usuario mantenimiento inadecuado uso de productos toallas de limpieza corrosivos o abrasivos y por uso de limpiadores para hornos QUIEN ESTA CUBIERTO Esta garantía se extiende al comprador original de productos adquiridos para uso residencial en Norte America incluyendo Estados Unidos Guam Puerto Rico Islas Vírgenes de USA y Canadá Esta garantía no es transferible y aplica solamente al comprador o...

Page 43: ......
Page 44: ...Printed in Mexico LI3FBA Ed 04 08 ...

Reviews: