elepho eClip User Manual Download Page 6

eClip Full User Guide

6

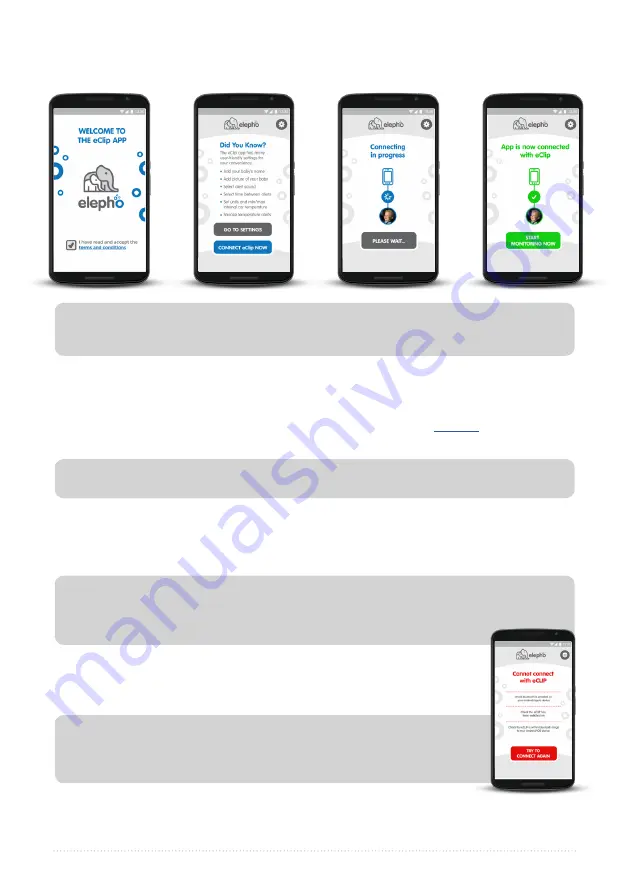
Pairing the eClip and the App

Now it’s time to get your smartphone to communicate with the eClip.
1.  Launch the eClip app. Read and accept the terms and conditions on the 

Welcome


screen. 

2.  On the 

Did You Know

?

 screen tap 

GO TO SETTINGS

 to personalize your eClip with your 

child’s name and picture, and to modify your sound alerts. See 

Settings

 on page 12 to 

do this now, or click the settings gear icon, at any time, to do it later.

3.  Turn on your eClip by pressing the On/Off switch continuously for three seconds. 

The red LED flashes three times quickly, then once a second until pairing has been 
completed. When it is paired it flashes blue about once a second. For ideal pairing 
setup, ensure that the eClip and app are less than 6 ft (2 m) apart. 

Note:

Note:

By default the temperature alerts are disabled.

To activate or deactivate the eClip, hold down the On/Off switch 

continuously for three seconds until you see the red LED flash quickly 3 times.
This will help prevent accidentally turning the eClip on or off.

4.  On the 

Did You Know

 screen tap 

CONNECT to eClip NOW

5.  The app displays the 

Connecting in progress

 screen. The eClip flashes 

red until Bluetooth Connection has been established. 

If you see the 

Cannot connect with eClip

 screen first check 

that the eClip is on and that your Bluetooth and GPS are activated on 
your smartphone. Then tap 

Try to connect again

.

6.  After a successful pairing the app displays the 

App is now connected with eClip


screen and the eClip red LED changes to a blue LED that flashes about once a second.

Note:

Recommendation:

The eClip will pair quicker and more easily if the app is 

running before the eClip is switched on.

Summary of Contents for eClip

Page 1: ...eClip Full User Guide Baby reminder in your car eClip...

Page 2: ...eClip and the App 6 Installing the eClip in Your Car 7 Time to Start Monitoring 8 When an Alert Sounds 10 Shutting Down until Next Time 11 Settings 12 Taking Care of Your eClip 13 Changing the eClip...

Page 3: ...utes to set up your new eClip and to learn how to use it A eClip battery included B eClip Accessory Strap C eClip Quick Setup Guide D End User Warranty After every journey always check that you have r...

Page 4: ...etooth Low Energy pairing between eClip and app Audio permission to sound eClip audio alerts and adjust volume for alerts Camera to take a picture to add in baby profile picture Storage to save and re...

Page 5: ...with the flat side marked with a plus sign facing up 5 Replace the battery cover turning it clockwise with a coin until the coin is in line with the two H clips Once you close the battery cover the e...

Page 6: ...re less than 6 ft 2 m apart Note Note By default the temperature alerts are disabled To activate or deactivate the eClip hold down the On Off switch continuously for three seconds until you see the re...

Page 7: ...t in place as follows Baby car seat strap Standard adult seat belt Diaper bag strap Included strap accessory Always check manufacturers recommendations before attaching the eClip to the strap of your...

Page 8: ...e then flashes about once per second 3 After a successful connection the Connecting in progress screen is replaced by the App is now connected with eClip screen The flashing LED on the eClip turns blu...

Page 9: ...e green bars in the Battery Level icon indicates a good strong power supply for your eClip The battery should be good for about 500 hours of continuous use Good battery health is very important so we...

Page 10: ...later You are still in the car The eClip LED flashes red meaning that the Bluetooth connection has been lost Check your smartphone correct the problem and then tap CONTINUE MONITORING to renew the co...

Page 11: ...s later Press the eClip On Off switch for three seconds to turn it off Tap SHUTDOWN on the eClip HAS BEEN SWITCHED OFF screen and then YES on the ARE YOU SURE THAT YOU WANT TO SHUT DOWN THE APP screen...

Page 12: ...dy available on your device Change the refresh time between alerts from thirty seconds to one two or three minutes Change the default temperature units from F to C Toggle Temperature Alerts to On to e...

Page 13: ...interfere with the temperature sensors Storage Environment Temperature Operation Environment Temperature Do not drop the eClip to the ground Physical shocks can damage its electronics If you store th...

Page 14: ...y second To change the battery Always use a high quality CR2032 battery Panasonic or equivalent for the most reliable results The battery cover is tight to prevent young children from opening it Cauti...

Page 15: ...droid 4 ice cream sandwich and above Bluetooth 4 1 or later If you are not going to use the eClip for an extended period of time remove the battery to prevent leakage and damage to the unit Do not dis...

Page 16: ...warranty shall not apply to Product installed operated or maintained in or under abnormal conditions This warranty is not applicable to any Product which is not operated and or installed in accordance...

Page 17: ...ference in a residential installation This equipment generates uses and can radiate radio frequency energy and if not installed and used in accordance with the instructions may cause harmful interfere...

Reviews: