background image


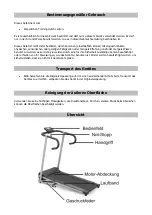
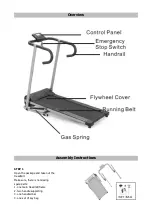
Overview 


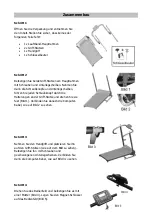
Assembly Instructions 


STEP 1 

Open the package and take out the 
treadmill. 
Make sure, there is no missing 
spare parts: 
1. one main treadmill frame 
2. two handle supporting 
3. one handrail bar 
4. one set of key bag 


Summary of Contents for 10026388

Page 1: ...Klarfit Laufband Pacemaker X1 10026388 10026392 10026393 ...

Page 2: ...Anweisungen wie das Gerät zu benutzen ist Kinder sollten beaufsichtigt werden um sicherzustellen dass sie nicht mit dem Gerät spielen 5 Stellen Sie das Gerät auf eine trockene und ebene Oberfläche 6 Stellen Sie vor jedem Training sicher dass sämtliche Schrauben und Befestigungen ordnungsgemäß festgezogen sind 7 Die Sicherheit des Gerätes kann nur gewährleistet werden wenn das Gerät regelmäßig gepf...

Page 3: ...oder mangels Wissen benutzt zu werden es sei denn sie werden durch eine für ihre Sicherheit zuständige Person beaufsichtigt oder erhielten von ihr Anweisungen wie das Gerät zu benutzen ist Kinder sollten beaufsichtigt werden um sicherzustellen dass sie nicht mit dem Gerät spielen Transport des Gerätes Bitte bewahren Sie die Originalverpackung auf Um einen ausreichender Schutz beim Transport des Ge...

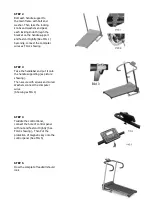
Page 4: ...egscheiben führen Sie jeden Schraubknopf durch die Halterungen an der Griff Stütze und drehen Sie sie fest Bild 1 Verbinden Sie danach die Computer Kabel wie auf Bild 2 zu sehen Schritt 3 Nehmen Sie den Handgriff und platzieren Sie ihn auf den Griff Stützen wie auf dem Bild zu sehen Befestigen Sie ihn mit Schrauben und geschwungenen Unterlegscheiben Verbinden Sie dann die Computer Kabel wie auf Bi...

Page 5: ...s Gerät nur mit genügend Platz um es herum Stellen Sie sicher dass hinter dem Gerät kein Hindernis steht das das Betreten oder Verlassen des Laufbands behindern könnte Unterbrechen Sie das Training sofern Sie eines der folgenden Symptome wahrnehmen Übelkeit Schwindelgefühl Atemnot starke Kurzatmigkeit überhöhter Puls Schmerzen in der Brust Zittern Suchen Sie im Falle eines dieser Symptome Ihren Ar...

Page 6: ...halben Umdrehung fest auf die das Band gerutscht ist und lösen Sie sie gleichermaßen auf der andern Seite Lassen Sie das Band vorsichtig durchlaufen um sicherzustellen dass es absolut mittig ist Wiederholen Sie den Vorgang wenn das Band noch nicht richtig mittig ist Pflege Das Band kann mit einem feuchten Tuch und etwas mildem Reinigungsmittel gereinigt werden Entfernen Sie nach jeder Reinigung üb...

Page 7: ...is Nach 4 Minuten ohne Verwendung schaltet sich das Display automatisch ab Problembehebung Computer funktioniert nicht richtig Überprüfen Sie in diesem Fall ob die Verbindungskabel des Computers richtig verbunden sind Stellen Sie außerdem sicher dass der Magnet Schalter noch funktioniert und der Magnet Schlüssel richtig angebracht ist Reparaturen Reparaturen am Gerät sollten nur von einer autorisi...

Page 8: ...dukt gilt die Europäische Richtlinie 2002 96 EG Diese Produkte dürfen nicht mit dem normalen Hausmüll entsorgt werden Informieren Sie sich über die örtlichen Regelungen zur getrennten Sammlung elektrischer und elektronischer Gerätschaften Richten Sie sich nach den örtlichen Regelungen und entsorgen Sie Altgeräte nicht über den Hausmüll Durch die regelkonforme Entsorgung der Altgeräte werden Umwelt...

Page 9: ...pment The equipment is under no circumstances suitable as a children s toy 5 Please always regularly that safety chain guard that protects the moving parts of the machine is secured and in good order Please make sure to keep 0 5m free space around equipment 6 Be careful Use the machine Please stop exercise immediately if you find any unusual problem or sound with the machine when assembling or usi...

Page 10: ...ew Assembly Instructions STEP 1 Open the package and take out the treadmill Make sure there is no missing spare parts 1 one main treadmill frame 2 two handle supporting 3 one handrail bar 4 one set of key bag ...

Page 11: ...computer wires as FIG 2 showing STEP 3 Take the handlebar and put it onto the handle supporting as picture showing Then secure with screws and cured Washers connect the computer wires Showing as FIG 3 STEP 4 Twiddle the control Panel connect the hole of control panel with nut and fasten it tightly See FIG 4 showing Then Put the protection of magnetic key onto the control panel See FIG 5 STEP 5 How...

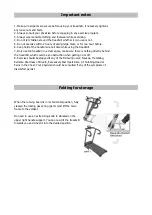
Page 12: ...l in a clear space make sure there is nothing directly behind the treadmill which could be an obstruction when getting on or off 8 Exercise should be stopped if any of the following occur Nausea Trembling Extreme Shortness of Breath Excessively Fast Heart Rate A Throbbing Head or Pains in the Chest Your physician should be consulted if any of the symptoms of discomfort persist Folding for storage ...

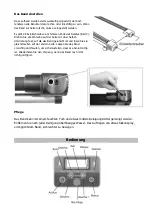
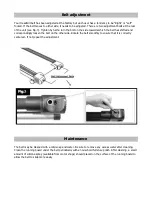
Page 13: ... shifted and correspondingly loosen the bolt on the other side Rotate the belt smoothly to ensure that it is correctly centered if not repeat the adjustment Maintenance The belt may be cleaned with a mild soap and water Be sure to remove any excess water after cleaning Clean the running board under the belt periodically with a household furniture polish After cleaning a small amount of silicone sp...

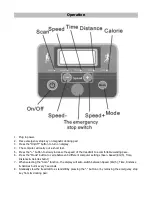
Page 14: ... the treadmill to a comfortable walking pace 6 Press the Mode button to cycle between 5 different computer settings Scan Speed Km h Time Distance Calories burnt 7 When selecting the Scan function the display will auto switch between Speed Km h Time Distance Calories burnt every 5 seconds 8 Gradually slow the treadmill to a standstill by pressing the button or by removing the emergency stop key fro...

Page 15: ...ng Computer not working correctly If your computer is not working correctly please check whether the computer sensor wire is plugged into the computer If you have checked the above and the computer is still not working then please make sure the Magnetic Switch is still working and that they are installed correctly in the computer Important Safety Advice DO NOT USE ANY EXERCISE PRODUCTS WITHOUT A P...

Page 16: ...ment and batteries is not handled correctly Electric and electronic equipment and batteries is marked with the crossed ou trash can symbol seen here This symbol signifies that electric and electronic equipment and batteries should not be disposed of with other household waste but should be disposed of separately As the end user it is important that you submit your used batteries to the appropriate...

Reviews: