background image


B. Play-Back Mode 

It is the mode either for Previewing photos and videos in the camera from the viewing screen or connecting 

to a TV with an attached cable. 


Preview key: 

While camera is ON and press PREVIEW key, Camera will be switched to Play-Back mode at once and show 

the last image. It is also a toggle button let you skip between Live View and Play-Back mode. During in Play-
Back mode, the DISPLAY key become  for skipping Full View an image > Clean screen > >Thumbnail 
pictures. 

You have two ways to enjoy the images /videos. 

1.View Image/ Video by Screen 

Since press Preview, screen will always show a full screen of the last shot. Use the left or right key to view 
other previous or next image. If you expect to view more pictures a time, press Display for a thumbnail 
screen. See more images by pressing Left / Right key. Then enlarge it by pressing Display again.  

2.View Image /Video with TV 

The unit is equipped with a TV-out port that allow you to connect to TV at home with an attached cable. 

Be sure the RCA end is plugged in the TV Video-In of your TV. To view pictures on TV set after camera 
is in Play-Back mode, just done a connection between camera and TV, all displays will be moved to TV 
screen. If you pull out the TV cable, the digital camera will switch to the internal viewing screen display 
automatically.  

NOTE: The last picture taken will be the first to appear and will include a display of the total number of 

pictures stored and the number of this picture. Example: 0024/0036 is the 24

th

 picture of a total of 36 

pictures. 


Digital Zoom      

Whenever in the live display mode or viewing a full size picture at Play-Back mode, press the UP key to 

Zoom In and the DOWN key to Zoom Out for a closer shoot or see more details when enjoying an image. 
 

Deleting Photos 

Press MENU key under the preview mode, then highlight deletion of Single or All photos from the Erase Title. 

Press MENU key to confirm deletion.    

 
Protect an Image or Video 

During viewing an image or video which you would like to retain in the memory without wash-out by delete 
processing, press MENU and highlight the PROTECT option once. Then an icon with small lock on the left top 

corner of this image to show it is protected. Repeat the same processing to unlock it. 
  All of protected items will not be deleted except you try to format 
 

Format 

  After proceed this function, every things in the card or internal flash memory will removed completely. Be 

careful when do it. 

  
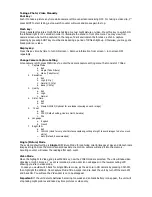
Change Camera Play-Back Setting 

When you are in Play-Back mode, press the MENU key to display the menu with 4 titles. 

1.


Erase Mode  

a.


Exit 

b.


One (Delete One photo) 

c.


All  (Delete All items except protected items) 

d.


Format(Delete Every things in disk) 

e.


Protect (Protect an image /video) 

2.


Date / Time 

a.


Exit 

b.


Set 

c.


Stamp ON/OFF (Same as Live View) 

3.


TV Out 

a.


Exit 

b.


NTSC (Same as Live View) 

c.


PAL  

4.


USB  

a.


Exit 

b.


MSDC (Default for frequency use to down pictures at any Window platform) 

c.


SIDC  (

Only for Win-XP to download depend on personal hobby)  

Summary of Contents for 10007194

Page 1: ...IR Wildkamera 4MP 10007194 ...

Page 2: ...nschluss zum Herunterladen der Bilder und Aktualisierung der Firmware Leistungsstarkes Infrarot Blitzlicht für klare monochrome Bilder und Videos bei Nacht bis zu 12m LCD Anzeige und Tasten zur leichteren Bedienung von Kamera und Bewegungssensor getrennt Pausierungseinstellung 0 1 3 5 10 20 30 60 90 Min Schnell Foto Modus ermöglicht bis zu 3 Bilder pro Erkennung Einzelne Symbole für Batterie des B...

Page 3: ...eite des Außengehäuses auf ON 3 Das System benötigt zur Initialisierung 20 Sek danach ist es bereit Einstellungen vorzunehmen Stellen Sie den Ein Ausschalter der Kamera auf ON 4 Stellen Sie Datum und Uhrzeit der Kamera ein und wählen Sie danach Bild oder Videomodus ein Siehe Einstellung von Datum und Uhrzeit Standbild Videomodus 5 Stellen Sie die anderen Parameter ein und verlassen Sie das Einstel...

Page 4: ...end zur Bestätigung OK DEL Filmlänge wählen Hier können Sie die Aufnahmedauer einstellen zur Wahl stehen 3 5 10 20 30 45 60 90 Sekunden Aufnahmedauer Die PAUSE Taste hat zwei Funktionen Drücken und halten Sie PAUSE für 3 Sek und ein blinkendes Videokamera Symbol erscheint und zeigt Ihnen das Sie die Filmlänge einstellen können Drücken Sie nun wiederholt PAUSE um die Filmlänge zu bestimmen Drücken ...

Page 5: ... bei jedem Tastendruck Turbo Auslöser Es befindet sich ein Schalter rechts neben der LCD Anzeige Drücken Sie diesen zum Aktivieren des Turbo Auslösers In diesem Modus ist der Auslöser doppelt so schnell wie im Stromsparmodus Es wird jedoch auch mehr Energie verbraucht Um die Lebensdauer der Batterie zu erhöhen wählen Sie den Modus BAT_SAVE Einstellungen für Kamera Bedienung Beschreibung der Kamera...

Page 6: ... Sie zum Auslösen SHOT Dieses funtkioniert bei eingeschalteter Kamera auch wenn die Anzeige aus ist Für Videoaufnahmen drücken Sie einmal SHOT zum Beginnen und noch einmal SHOT zum Beenden Blitz Diese Funktion unterstützt die Aufnahme von Foto oder Video bei Dunkelheit Drücken Sie diese Taste um das Fotolicht für 10 Sekunden einzuschalten Sie können So die Umgebung vor dem Fotografieren betrachten...

Page 7: ...en Drücken Sie DISPLAY um die Bilderübersicht aufzurufen wählen Sie mit links rechts eine Aufnahme und drpcken Sie erneut DISPLAY um diese aufzurufen 2 Bild Video über TV wiedergeben Das Gerät verfügt über einen TV Ausgang an den Sie mittels Cinch Kabel ein TV anschließen können Wechseln Sie zuerst in den Wiedergabemodus und verbinden dann das Gerät mit dem TV NOTIZ Das zuletzt aufgenommene Bild z...

Page 8: ...n Sie die Kamera zum ersten Mal an Ihren PC an wird neues USB Gerät erkannt und nach Treibern gesucht Es ist also notwendig zuerst die mitgelieferte CD ROM einzulegen und zu installieren Folgen Sie den Anweisungen Sollte das Setup nicht automatisch starten führen Sie die Datei SETUP aus und folgen den Anweisungen Bildbearbeitungssoftware installieren Es gibt eine Bild und eine Videobearbeitunssoft...

Page 9: ... zum Einschalten 2 Die Batterie ist zu schwach um die Kamera einzuschalten Ersetzen Sie die 4 Typ D Batterien Der Kamera Ein Ausschalter reagiert nicht Sie haben versucht die Kamera zu schnell nach dem Haupt Ein Ausschalter einzuschalten Warten Sie 10 Sekunden bis das Hintergrundlicht der Anzeige erlischt und versuchen es erneut Das Licht an der Vorderseite des Gehäuses bleibt eingeschaltet 1 Das ...

Page 10: ...sowie über etwa anfallende Kosten bei Abholung entnehmen Sie bitte den Informationen der jeweiligen Gemeinde Hinweise zur Batterieentsorgung Batterien dürfen nicht in den Hausmüll gegeben werden Als Endverbraucher sind Sie zur Rückgabe gebrauchter Batterien gesetzlich verpflichtet Sie können Batterien nach Gebrauch in der Verkaufsstelle oder deren unmittelbarer Nähe z B in kommunalen Sammelstellen...

Page 11: ...AL TV USB port for downloading images to computer and firmware upgrade Powerful Infra Red flash to take monochrome clear picture and video at night within 40 feet Separated LCD screens and keys to simplify setting for camera and motion sensor controls Pause setting option 0 1 3 5 10 20 30 60 90 minutes Quick Shot mode allow for more detections up to 3 pictures Separate Icons for Battery of Motion ...

Page 12: ...e device storage media Since a CF card is used all pictures will be saved in it automatically without a further setting Regarding a CF card usage skip to view a description in the paragraph below for Using a CF Card 2 Push the main power switch which is allocated in the bottom of out side cabinet to ON 3 After 20s since PW is ON system will finish initialization and ready for setup Press CAM PW to...

Page 13: ...or more instant shots You can choose 1 3 images in order to take a group animals passing by 1 is the default that only one picture to be taken and then goes to PAUSE time 2 or 3 will re arm the sensor for taking the second and third picture if more animals are following Example of use On a trail when you want a picture of what is following the first young deer Like a smart buck it always walk at t...

Page 14: ...lk Test mode Then Walk Test Light will goes off and will alert with 3 times flash once you will be detected in front of the device Now you try to go far away to check how long the PIR motion sensor will still see you The camera does not take any picture during this test process Note The system will resume to normal ON DUTY mode automatically after 3 minutes Time Out since the last triggered detect...

Page 15: ... Select a title that you wish to change by pressing the left or right navigator key Highlight your choice from a list of the displaying title by the Up or Down Key Press the MENU to accept the change and exit Camera Operating Menu Titles There are two main menus for two modes A Live View Mode B Play Back Mode Date and time Setting Before you would place this unit in the field you are recommended t...

Page 16: ...ime a Exit b Set c Stamp ON OFF Optional for a calendar showing on each image 5 TV out a Exit b NTSC Default setting Used in North America c PAL 6 Language a English b French 7 Bright ISO a Exit b ISO 100 Used for very short distance capturing setting at night to avoid images to be too much white c Auto Default Recommended Single Picture Mode The system default setting is Single Still Picture Mode...

Page 17: ...lude a display of the total number of pictures stored and the number of this picture Example 0024 0036 is the 24th picture of a total of 36 pictures Digital Zoom Whenever in the live display mode or viewing a full size picture at Play Back mode press the UP key to Zoom In and the DOWN key to Zoom Out for a closer shoot or see more details when enjoying an image Deleting Photos Press MENU key under...

Page 18: ...e has been connected and try to looking for a driver So that it is required to run the attached CD Rom before connecting the camera to PC Follow the instructions to complete the driver and software installation Since the CD Rom is inserted an auto run will show a pop up installation menu If your computer does not run the setup program automatically please run SETUP file under root directory of the...

Page 19: ... the zone 4 Make sure that the unit is mounted on a steady tree or other place that does not wobble The Camera In Use light is remaining ON but the camera does not respond 1 The camera may be time out and shut down automatically Repeat to press the CAM PW to resume the camera ON 2 Battery may be too low that could not support the camera staying ON Replace with 4pcs D type brand new batteries The C...

Reviews: