background image

19

4. USER INTERFACE AND CONTROLS

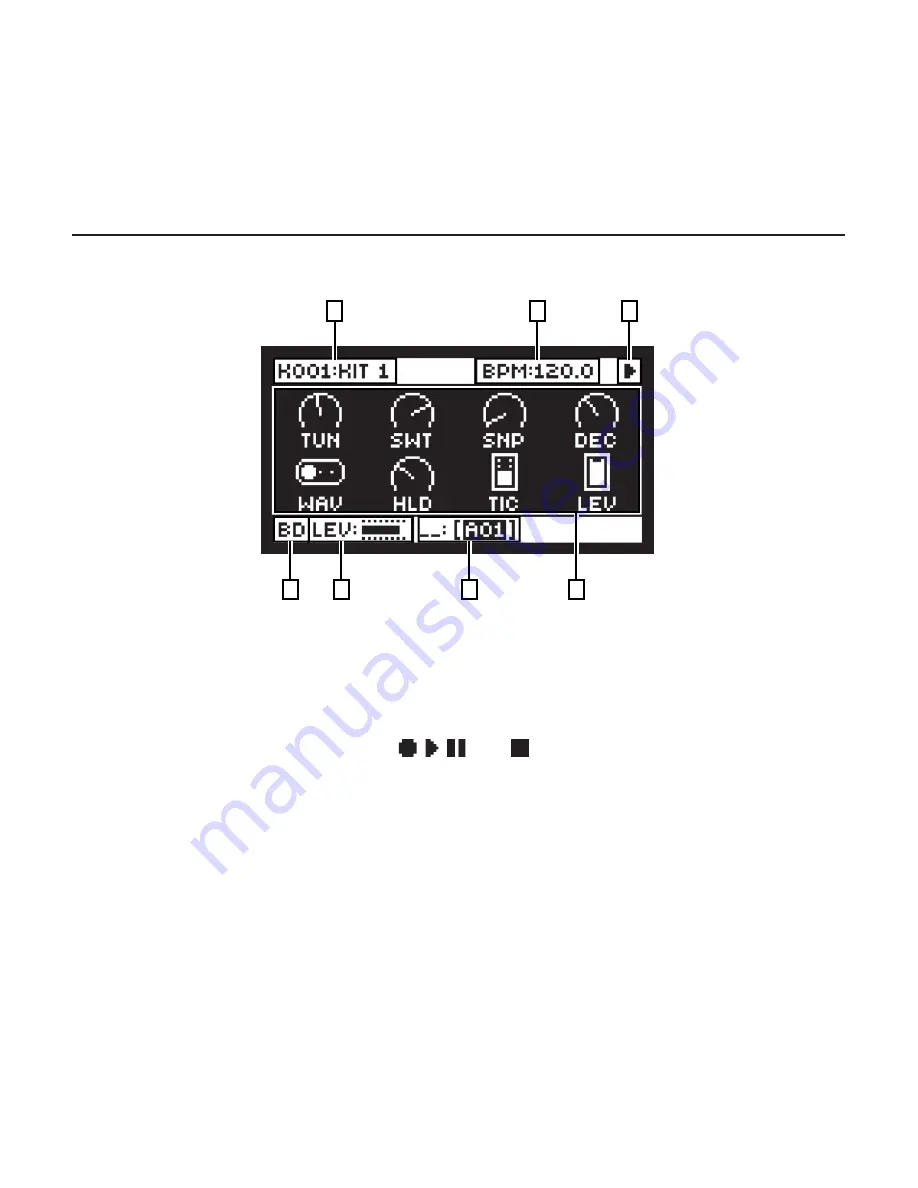
The screen is the center of Analog Rytm MKII editing. 

2

3

1

4

5

6

7

1.  The currently active kit. The you can see the full name of the parameter you adjust here 

when you turn a 

DATA ENTRY

 knob.

2.  The current tempo displayed with one decimal.
3.  The playback/recording status of the sequencer shown by the standard “record”, 

“play”, “pause” and “stop” symbols;  ,  ,  , and  . 

4.  Up to eight track parameters. They show what the 

DATA ENTRY

 knobs control and also 

indicate the current parameter values. Press and turn a knob to adjust its parameters in 
larger increments.

5.  The currently active pattern. To the left of this you can see the active song row. A “_ _:” 

indicates that the scratch pad row is active

6.  Bar that indicates the track level of the active track.
7.  Track name.

Summary of Contents for Analog Rytm MKII

Page 1: ...Analog Rytm MKII A different drum Quick Guide ...

Page 2: ......

Page 3: ... of its own The innovative combination of modern technology and tried and trusted ways of sound generation lets you create any kind of drum purely ana log sample based or a combination of the two For all its layers of complexity and depth it remains instantly accessible and we are sure you agree fun to play This Quick Guide guides you through the basic functions of this product For more detailed i...

Page 4: ...d used in accordance with the instructions may cause harmful interference to radio communications However there is no guarantee that interfer ence will not occur in a particular installation If this equipment does cause harmful interference to radio or television reception which can be determined by turning the equipment off and on the user is encouraged to try to correct the interference by one o...

Page 5: ...le for any special indirect or consequential damages or any damages whatsoever resulting from loss of use data or profits whether in an action of contract negligence or other action arising out of or in connection with the use or performance of this information European Union regulation compliance statement This product has been tested to comply with the Low Voltage Directive 2014 35 EU and the El...

Page 6: ... manufacturer or the original box and padding 7 Do not install near any heat sources such as radiators heat registers stoves or any other equipment including amplifiers producing heat 8 Do not put a protective cover on the unit while the unit is powered on 9 This product by itself or in combination with amplifiers headphones or speakers is capable of producing sound levels that may cause permanent...

Page 7: ... and headphones before activating Test mode During calibration there will be loud and unpleasant sounds on the individual outs Disconnect these during calibration SAFETY INSTRUCTIONS FOR THE POWER ADAPTER ELEKTRON PSU 3b The adapter is not safety grounded and may only be used indoors To ensure good ventilation for the adapter do not place it in tight spaces To prevent risk of electric shock and fi...

Page 8: ...T THE TRACK TYPES 18 4 USER INTERFACE AND CONTROLS 19 4 1 SCREEN NAVIGATION 20 4 2 PARAMETER EDITING 20 4 3 PARAMETER VALUE JUMP 20 4 4 FUNC KEY PRESS COMBINATIONS 20 4 5 QUICK SCROLLING 20 4 6 COPY CLEAR AND PASTE 20 4 7 THE NAMING MENU 21 4 8 PADS 22 4 9 MACHINES 22 4 10 OVERBRIDGE 24 5 GETTING STARTED 24 5 1 SETTING UP AND STARTING 24 5 2 PLAYING THE FACTORY PRESETS 25 5 3 USING PERFORMANCE MOD...

Page 9: ...28 6 4 PATTERN RECORDING MODES 28 6 5 USING GRID RECORDING MODE 28 6 6 USING LIVE RECORDING MODE 28 6 7 PARAMETER LOCKS 29 6 8 PATTERN MODES 30 7 SAMPLING 30 7 1 SAMPLING FROM EXTERNAL SOURCES 30 7 2 ASSIGNING A SAMPLE TO A TRACK FROM THE DRIVE 32 8 TECHNICAL INFORMATION 33 9 CREDITS AND CONTACT INFORMATION 34 ...

Page 10: ...LEVEL MENU NAMES Written with uppercase letters For example the PROJECT menu PARAMETER NAMES MENU OPTIONS Written with uppercase bold letters for parameter names and certain menu options where you can make settings or perform actions For example CLOCK SEND PARAMETER SETTING ALTERNATIVES Written with uppercase letters For example OFF SCREEN MESSAGES Written with uppercase letters with quotation mar...

Page 11: ...rb Dist Comp LFO Sync B Sync A SD MT HT CY CB BT Main Volume A E F G H B C D Quick Perf Amount Track Level 1 BD 2 SD 3 RS 4 CP 5 BT 6 LT 7 MT 8 HT 9 CH 10 OH 11 CY 12 CB Save Reload Retrig Retrig µTime µTime 2 3 4 5 6 7 8 9 10 11 12 13 14 15 16 A B C D E F G H YES 1 2 10 26 14 28 3 4 5 6 8 7 9 13 12 11 15 18 19 20 16 17 24 25 22 23 21 27 29 30 31 32 33 34 35 36 1 MAIN VOLUME sets the volume for th...

Page 12: ...ing some parameter values In menus they are called UP DOWN LEFT and RIGHT 12 TRIG key controls the TRIG settings for the active track The secondary function opens the QUANTIZE menu 13 DATA ENTRY knobs A H Used for setting parameter values Press knob when turning to change values in larger increments 14 PARAMETER keys access the PARAMETER pages of the active track The five parameter page keys are f...

Page 13: ...The LED flashes on the pattern page that is currently playing 20 PAGE selects the active pattern page if the pattern is made of more than 16 steps The secondary function opens the SCALE menu 21 STOP stops playback The secondary function is a paste operation 22 PLAY starts the sequencer playback The secondary function is a clear operation 23 RECORD key Activates deactivates GRID RECORDING mode Keep...

Page 14: ...s are written in blue text on the panel 31 GLOBAL SETTINGS opens the GLOBAL SETTINGS menu The secondary func tion opens the SAVE PROJECT menu A long press opens the LOAD PROJECT menu 32 PLAY MODE activates the PLAY mode in which the pads are used to play the current sound loaded to every pad The secondary function opens the KIT menu 33 MUTE activates the MUTE mode The secondary function opens the ...

Page 15: ...vice 6 MIDI OUT SYNC A MIDI data output Can be configured to send DIN sync to legacy instruments Use a standard MIDI cable to connect to MIDI In of an external device 7 MIDI IN MIDI data input Use a standard MIDI cable to connect to MIDI Out of an external device 8 AUDIO IN L R Inputs for sampling or sound card use Use 1 4 mono phone plugs 9 TRACK OUT Individual drum voice outputs Use either 1 4 m...

Page 16: ...The Drive also contains the Drive Sound library capa ble of storing 4096 drum Sounds and the Sample bank All projects have access to these Sounds and samples 3 2 DATA STRUCTURE 3 2 1 PROJECT A project contains 128 patterns 128 kits 16 songs 4 global slots 127 sample slots and a project Sound pool consisting of up to 128 Sounds General settings and states are stored in the project When a project is...

Page 17: ...16 patterns are available for each of the 8 banks which means that 128 patterns are available for each project A pattern contains sequencer data like drum trigs trig mutes and parameter locks for the drum tracks and the FX track as well as default settings on the TRIG page and length swing and time signature settings 3 2 6 SONGS 16 songs are available for each project You use songs to sequence the...

Page 18: ...is track To select the FX track for editing press the FX key 3 3 3 EDITING THE TRACKS The five PARAMETER keys open parameter pages that you use to edit the tracks The SRC page of a drum track contains different parameters depending on the MA CHINE chosen for the analog percussion sound generator The other pages are identi cal for all drum tracks the SMPL page for the sample playback engine the FLT...

Page 19: ...ecording status of the sequencer shown by the standard record play pause and stop symbols and 4 Up to eight track parameters They show what the DATA ENTRY knobs control and also indicate the current parameter values Press and turn a knob to adjust its parameters in larger increments 5 The currently active pattern To the left of this you can see the active song row A _ _ indicates that the scratch ...

Page 20: ...hen you edit certain parameters then the parameter values jump to appropriate positions For example the oscillator tuning which will jump in octaves 4 4 FUNC KEY PRESS COMBINATIONS The standard way to use the FUNC key in combination with other keys is to press and hold FUNC and then make a short press on the second key in the combination 4 5 QUICK SCROLLING Scroll through menus using the TRACK LEV...

Page 21: ...O will erase letters POP UP MENU NAMING While in a NAMING menu it is possible to open a pop up menu displaying all available let ters symbols and digits Entering characters in the pop up menu is often a considerably faster naming method When a NAMING menu is open press the FUNC key to access the pop up menu While keeping FUNC pressed use the ARROW keys to navigate to the character you want to inse...

Page 22: ... BT 5 BD 1 SD 2 RS 3 CP 4 LT 6 MT 7 HT 8 Use the PADS to play the track Sounds of the active kit Eight individual track Sounds can be voiced simultaneously with the eight physical voices of the Analog Rytm MKII The BD SD BT and LT are independent tracks with their separate voices The track pairs RS CP MT HT CH OH and CY CB share one voice for each pair and are shown with a coupling on the front pa...

Page 23: ...rum track Press YES to confirm your selection All MACHINES cannot be accessed from all tracks since the tracks control different physi cal sound generators The illustration above shows the tracks that can make use of a specific type of percussion sound generator within the boundaries of the same gray shaded box These are the twelve tracks and their default MACHINES TRACK PAD MACHINES 1 BD Bass Dru...

Page 24: ...ftware suite enables a tight integration between the Analog Rytm MKII and a computer DAW When using Overbridge the user interface for the Analog Rytm MKII will present itself as a clearly laid out plug in window in your DAW Access edit and automate parameters for sound shaping on screen Always find your device preset parameters in the same state as you left them when you return to your DAW project...

Page 25: ...I 2 Press PLAY to listen to pattern A01 3 Press BANK A TRIG 2 to select pattern A02 which is the second demo pat tern Pattern A02 starts to play when pattern A01 reaches it end Press BANK A TRIG 3 to select pattern A03 and so on 4 Press MUTE the PAD of the drum track you want to mute Unmute by repeating the procedure 5 Press STOP to stop playback 5 3 USING PERFORMANCE MODE The PERFORMANCE mode ena...

Page 26: ...bottom to top Twelve successive pads make one octave The range spans four octaves middle one up and two down The middle octave has sky blue color PADS the two below are of violet and dark blue color in that order and the one above is yellow 1 Select the drum track to play chromatically by pressing TRK one of the PADS 2 Press the CHRO key to enter CHROMATIC mode 3 Play the PADS The active track Sou...

Page 27: ... BANK A H and then TRIG 1 16 to select bank and pattern Patterns containing data are indicated by half bright red TRIG keys The currently active pattern is indicated by a full bright red TRIG key 6 2 PATTERN CONTROL Press PLAY to start the playback of a pattern Press STOP to stop the playback of all tracks The sound will be cut off but effects like Delay will continue to be audible until the delay...

Page 28: ...d trigs in the pattern grid 1 Press RECORD to enter GRID RECORDING mode The RECORD key lights up red to indicate that GRID RECORDING mode is active 2 Press TRK one of the PADS to select the track to which you want to add trigs 3 Press the TRIG keys 1 16 in the sequence desired to place note trigs on the se quencer In CHROMATIC mode you can press TRIG PADS to add pitch value to the note trig 4 To a...

Page 29: ...s unique parameter values All note trigs of a track could for example have different tune or volume settings Parameter locks can be applied to both note trigs and lock trigs In GRID RECORDING mode press and hold the TRIG key of a note trig or a lock trig and then adjust the parameters you want to lock using the DATA ENTRY knobs to apply pa rameter locks The graphics on the screen becomes inverted ...

Page 30: ...ginning DIRECT JUMP will immediately change patterns The new pattern will start playing from the position where the previous pattern left off TEMP JUMP will immediately change patterns The new pattern will start playing from the position where the previous pattern left off It will play the new pattern once and then revert to the pattern that was playing before the change 7 SAMPLING Analog Rytm MKI...

Page 31: ... of the audio source when it is not playing 5 Press YES to arm the sampling and then play the sound source When the input audio exceeds the set THRESHOLD level sampling will start 6 Press YES when you want to stop the sampling 7 Use the DATA ENTRY knobs A and C to set the parameters TRIM START and TRIM END to trim the sample to the desired length You can use the DATA ENTRY knobs B and D to zoom in...

Page 32: ...e to the sample you want to assign and then press YES to select the sample 3 Press RIGHT and then select LOAD TO PROJ and press YES to load the sample to the project 4 Press YES to confirm 5 Press SETTINGS to exit SETTINGS menu 6 Press TRK PADS to select the track to where you want to assign the sample 7 Press SMPL to access the SAMPLE parameter page and then use DATA ENTRY knob D to select the sa...

Page 33: ... 105 dBFS 20 20 000 Hz Unit power consumption 16 W typical 22 W maximum Recommended power supply PSU 3b or similar 12 V DC 2 A HARDWARE 128 64 pixel OLED screen MIDI In Out Thru with DIN Sync out 2 x 1 4 impedance balanced audio out jacks 1 x 1 4 stereo headphone jack 8 x 1 4 impedance balanced individual track output jacks 2 1 4 balanced audio in jacks 2 1 4 ext in jacks 2 1 4 CV Expression input...

Page 34: ...rk Christer Lindström Jimmy Myhrman Jon Mårtensson Viktor Nilsson David Revelj Mattias Rickardsson Martin Sigby Daniel Troberg ADDITIONAL DESIGN Ufuk Demir Thomas Ekelund DOCUMENTATION Daniel Sterner Erik Ångman CONTACT INFORMATION ELEKTRON WEBSITE https www elektron se OFFICE ADDRESS Elektron Music Machines MAV AB Sockerbruket 9 SE 414 51 Gothenburg Sweden TELEPHONE 46 0 31 743 744 0 ...

Page 35: ...35 ...

Page 36: ...8261ENG A ...

Reviews: