background image

from the mains at all poles. The isolation device

must have a contact opening width of minimum

3 mm.

GAS CONNECTION

CAUTION! When using a gas cylinder,

always keep it on a flat horizontal

surface (with the gas valve on top).

• All gas connections must be made by a qualified

person.

• Before installation, make sure that the local

distribution conditions (nature of the gas and

gas pressure) and the adjustment of the

appliance are compatible.

• Make sure that there is air circulation around the

appliance.

• The information about the gas supply is on the

rating plate.

• This appliance is not connected to a device,

which evacuates the products of combustion.

Make sure to connect the appliance according

to current installation regulations. Follow the

requirements for adequate ventilation.

USE

WARNING! Risk of injury, burns and

electric shock.

CAUTION! The use of a gas cooking

appliance results in the production of

heat, moisture and products of

combustion in the room in which it is

installed. Ensure that the kitchen is

well ventilated especially when the

appliance is in use.

Prolonged intensive use of the

appliance may require additional

ventilation, for example the increasing

of mechanical ventilation where

present, additional ventilation to safely

remove the products of combustion to

outside (external) air whilst also

providing room air changes with

additional ventilation. Consult a

qualified person before installation of

the additional ventilation.

• Do not change the specification of this

appliance.

• Remove all the packaging, labelling and

protective film (if applicable) before first use.

• Make sure that the ventilation openings are not

blocked.

• Do not let the appliance stay unattended during

operation.

• Set the cooking zone to “off” after each use.

• Do not put cutlery or saucepan lids on the

cooking zones. They can become hot.

• Do not operate the appliance with wet hands or

when it has contact with water.

• Do not use the appliance as a work surface or

as a storage surface.

• When you place food into hot oil, it may splash.

WARNING! Risk of fire and explosion

• Fats and oil when heated can release flammable

vapours. Keep flames or heated objects away

from fats and oils when you cook with them.

• The vapours that very hot oil releases can cause

spontaneous combustion.

• Used oil, that can contain food remnants, can

cause fire at a lower temperature than oil used

for the first time.

• Do not put flammable products or items that are

wet with flammable products in, near or on the

appliance.

WARNING! Risk of damage to the

appliance.

• Do not keep hot cookware on the control panel.

• Do not let cookware boil dry.

• Be careful not to let objects or cookware fall on

the appliance. The surface can be damaged.

• Never leave a burner on with empty cookware or

without cookware.

• Do not put aluminium foil on the appliance.

• Use only stable cookware with the correct

shape and diameter larger than the dimensions

of the burners.

• Make sure cookware is centrally positioned on

the burners.

• Do not use large cookware that overlap the

edges of the appliance. This can cause damage

to the worktop surface.

• Make sure the flame does not go out when you

quickly turn the knob from the maximum to the

minimum position.

• Use only the accessories supplied with the

appliance.

• Do not install a flame diffuser on the burner.

• Do not let acid liquids, for example vinegar,

lemon juice or limescale remover, touch the hob.

This can cause matt patches.

• Discoloration of the enamel or stainless steel

has no effect on the performance of the

appliance.

5

Summary of Contents for ZGNN752X

Page 1: ...GETTING STARTED EASY User Manual ZGNN752X ZGNN755X EN User Manual Hob GB ...

Page 2: ...ervision or instruction concerning the use of the appliance in a safe way and understand the hazards involved Children of less than 8 years of age and persons with very extensive and complex disabilities shall be kept away from the appliance unless continuously supervised Children should be supervised to ensure that they do not play with the appliance Keep all packaging away from children and disp...

Page 3: ...ger of fire Do not store items on the cooking surfaces Metallic objects such as knives forks spoons and lids should not be placed on the hob surface since they can get hot Do not use the appliance before installing it in the built in structure Do not use a steam cleaner to clean the appliance If the supply cord is damaged it must be replaced by the manufacturer an authorized Service or similarly q...

Page 4: ...be accessible after installation ELECTRICAL CONNECTION WARNING Risk of fire and electric shock All electrical connections should be made by a qualified electrician The appliance must be earthed Before carrying out any operation make sure that the appliance is disconnected from the power supply Make sure that the parameters on the rating plate are compatible with the electrical ratings of the mains...

Page 5: ... let the appliance stay unattended during operation Set the cooking zone to off after each use Do not put cutlery or saucepan lids on the cooking zones They can become hot Do not operate the appliance with wet hands or when it has contact with water Do not use the appliance as a work surface or as a storage surface When you place food into hot oil it may splash WARNING Risk of fire and explosion F...

Page 6: ...B S 6172 B S 5440 Par 2 and B S 6891 Current Editions The hob should not be installed in a bed sitting room with a volume of less than 20 m If it is installed in a room of volume less than 5 m an air vent of effective area of 100 cm is required If it is installed in a room of volume between 5 m and 10 m an air vent of effective area of 50 cm is required while if the volume exceeds 11 m no air vent...

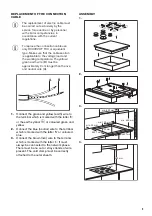
Page 7: ... connection by using metal rigid pipes copper with mechanical end INJECTORS REPLACEMENT 1 Remove the pan supports 2 Remove the caps and crowns of the burner 3 With a socket spanner 7 remove the injectors and replace them with the ones which are necessary for the type of gas you use see table in Technical Data chapter 4 Assemble the parts follow the same procedure backwards 5 Attach the label with ...

Page 8: ...on the roll of the National Inspection Council for Electrical Installation Contracting NICEIC The manufacturer refuses to be held responsible if these safety measures are not abided by Supply connections This hob has to be connected to 220 240 V 50 60 Hz electricity supply The hob has a terminal block which is marked as follows L Live terminal N Neutral terminal or E Earth terminal Before carrying...

Page 9: ... 2 cm longer than the live and neutral wire A A B 1 Connect the green and yellow earth wire to the terminal which is marked with the letter E or the earth symbol or coloured green and yellow 2 Connect the blue neutral wire to the terminal which is marked with the letter N or coloured blue 3 Connect the brown live wire to the terminal which is marked with the letter L It must always be connected to...

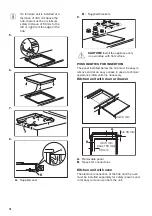
Page 10: ...h flat surface POSSIBILITIES FOR INSERTION The panel installed below the hob must be easy to remove and let an easy access in case a technical assistance intervention is necessary Kitchen unit with door or drawer min 6 mm min 30 mm 60 mm min 5 mm max 150 mm A B A Removable panel B Space for connections Kitchen unit with oven The electrical connection of the hob and the oven must be installed separ...

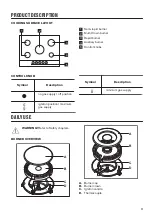
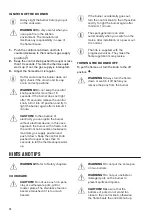
Page 11: ...r 4 Auxiliary burner 5 Control knobs CONTROL KNOB Symbol Description no gas supply off position ignition position maximum gas supply Symbol Description minimum gas supply DAILY USE WARNING Refer to Safety chapters BURNER OVERVIEW A B D C C D A B A Burner cap B Burner crown C Ignition candle D Thermocouple 11 ...

Page 12: ...ntrol knob counter clockwise to maximum gas supply position and push it down Keep the control knob pushed for equal or less than 10 seconds to let the thermocouple warm up If the burner accidentally goes out turn the control knob to the off position and try to light the burner again after minimum 1 minute The spark generator can start automatically when you switch on the mains after installation o...

Page 13: ...amount of mild detergent for a few minutes before cleaning Use cleaning products designed specifically for cleaning stainless steel in order to protect the steel surfaces Do not use cleaning products containing corrosive chemicals such as chlorides do not clean the surface with disinfectants stain or rust removers and immersion cleaners PAN SUPPORTS The pan supports are not resistant to washing in...

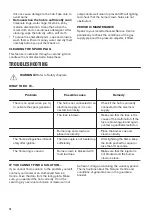
Page 14: ...e spark generator The hob is not connected to an electrical supply or it is con nected incorrectly Check if the hob is correctly connected to the electrical supply The fuse is blown Make sure that the fuse is the cause of the malfunction If the fuse is blown again and again contact a qualified electrician Burner cap and crown are placed incorrectly Place the burner cap and crown correctly The flam...

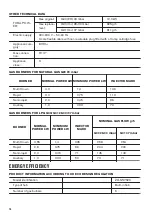
Page 15: ...O 03 IT MADE IN ITALY TYPE IP20 0049 A B C A Stick it on Guarantee Card and send this part if applicable B Stick it on Guarantee Card and keep this part if applicable C Stick it on instruction booklet TECHNICAL DATA HOB DIMENSIONS Width 744 mm Depth 510 mm BYPASS DIAMETERS BURNER Ø BYPASS 1 100 mm Multi Crown 57 Rapid 42 Semi rapid 32 Auxiliary 28 15 ...

Page 16: ...URNER NORMAL POWER kW MINIMUM POWER kW INJECTOR MARK Multi Crown 4 0 1 4 146 Rapid 3 0 0 75 119 Semi rapid 2 0 0 45 96 Auxiliary 1 0 0 33 70 GAS BURNERS FOR LPG G30 G31 28 30 37 mbar BURNER NORMAL POWER kW MINIMUM POWER kW INJECTOR MARK NOMINAL GAS FLOW g h G30 28 30 mbar G31 37 mbar Multi Crown 3 55 1 4 095 258 254 Rapid 2 8 0 75 86 204 200 Semi rapid 2 0 0 45 71 145 143 Auxiliary 1 0 0 33 50 73 ...

Page 17: ...make sure that the burners and pan supports are assembled correctly Use cookware with diameters applicable to the size of burners Center the pot on the burner When you heat up water use only the amount you need If it is possible always put the lids on the cookware When the liquid starts to boil turn down the flame to barely simmer the liquid If it is possible use a pressure cooker Refer to its use...

Page 18: ......

Page 19: ......

Page 20: ...WWW ZANUSSI COM SHOP 867356517 F 502021 ...

Reviews: