background image

If the supply cord is damaged, it must be replaced by

the manufacturer, its Authorised Service Centre or

similarly qualified persons in order to avoid a hazard.

Before maintenance, deactivate the appliance and

disconnect the mains plug from the mains socket.

Do not use water spray and steam to clean the

appliance.

Clean the appliance with a moist soft cloth. Only use

neutral detergents. Do not use abrasive products,

abrasive cleaning pads, solvents or metal objects.

2. SAFETY INSTRUCTIONS

2.1 Installation

• Remove all the packaging and the

transit bolts.

• Keep the transit bolts. When you

move the appliance again you must

block the drum.

• Always be careful when you move the

appliance because it is heavy. Always

wear safety gloves.

• Do not install or use a damaged

appliance.

• Obey the installation instruction

supplied with the appliance.

• Do not install or use the appliance

where the temperature is less than 0

°C or where it is exposed to the

weather.

• Make sure that the floor where you

install the appliance is flat, stable,

heat resistant and clean.

• Make sure that there is air circulation

between the appliance and the floor.

• Adjust the feet to have the necessary

space between the appliance and the

carpet.

• Do not install the appliance where the

appliance door can not be fully

opened.

2.2 Electrical connection

• The appliance must be earthed.

• Always use a correctly installed

shockproof socket.

• Make sure that the electrical

information on the rating plate agrees

with the power supply. If not, contact

an electrician.

• Do not use multi-plug adapters and

extension cables.

• Make sure not to cause damage to

the mains plug and to the mains

cable. Should the mains cable need to

be replaced, this must be carried out

by our Authorised Service Centre.

• Connect the mains plug to the mains

socket only at the end of the

installation. Make sure that there is

access to the mains plug after the

installation.

• Do not touch the mains cable or the

mains plug with wet hands.

• Do not pull the mains cable to

disconnect the appliance. Always pull

the mains plug.

• Only for UK and Ireland: The

appliance has a 13 amp mains plug. If

it is necessary to change the fuse in

the mains plug, use a 13 amp ASTA

(BS 1362) fuse.

• This appliance complies with the

E.E.C. Directives.

2.3 Water connection

• Make sure not to cause damage to

the water hoses.

• Before you connect the appliance to

new pipes or pipes not used for a long

time, let the water flow until it is clean.

• The first time you use the appliance,

make sure that there is no leakage.

www.electrolux.com

4

Summary of Contents for UFW58K9162

Page 1: ...UFW58K9162 EN Washing Machine User Manual ...

Page 2: ...never you use it you can be safe in the knowledge that you ll get great results every time Welcome to Electrolux Visit our website for Get usage advice brochures trouble shooter service information www electrolux com Register your product for better service www registerelectrolux com Buy Accessories Consumables and Original spare parts for your appliance www electrolux com shop CUSTOMER CARE AND S...

Page 3: ... involved Do not let children play with the appliance Children of less than 3 years should be kept away unless continuously supervised Keep all packaging away from children Keep all detergents away from children Keep children and pets away from the appliance door when it is open Cleaning and user maintenance shall not be made by children without supervision 1 2 General Safety Do not change the spe...

Page 4: ... space between the appliance and the carpet Do not install the appliance where the appliance door can not be fully opened 2 2 Electrical connection The appliance must be earthed Always use a correctly installed shockproof socket Make sure that the electrical information on the rating plate agrees with the power supply If not contact an electrician Do not use multi plug adapters and extension cable...

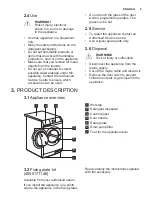
Page 5: ...rates The glass can be hot 2 5 Service To repair the appliance contact an Authorised Service Centre Use original spare parts only 2 6 Disposal WARNING Risk of injury or suffocation Disconnect the appliance from the mains supply Cut off the mains cable and discard it Remove the door catch to prevent children and pets to get closed in the appliance 3 PRODUCT DESCRIPTION 3 1 Appliance overview 1 2 3 ...

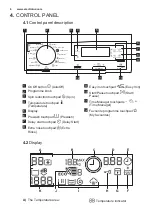
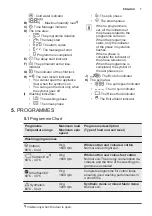
Page 6: ... 10 12 11 8 7 9 6 1 2 1 On Off button AutoOff 2 Programme knob 3 Spin reduction touchpad Spin 4 Temperature touchpad Temperature 5 Display 6 Prewash touchpad Prewash 7 Delay start touchpad Delay Start 8 Extra rinse touchpad Extra Rinse 9 Easy iron touchpad Easy Iron 10 Start Pause touchpad Start Pause 11 Time Manager touchpads Time Manager 12 Favourite programme touchpad My favourites 4 2 Display ...

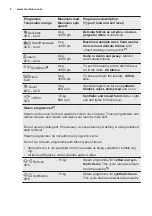
Page 7: ...ator of the phase remains on When the programme is completed the symbol of the last phase is on J The Eco Info indicator K The spin area The spin speed indicator The no spin indicator The Rinse Hold indicator The Extra Silent indicator 5 PROGRAMMES 5 1 Programme Chart Programme Temperature range Maximum load Maximum spin speed Programme description Type of load and soil level Washing programmes Co...

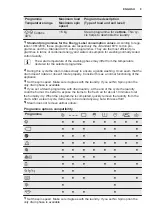
Page 8: ...blanket duvet bedspread and so on 14 Min 30 C 1 5 kg 800 rpm Synthetic and mixed fabric items Light soil and items to freshen up Steam programmes4 Steam can be used for dried washed or worn once laundry These programmes can reduce creases and odours and make your laundry more soft Do not use any detergent If necessary remove stains by washing or using localized stain removal Steam programmes do no...

Page 9: ...ring this cycle the drum rotates slowly to ensure a gentle washing It can seem that the drum doesn t rotate or doesn t rotate properly Consider this as a normal functioning of the appliance 3 Set the spin speed Make sure it agrees with the laundry If you set No Spin option the only drain phase is available 4 If you set a Steam programme with dried laundry at the end of the cycle the laundry could ...

Page 10: ...ramme start the display shows the duration programme for the maximum load capacity During the washing phase the programme duration is automatically cal culated and can be greatly reduced if the laundry load is lower than the maximum load capacity e g Cotton 60 C maximum load capacity 9 kg the programme duration exceeds 2 hours real load 1 kg the programme duration don t reach 1 hour When the appli...

Page 11: ...ator of the set speed Additional spin options No Spin Set this option to remove all spin phases Set it for very delicate fabrics The rinse phase uses more water for some washing programmes The display shows the indicator Rinse Hold Set this option to prevent the laundry creases The washing programme stops with the water in the drum The drum turns regularly to prevent the laundry creases The door s...

Page 12: ...display shows the default duration Press or to decrease or increase the programme duration The Time Manager is available only with the programmes in the table Indicator Cottons Eco 1 1 2 3 3 3 4 3 3 3 1 If available 2 Shortest to fresh the laundry 3 Programme default duration 4 Longest Increasing the programme du ration gradually decreases the energy con sumption The optimized heating phase saves ...

Page 13: ...event that the children play with the control panel To activate deactivate this option press Prewash and Easy Iron at the same time until the indicator comes on goes off You can activate this option After you press the options and the programme knob are locked Before you press the appliance cannot start 8 2 Permanent Extra Rinse With this option you can permanently have an extra rinse when you set...

Page 14: ...e is a risk of water leakage or damage to the laundry 10 2 Using detergent and additives 1 Measure out the detergent and the fabric conditioner 2 Carefully close the detergent drawer 10 3 Detergent compartments CAUTION Use only specified detergents for washing machine Always obey the instructions that you find on the packaging of the detergent products Detergent compartment for prewash phase Deter...

Page 15: ... appliance is activated 10 6 Setting a programme 1 Turn the programme knob and set the programme The related programme indicator comes on The indicator of the flashes The display shows the level of the Time Manager the programme duration and the indicators of the programme phases 2 If necessary change the temperature the spin speed the cycle duration or add available options When you activate an o...

Page 16: ...cking If the display shows an alarm message after the indicator has flashed for a few seconds it indicates that the door is not properly locked for more details see Troubleshooting chapter When the countdown is completed the programme starts automatically You can cancel or change the set of the delay start before you press the To cancel the delay start Press to set the appliance to pause Press unt...

Page 17: ...ut there is water in the drum The drum turns regularly to prevent the creases in the laundry The door lock indicator is on The door stays locked You must drain the water to open the door To drain the water 1 Press The appliance drains the water and spins 2 To make the appliance drain only set If necessary decrease the spin speed 3 When the programme is completed and the door lock indicator goes of...

Page 18: ...and additives specially made for washing machines powder detergents for all types of fabric powder detergents for delicate fabrics 40 C max and woollens liquid detergents preferably for low temperature wash programmes 60 C max for all types of fabric or special for woollens only Do not mix different types of detergents To help the environment do not use more than the correct quantity of detergent ...

Page 19: ...rticles To remove rust particles use only special products for washing machine Do this separately from the laundry wash Always obey the instructions that you find on the packaging of the product 12 3 Maintenance wash With the low temperature programmes it is possible that some detergent stays in the drum Make regularly a maintenance wash To do this Remove the laundry from the drum Set the cotton p...

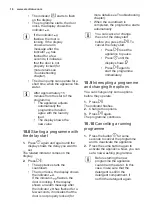
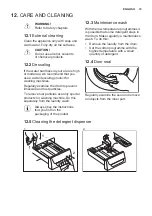
Page 20: ...3 4 12 6 Cleaning the drain filter Do not clean the drain filter if the water in the appliance is hot 1 1 2 2 2 1 1 3 4 1 2 www electrolux com 20 ...

Page 21: ...5 1 2 6 7 8 1 2 9 1 2 ENGLISH 21 ...

Page 22: ...e detergent dispenser 2 Start the programme to drain the water 12 9 Frost precautions If the appliance is installed in an area where the temperature can be less than 0 C remove the remaining water from the inlet hose and the drain pump 1 Disconnect the mains plug from the mains socket 2 Close the water tap 3 Put the two ends of the inlet hose in a container and let the water flow out of the hose 4...

Page 23: ...ame time until the indicator stops flashing see the picture below The mains supply is unstable Wait until the mains supply is stable No communication between electronic elements of the appliance Switch off and switch on again The anti flood device is on Disconnect the appliance and close the water tap Contact the Authorised Service Centre WARNING Deactivate the appliance before you do the checks 1...

Page 24: ...e sure that the drain hose has no kinks or bends Make sure that the drain filter is not clogged Clean the fil ter if necessary Refer to Care and cleaning Make sure that the connection of the drain hose is correct Set the drain programme if you set a programme without drain phase Set the drain programme if you set an option which ends with water in the tub The spin phase does not operate or the was...

Page 25: ...time This is a normal behaviour of the appliance The washing results are not satisfactory Increase the detergent quantity or use a different deter gent Use special products to remove the stubborn stains before you wash the laundry Make sure that you set the correct temperature Decrease the laundry load You cannot set an op tion Make sure that you press only the wanted button s After the check acti...

Page 26: ...850 mm 605 mm 639 mm Electrical connection Voltage Overall power Fuse Frequency 230 V 2200 W 10 A 50 Hz Level of protection against ingress of solid parti cles and moisture ensured by the protective cov er except where the low voltage equipment has no protection against moisture IPX4 Water supply pressure Minimum Maximum 0 5 bar 0 05 MPa 8 bar 0 8 MPa Water supply 1 Cold water Maximum Load Cotton ...

Page 27: ...your local recycling facility or contact your municipal office ENGLISH 27 ...

Page 28: ...www electrolux com shop 132903490 A 102015 ...

Reviews: