background image

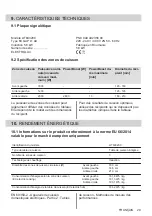
9. TECHNICAL DATA

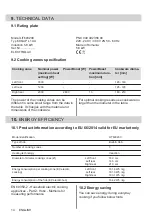
9.1 Rating plate

Model LIT60320C

PNC 949 492 356 00

Typ 60 GAP L1 AU

220 - 240 V / 400 V 2N 50 - 60 Hz

Induction 5.8 kW

Made in Romania

Ser.Nr. .................

5.8 kW

ELECTROLUX


9.2 Cooking zones specification

Cooking zone

Nominal power

(maximum heat

setting) [W]

PowerBoost [W] PowerBoost

maximum dura‐

tion [min]

Cookware diame‐

ter [mm]

Left front

1800

-

-

145 - 180

Left rear

1200

-

-

125 - 145

Right rear

2300

2800

10

180 - 210

The power of the cooking zones can be

different in some small range from the data in

the table. It changes with the material and

dimensions of the cookware.

For optimal cooking results use cookware no

larger than the diameter in the table.

10. ENERGY EFFICIENCY

10.1 Product information according to EU 66/2014 valid for EU market only

Model identification

LIT60320C

Type of hob

Built-In Hob

Number of cooking zones

3

Heating technology

Induction

Diameter of circular cooking zones (Ø)

Left front

Left rear

Right rear

18.0 cm

14.5 cm

21.0 cm

Energy consumption per cooking zone (EC electric

cooking)

Left front

Left rear

Right rear

181.6 Wh / kg

181.0 Wh / kg

190.1 Wh / kg

Energy consumption of the hob (EC electric hob)

184.2 Wh / kg

EN 60350-2 - Household electric cooking

appliances - Part 2: Hobs - Methods for

measuring performance

10.2 Energy saving

You can save energy during everyday

cooking if you follow below hints.

14

ENGLISH

Summary of Contents for LIT60320C

Page 1: ...LIT60320C User Manual Hob EN 2 Notice d utilisation Table de cuisson FR 16 electrolux com register ...

Page 2: ...ww electrolux com shop CUSTOMER CARE AND SERVICE Always use original spare parts When contacting our Authorised Service Centre ensure that you have the following data available Model PNC Serial Number The information can be found on the rating plate Warning Caution Safety information General information and tips Environmental information Subject to change without notice CONTENTS 1 SAFETY INFORMATI...

Page 3: ...ildren play with the appliance Keep all packaging away from children and dispose of it appropriately WARNING Keep children and pets away from the appliance when it operates or when it cools down Accessible parts become hot during use If the appliance has a child safety device it should be activated Children shall not carry out cleaning and user maintenance of the appliance without supervision 1 2 ...

Page 4: ...e Authorised Service Centre If the supply cord is damaged it must be replaced by the manufacturer an authorized Service or similarly qualified persons in order to avoid a hazard WARNING Use only hob guards designed by the manufacturer of the cooking appliance or indicated by the manufacturer of the appliance in the instructions for use as suitable or hob guards incorporated in the appliance The us...

Page 5: ...ce or hot cookware when you connect the appliance to the near sockets Do not use multi plug adapters and extension cables Make sure not to cause damage to the mains plug if applicable or to the mains cable Contact our Authorised Service Centre or an electrician to change a damaged mains cable The shock protection of live and insulated parts must be fastened in such a way that it cannot be removed ...

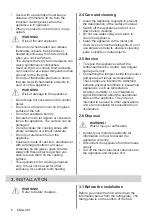
Page 6: ... purposes only It must not be used for other purposes for example room heating 2 4 Care and cleaning Clean the appliance regularly to prevent the deterioration of the surface material Switch off the appliance and let it cool down before cleaning Do not use water spray and steam to clean the appliance Clean the appliance with a moist soft cloth Use only neutral detergents Do not use abrasive produc...

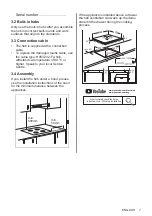
Page 7: ...ture of 90 C or higher Speak to your local Service Centre 3 4 Assembly If you install the hob under a hood please see the installation instructions of the hood for the minimum distance between the appliances min 50mm min 500mm If the appliance is installed above a drawer the hob ventilation can warm up the items stored in the drawer during the cooking process min 40 520 60 15 590 490 1 560 1 www y...

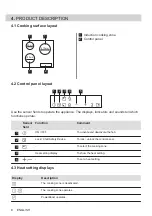
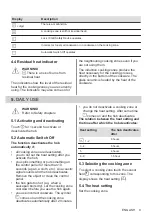
Page 8: ...dicators and sounds tell which functions operate Sensor field Function Comment 1 ON OFF To activate and deactivate the hob 2 Lock Child Safety Device To lock unlock the control panel 3 To select the cooking zone 4 Heat setting display To show the heat setting 5 To set a heat setting 4 3 Heat setting displays Display Description The cooking zone is deactivated The cooking zone operates PowerBoost o...

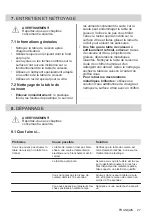
Page 9: ... function deactivates the hob automatically if all cooking zones are deactivated you do not set the heat setting after you activate the hob you spill something or put something on the control panel for more than 10 seconds a pan a cloth etc An acoustic signal sounds and the hob deactivates Remove the object or clean the control panel the hob gets too hot e g when a saucepan boils dry Let the cooki...

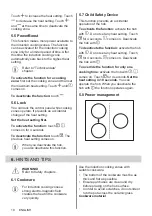
Page 10: ...the hob you also deactivate this function 5 7 Child Safety Device This function prevents an accidental operation of the hob To activate the function activate the hob with Do not set any heat setting Touch for 4 seconds comes on Deactivate the hob with To deactivate the function activate the hob with Do not set any heat setting Touch for 4 seconds comes on Deactivate the hob with To override the fu...

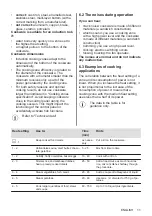
Page 11: ...ou use a cooking zone with a high power level and the cookware is made of different materials a sandwich construction humming you use a high power level clicking electric switching occurs hissing buzzing the fan operates The noises are normal and do not indicate any malfunction 6 3 Examples of cooking applications The correlation between the heat setting of a zone and its consumption of power is n...

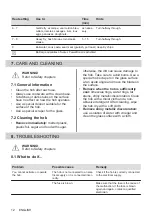
Page 12: ... food with sugar otherwise the dirt can cause damage to the hob Take care to avoid burns Use a special hob scraper on the glass surface at an acute angle and move the blade on the surface Remove when the hob is sufficiently cool limescale rings water rings fat stains shiny metallic discoloration Clean the hob with a moist cloth and a non abrasive detergent After cleaning wipe the hob dry with a so...

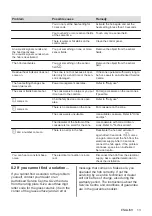
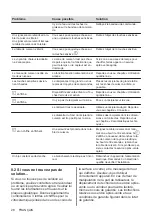
Page 13: ...Daily use comes on There is no cookware on the zone Put cookware on the zone The cookware is unsuitable Use suitable cookware Refer to Hints and tips The diameter of the bottom of the cookware is too small for the zone Use cookware with correct dimen sions Refer to Technical data and a number come on There is an error in the hob Deactivate the hob and activate it again after 30 seconds If comes on...

Page 14: ...For optimal cooking results use cookware no larger than the diameter in the table 10 ENERGY EFFICIENCY 10 1 Product information according to EU 66 2014 valid for EU market only Model identification LIT60320C Type of hob Built In Hob Number of cooking zones 3 Heating technology Induction Diameter of circular cooking zones Ø Left front Left rear Right rear 18 0 cm 14 5 cm 21 0 cm Energy consumption ...

Page 15: ...he cooking zone Use the residual heat to keep the food warm or to melt it 11 ENVIRONMENTAL CONCERNS Recycle materials with the symbol Put the packaging in relevant containers to recycle it Help protect the environment and human health by recycling waste of electrical and electronic appliances Do not dispose of appliances marked with the symbol with the household waste Return the product to your lo...

Page 16: ... À LA CLIENTÈLE Utilisez toujours des pièces de rechange d origine Avant de contacter notre centre de service agréé assurez vous de disposer des informations suivantes Modèle PNC Numéro de série Les informations se trouvent sur la plaque signalétique Avertissement Mise en garde Information de sécurité Informations générales et conseils Informations environnementales Sous réserve de modifications T...

Page 17: ... à l écart de l appareil à moins d être surveillés en permanence Ne laissez pas les enfants jouer avec l appareil Ne laissez pas les emballages à la portée des enfants et jetez les convenablement AVERTISSEMENT Tenez les enfants et les animaux éloignés de l appareil lorsqu il est en cours de fonctionnement ou lorsqu il refroidit Les parties accessibles deviennent chaudes en cours d utilisation Si l...

Page 18: ...r l appareil Après utilisation éteignez toujours la zone de cuisson à l aide de la manette de commande correspondante et ne vous fiez pas à la détection des récipients Si la surface vitrocéramique en verre est fissurée éteignez l appareil et débranchez le Si l appareil est branché à l alimentation secteur directement en utilisant une boîte de jonction retirez le fusible pour déconnecter l appareil...

Page 19: ... de 2 mm entre le plan de travail et l avant de l appareil qui est installé dessous La garantie ne couvre pas les dommages causés par l absence d un espace de ventilation adéquat 2 2 Branchement électrique AVERTISSEMENT Risque d incendie ou d électrocution Tous les raccordements électriques doivent être effectués par un électricien qualifié L appareil doit être relié à la terre Avant toute interve...

Page 20: ...rs doivent rester à une distance minimale de 30 cm des zones de cuisson à induction lorsque l appareil est en cours de fonctionnement Lorsque vous versez un aliment dans de l huile chaude elle peut éclabousser AVERTISSEMENT Risque d incendie et d explosion Les graisses et l huile chaudes peuvent dégager des vapeurs inflammables Tenez les flammes ou les objets chauds éloignés des graisses et de l h...

Page 21: ...RTISSEMENT Risque de blessure ou d asphyxie Contactez votre service municipal pour obtenir des informations sur la marche à suivre pour mettre l appareil au rebut Débranchez l appareil de l alimentation électrique Coupez le câble d alimentation au ras de l appareil et mettez le au rebut 3 INSTALLATION AVERTISSEMENT Reportez vous aux chapitres concernant la sécurité 3 1 Avant l installation Avant d...

Page 22: ...m aeg How to install your Electrolux Induction Hob Worktop installation 4 DESCRIPTION DE L APPAREIL 4 1 Description de la table de cuisson 180 mm 145 mm 210 mm 1 1 1 2 1 Zone de cuisson à induction 2 Bandeau de commande 4 2 Description du bandeau de commande 1 3 2 4 5 Les touches sensitives permettent de faire fonctionner l appareil Les affichages les voyants et les signaux sonores indiquent les f...

Page 23: ...urité enfant est activée Le récipient est inapproprié ou trop petit ou bien il n y a pas de récipient sur la zone de cuisson Arrêt automatique est activé 4 4 Indicateur de chaleur résiduelle AVERTISSEMENT Il y a risque de brûlures par la chaleur résiduelle Les voyants indiquent le niveau de chaleur résiduelle des zones de cuisson que vous utilisez actuellement Les voyants des zones voisines peuven...

Page 24: ...nez la zone de cuisson Appuyez sur pour augmenter le niveau de cuisson Appuyez sur pour diminuer le niveau de cuisson Appuyez simultanément sur et pour désactiver la zone de cuisson 5 5 PowerBoost Cette fonction vous permet d augmenter la puissance des zones de cuisson à induction La fonction peut être activée pour la zone de cuisson à induction uniquement pour une durée limitée Lorsque cette duré...

Page 25: ...s glisser et ne frottez pas le récipient sur la surface vitrocéramique Matériaux des récipients de cuisson corrects fonte acier acier émaillé acier inoxydable fond multicouche homologué par le fabricant incorrects aluminium cuivre laiton verre céramique porcelaine Les récipients de cuisson conviennent pour l induction si une petite quantité d eau contenue dans un récipient chauffe dans un bref lap...

Page 26: ...ments cuits au chaud au besoin Placez un couvercle sur le récipient 1 2 Sauce hollandaise faire fondre beur re chocolat gélatine 5 25 Mélangez de temps en temps 1 2 Solidifier omelettes œufs cocotte 10 40 Couvrez pendant la cuisson 2 3 Faire mijoter des plats à base de riz et de laitage réchauffer des plats cuisi nés 25 50 Ajoutez au moins deux fois plus d eau que de riz Remuez les plats à base de...

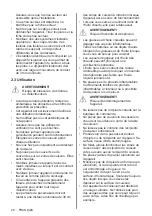
Page 27: ...ttoyez la table de cuisson à l aide d un chiffon humide et d un détergent non abrasif Après le nettoyage séchez la table de cuisson à l aide d un chiffon doux Pour retirer les décolorations métalliques brillantes utilisez une solution d eau additionnée de vinaigre et nettoyez la surface vitrée avec un chiffon 8 DÉPANNAGE AVERTISSEMENT Reportez vous aux chapitres concernant la sécurité 8 1 Que fair...

Page 28: ...lisez un récipient adapté Reportez vous au chapitre Conseils Le diamètre du fond du récipient de cuisson est trop petit pour la zone Utilisez des récipients dont les dimen sions sont correctes Reportez vous au chapitre Caractéristiques techni ques et un chiffre s affichent Une erreur s est produite dans la ta ble de cuisson Éteignez la table de cuisson et rallu mez la au bout de 30 secondes Si s a...

Page 29: ... optimaux utilisez des récipients qui ne dépassent pas les diamètres indiqués dans le tableau 10 RENDEMENT ÉNERGÉTIQUE 10 1 Informations sur le produit conformément à la norme EU 66 2014 valable pour le marché européen uniquement Identification du modèle LIT60320C Type de table de cuisson Table de cuisson intégrée Nombre de zones de cuisson 3 Technologie de chauffage Induction Diamètre des zones d...

Page 30: ...ones de cuisson Posez directement le récipient au centre de la zone de cuisson Vous pouvez utiliser la chaleur résiduelle pour conserver les aliments au chaud ou pour faire fondre 11 EN MATIÈRE DE PROTECTION DE L ENVIRONNEMENT Recyclez les matériaux portant le symbole Déposez les emballages dans les conteneurs prévus à cet effet Contribuez à la protection de l environnement et à votre sécurité rec...

Page 31: ...31 ...
Page 32: ...867358711 A 332020 electrolux com ...

Reviews: