background image

ENGLISH        

35

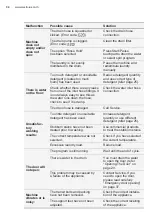
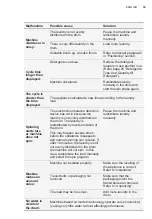
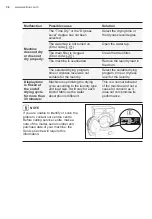
Malfunction

Possible cause

Solution

Detergent over dose.

Reduce the detergent 

quantity or use another one. 

(Refer page 25 “Detergents 

Type And Quantity Of 

Detergent”).

Machine unbalance.

Redistribute laundry 

manually in the drum and 

start the spin phase again. 

The laundry is not evenly 

distributed in the drum.

Pause the machine and 

redistribute laundry 

manually.

There is very little laundry in the 

drum.

Load more laundry.

Unstable floors eg. wooden floors.

Refer to relevant paragraph 

in “Positioning” section.

Machine 

vibrates or is 

noisy:

Cycle time 

longer than 

displayed:

The electronic unbalance detection 

device has cut in because the 

laundry is not evenly distributed in 

the drum. The laundry is 

redistributed by reverse rotation of 

the drum.  
This may happen several times 

before the unbalance disappears 

and normal spinning can resume. If, 

after 10 minutes, the laundry is still 

not evenly distributed in the drum, 

the machine will not spin. In this 

case, redistribute the load manually 

and select the spin program.

Pause the machine and 

redistribute laundry 

manually.

Machine not installed properly.

Make sure the levelling of 

the appliance is correct. 

Refer to “Installation”.

Transit bolts or packaging not 

removed.

Make sure that the 

packaging and/or the 

transit bolts are removed. 

Refer to “Unpacking”.

The load may be too small.

Add more laundry in the 

drum. 

Machines based on modern technology operate very economical-

ly using very little water without affecting performance.

Spinning 

starts late 

or machine 

does not 

spin:

Machine 

makes an 

unusual 

noise:

No water is 

visible in 

the drum:

The appliance calculated a new time according to the laundry 

load. 

The cycle is 

shorter than 

the time 

displayed.

Summary of Contents for EWW1024P5WB

Page 1: ...EWW9024P5WB EWW1024P5WB EN TH Washer Dryer เครื องซััก อบผ า User Manual คู มืือการใช งาน 2 44 ...

Page 2: ...be safe in the knowledge that you ll get great results every time Welcome to Electrolux We recommend the use of original spare parts When contacting Service ensure that you have the following data available The information can be found on the rating plate Model PNC Serial Number Get usage advice brochures trouble shooting service information buy accessories spare parts online product registration ...

Page 3: ... 27 13 TECHNICAL DATA 38 14 1 14 2 14 3 14 4 14 5 Unpacking Positioning Water Inlet Water Drainage Electrical Connection 14 INSTALLATION 15 1 15 2 15 3 Packaging Materials Old Machine Ecological Hints 44 44 44 15 ENVIRONMENT CONCERNS 7 1 7 2 Washing Program Dryness Level Option Washing Program Time Dry Option 7 DAILY USE WASHING DRYING Non Stop Program 22 23 6 DAILY USE DRYING Only 22 11 1 11 2 11...

Page 4: ...s important to ensure that all people using the appliance are thoroughly familiar with its operation and safety features Save these instructions and make sure that they remain with the appliance if it is moved or sold so that everyone using it through its life will be properly informed on appliance use and safety 1 bed and breakfast type environtments areas for communal use in blocks of flats or i...

Page 5: ...ve damage and must not be placed into the machine Only use manufacturer s recommended quantities of fabric softener and detergent Damage to the fabric or appliance can occur if you exceed the recommended amount Wash small items such as socks laces washable belts etc in a washing bag or pillow case as it is possible for such items to slip down between the tub and the inner drum Do not use your Wash...

Page 6: ...r the installation Any plumbing work required to install this appliance should be carried out by a qualified plumber Any electrical work required to install this appliance should be carried out by a qualified electrician Only wash fabrics which are designed to be machine washed Follow the instructions on each garment label Do not overload the appliance See the relevant section in the user manual B...

Page 7: ...ems can prevent heat from escaping and so create a fire hazard Items containing foam rubber also known as latex foam or similarly textured rubber like materials should not be dried in a washer dryer on a heat setting Fabric softeners or similar products should not be used in a washer dryer to eliminate the effects of static electricity unless this practice is specifically recommended by the manufa...

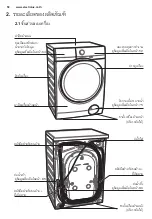
Page 8: ...binet Front Panel Door Drain Pump Filter see page 29 Level Adjustment Feet Front Level Adjustment Feet Back Water Inlet Hose see page 41 Transit Bolts Hose Support Transit Bolts Hose Support Mains Cable Water Drain Hose see page 41 2 1 Parts Worktop Control Panel see page 10 Transit Bolts ...

Page 9: ... Plastic Caps Plastic Hose Guide Stainless Steel Washing Drum Detergent Softener Dispenser For more informations see page 18 28 Door when open for more informations see page 18 Transit Bolt when remove Transit bolts must be removed before using the appliance Level Adjustment Feet Softener Prewash Main Wash Drain Pump Filter when open Drain Pump Filter Door Drain Pump Filter ...

Page 10: ...Icon I Program Time A I H G E F B D C Extra dry Cupboard dry Iron dry 2s 2s A C D B E N O F G H I J K L M A Program knob I Display B Mode Selection touchpad J Time Dry touchpad C On Off button K Dryness Level touchpad D Temp touchpad L Pause to add Clothes option E Spin touchpad M Start Pause touchpad F Hygienic Care touchpad N Favourite program save option G Prewash touchpad O Extra Rinse Option ...

Page 11: ...rum Energy Saver 40 C and 60 C2 White and colourfast cotton Set this program to have a good washing results and decrease the energy consumption The time of the washing program is extended Daily wear coloured cotton clothes such as shirts blouses towels and undergarments Ideal for low level of soil Cottons Mixed Daily 39 Quick 15 Tub Clean For cleaning the tub White and coloured cotton Synthetic or...

Page 12: ...lue The wool wash cycle of this machine has been approved by The Woolmark Company for the washing of wool garments labelled as hand wash provided that the garments are washed according to the instructions issued by the manufacturer of this machine Follow the garment care label for drying and other laundry instructions M1361 The Woolmark symbol is a Certification mark in many countries Wash Dry 1 M...

Page 13: ...perature 40 C to 90 C only 2 Do not select a spin speed LOWER than that proposed by the appliance to avoid a too long drying time so saving energy In any case the reduction of the spin speed is only possible after selecting drying 3 This program can select only Cupboard Dry option 3 3 Program Options Compatibility If a mode is not compatible with program selected the symbol will flash on display a...

Page 14: ... cycle Vapour function is more effective with half load NOTE When you set this function put the detergent into the compartment This function increases the program duration If you wish to add laundry in the machine during the delay time press Start Pause touchpad to put the machine in pause mode Add laundry close the door and press Start Pause touchpad again Delay Start Touchpad This option makes i...

Page 15: ...l show the selected option Level of dryness Type of fabric Load Extra Dry Ideal for towels or similar Suitable for items to put away without ironing Cotton and linen bathrobes bath towels etc up to Max 1 kg Cupboard Dry Suitable for ironing Iron Dry Cotton and linen bathrobes bath towels etc Synthetics and mixed fabrics jumpers blouses underwear household linen Cotton and linen sheets tablecloths ...

Page 16: ... dryer cycle occurs without heat cool down cycle This ensures the laundry will be left at a low temperature Child Safety Lock Option Your appliance is provided with CHILD SAFETY LOCK which permits you to leave the appliance unsupervised with the door closed without having to worry that children might be injured by or cause damage to the appliance Set this option after pressing the Start Pause touc...

Page 17: ...RST USE 4 Ensure that the electrical and water connections comply with the installation instructions Put 2 litres of water in the detergent compartment for washing phase This activates the drain system 1 2 3 Select a Cottons cycle at 90 C without any laundry in the machine to remove any manufacturing residue from the drum and tub then start the machine To restart the program from the point at whic...

Page 18: ... page 24 WASHING HINTS 5 Close the door 6 4 Make sure that no laundry remains between the seal and the door Detergent Dispenser Drawer 1 The detergent dispenser is divided into three compartments Please read Detergents Type and Quantity of Detergent on page 25 before use 5 2 Using Detergent And Additives Compartment PREWASH This compartment is only used for detergent when a Prewash option is selec...

Page 19: ...eners it is recommended to dilute with water If you want your laundry to be spun or use temperature different from the one proposed by the Washer Dryer press Spin and Temp touchpads repeatedly to change the spin speed and temperature Press the option touchpads if you want your laundry to be washed with special functions Different functions can be combined which is dependent on the program selected...

Page 20: ...t flashing 1 If available change the options that you wish 2 Press Start Pause again The program will continue 3 While a program or the Delay Start is operating the appliance door is locked and the display shows the indicator First set the machine to PAUSE by pressing the Start Pause touchpad Wait until the door lock indicator goes off then the door can be opened If the door lock indicator does no...

Page 21: ... The AUTO Off mode automatically deactivates the appliance to decrease the energy consumption when You do not press any buttons for 5 minutes before you press Start Pause Press the On Off button to activate the appliance again After 5 minutes from the end of the washing program Press the On Off button to reactivate the appliance Display will show the end of the last wash Press any touchpad again t...

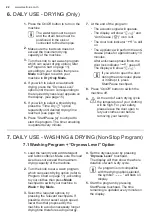
Page 22: ...to open the door during the anti crease phase or interrupt it press Start Pause touchpad The acoustic signal will operate At the end of the program 7 Press On Off button to switch the machine off 8 9 At the end of each drying cycle the temperature of your clothing will be high For your safety please leave the door open to let your clothes cool before removing your laundry If a program is not compa...

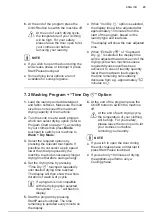
Page 23: ...e for some programs If you set only 10 minutes of drying the appliance performs only a Cooling phase When Iron Dry option is selected the display time will be adjusted after approximately 15 minutes from the start of the program based on the laundry type and load size The display will show the new adjusted time When Extra Dry or Cupboard Dry is selected the display time will be adjusted towards th...

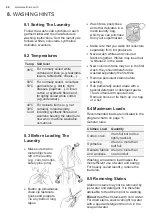
Page 24: ...tapes Remove persistent stains before washing Rub particularly soiled areas with a special detergent or detergent paste Treat curtains with special care Remove hooks or tie them up in a bag or a net Make sure that no metal objects are left in the laundry e g coin hair clips safety pins pins 8 3 Before Loading The Laundry Recommended loads are indicated in the program charts on page 11 Washing a ma...

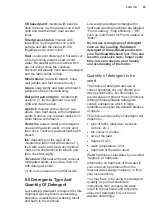
Page 25: ...rtificial silk Low sudsing detergent is required for this Washer Dryer to prevent oversudsing problems unsatisfactory washing result and harm to the machine 8 6 Detergents Type And Quantity Of Detergent Do not use wrong types of detergent such as Top Loading Handwash detergent or Soap Based products in your frontload Washer Dryer This can result in excessive suds longer cycle time low spin speeds ...

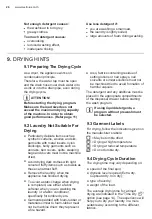
Page 26: ...compartments of the dispenser drawer before starting the wash program If using liquid detergents a program without prewash must be selected Particularly delicate items such as synthetic curtains woollen and silk garments with metal inserts nylon stockings bulky garments such as anoraks bed covers quilts sleeping bags and duvets must not be machine dried Avoid drying dark clothes with light coloure...

Page 27: ...ol pure alcohol and R 113 DO NOT dry clean Warm iron max 150 C Lukewarm iron max 110 C DO NOT iron Max wash temperature 60 C Max wash temperature 40 C Max wash temperature 30 C DO NOT wash at all Ironing Dry cleaning Drying Flat Tumble dry DO NOT tumble dry High temperature Low temperature On clothes hanger On the line Energetic wash Delicate wash If the laundry is still damp at the end of the dry...

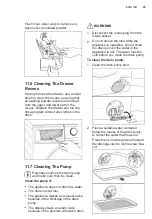
Page 28: ... open for a while This helps to prevent mould and stagnant smells forming inside the appliance Keeping the door open after a wash will also help to preserve the door seal 11 3 After Each Wash The washing powder and additive dispenser drawer should be cleaned regularly Remove the drawer by pressing the catch downwards and by pulling it out 11 5 Cleaning The Dispenser Drawer 11 4 Maintenance Wash Wi...

Page 29: ...ecause of the blockage of the drain pump The display shows an alarm code because of the problem with water drain Regularly examine the drain pump and make sure that it is clean Clean the pump if 1 Disconnect the mains plug from the mains socket WARNING 2 Do not remove the filter while the appliance is operating Do not clean the drain pump if the water in the appliance is hot The water must be cold...

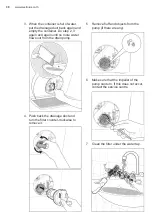
Page 30: ...and again until no more water flows out from the drain pump 5 Remove fluff and objects from the pump if there are any 6 Make sure that the impeller of the pump can turn If this does not occur contact the service centre 7 Clean the filter under the water tap 4 Push back the drainage duct and turn the filter counter clockwise to remove it ...

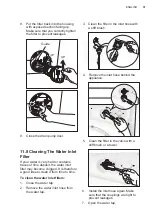
Page 31: ...f your water is very hard or contains traces of lime deposit the water inlet filter may become clogged It is therefore a good idea to clean it from time to time 11 8 Cleaning The Water Inlet Filter To clean the water inlet filters 1 Close the water tap 2 3 4 5 6 7 Open the water tap Remove the inlet hose behind the appliance Clean the filter in the valve with a stiff brush or a towel Install the i...

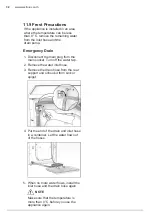
Page 32: ...the main plug from the main socket Turn off the water tap 1 2 Remove the water inlet hose 3 Remove the drain hose from the rear support and unhook it from sink or spigot Put the end of the drain and inlet hose in a container Let the water flow out of the hoses 4 5 When no more water flows install the inlet hose and the drain hose again Make sure that the temperature is more than 0 C before you use...

Page 33: ...ed Error code Close the door firmly The plug is not properly inserted into the power socket Insert the plug into the power socket There is no power at the socket Please check your domestic electrical installation The Start Pause touchpad has not been pressed Press the Start Pause touchpad The Delay Start has been selected If the laundry are to be washed immediately cancel the Delay Start The Main ...

Page 34: ...ead carefully Emergency door opening on page 37 Stubborn stains have not been treated prior to washing Use commercial products to treat the stubborn stains The correct temperature was not selected Check if you have selected the correct temperature Excessive laundry load Reduce load The drain hose is damaged Call Service There is water on the floor Unsatisfac tory washing results The door will not ...

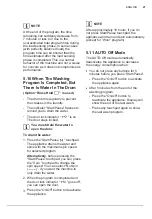
Page 35: ...m This may happen several times before the unbalance disappears and normal spinning can resume If after 10 minutes the laundry is still not evenly distributed in the drum the machine will not spin In this case redistribute the load manually and select the spin program Pause the machine and redistribute laundry manually Machine not installed properly Make sure the levelling of the appliance is corr...

Page 36: ... program time or dryness level for the laundry Machine does not dry or does not dry properly Machine is optimizing the drying cycle according to the laundry type and load size It will vary for each kind of fabric as the water absorption is different This is a normal behavior of the machine and not a cause for concern as it does not compromise its performance Display time is frozen at the end of dr...

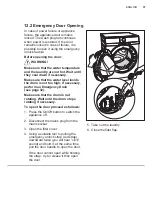
Page 37: ...otating Wait until the drum stops rotating if necessary Make sure that the water level inside the drum is not too high If necessary perform an Emergency Drain see page 32 To open the door proceed as follows 1 Press the On Off button to switch the appliance off 2 Disconnect the mains plug from the mains socket 3 Open the filter cover 4 Using a suitable tool to pulling the emergency unlock strap red...

Page 38: ...ed Maximum Minimum 1200 rpm 400 rpm Power supply Voltage Frequency Total power absorbed Water supply pressure Maximum Minimum 0 8 MPa 0 05 MPa Minimum fuse protection 10 A Max 1 4 kg 4 kg 3 kg 4 kg Max 1 Max 1 Max 1 2 kg 1 5 kg 5 5 kg Max 1 1 kg Washing Program Max 1 3 kg Max 1 Max 1 Max 1 1 kg 4 kg 1 kg Drying 1 Maximum capacity depended on the model of the Washer Dryer see defined on the control...

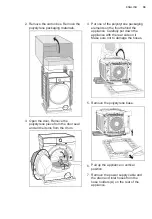
Page 39: ...ear side on it Make sure not to damage the hoses Pull up the appliance in vertical position Remove the carton box Remove the polystyrene packaging materials 2 Open the door Remove the polystyrene piece from the door seal and all the items from the drum 3 7 Remove the power supply cable and the drain and inlet hoses from the hose holders A on the rear of the appliance ...

Page 40: ...r Dryer is leveled It is important that your Washer Dryer stands firm and leveled on the floor to ensure correct operation The appliance must not be installed behind a lockable door a sliding door or a door with a hinge on the opposite side to avoid restricting the Washer Dryer door 8 9 Pull out the plastic spacers 10 Put the plastic caps in the holes X3 You can find these caps in the user manual ...

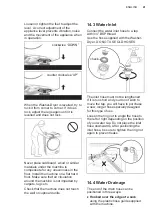
Page 41: ...not touch the wall or cupboard units Connect the water inlet hose to a tap with 3 4 BSP thread Use the hose supplied with the Washer Dryer DO NOT USE OLD HOSES 14 3 Water Inlet The inlet hose must not be lengthened If it is too short and you do not wish to move the tap you will have to purchase a new longer hose specially designed for this type of use Loosen the ring nut to angle the hose to the l...

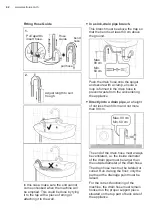
Page 42: ...nside diameter of the drain pipe must be larger than the outside diameter of the drain hose The drain hose must not be twisted or curled Run it along the floor only the part near the drainage point must be raised In this case make sure the end cannot come unhooked when the machine will be emptied This could be done by tying it to the tap with a piece of string or attaching it to the wall For the c...

Page 43: ...ased the product 15 1 Packaging Materials 15 3 Ecological Hints 15 2 Old Machine ENVIRONMENT CONCERNS 15 Normally soiled laundry may be washed without prewashing in order to save detergent water and time the environment is protected too The machine works more economically if it is fully loaded With adequate pre treatment stains and limited soiling can be removed the laundry can then be washed at a...

Page 44: ...ในคู มือฉบับนี เป นสิ งสำคัญที ควรปฏิบัติตามเพื อให เกิดประโยชน ต อสุขภาพ และความปลอดภัย การไม ปฏิบัติตามคำแนะนำและข อกำหนดอย างเคร งครัดอาจทำให บุคคลได รับบาดเจ บ เกิดความเสียหายต อทรัพย สินและส งผลกระทบต อการเรียกร องค าสินไหมทดแทนภายใต การรับประกัน สินค าจากอีเลคโทรลักซ ที มาพร อมกับผลิตภัณฑ ผลิตภัณฑ นี ต องได รับการติดตั งและการใช งานตามคำแนะนำ และข อกำหนดที ระบุไว ภายในคู มือฉบับบนี คุณอาจไม ...

Page 45: ...ารแกะบรรจุภัณฑ พื นที การติดตั ง การต อน ำเข า ระบบระบายน ำ การเชื อมต อทางไฟฟ า 14 การติดตั ง 15 1 15 2 15 3 วัสดุบรรจุภัณฑ เครื องเก า คำแนะนำด านระบบนิเวศน 88 88 88 15 ข อมูลเพื อการรักษาสิ งแวดล อม 7 1 7 2 โปรแกรมซัก ตัวเลือก Dryness Level ระดับการอบผ า โปรแกรมซัก ตัวเลือก Time Dry ตั งเวลาอบผ า 7 การใช งานประจำวัน การซักผ าและ อบผ า ซักและอบครบวงจร 68 69 6 การใช งานประจำวัน การอบผ า เพียงอย า...

Page 46: ... ชิด เด กเล กควรมีผู ดูแลในการใช งาน เพื อให แน ใจว าจะไม เล นกับเครื อง 1 2 ความปลอดภัยสำหรับเด ก เครื องซัก อบผ าต องไม ถูกติดตั งอุปกรณ ควบคุมการทำงานจาก ภายนอก เช น อุปกรณ กำหนดเวลา หรือถูกติดตั งวงจรควบคุมที แตกต างไปจากเดิมของเครื อง เพื อความปลอดภัยและการใช งานอย างถูกต อง ก อนติดตั งและใช งานเครื อง เป นครั งแรก ขอให อ านคู มือการใช งานเล มนี รวมถึงเคล ดวิธีการใช งานและ คำเตือนต างๆ อย างล...

Page 47: ...ี มีความแข งและคม อาจ ก อให เกิดความเสียหายต อเครื องและผ าได ควรคัดแยกออกก อนนำผ าเข าเครื อง ใช น ำยาปรับผ านุ มและผงซักฟอกในปริมาณ ที เหมาะสมเท านั น หากเติมน ำยามากเกินไป อาจทำให เกิดความเสียหายต อผ าหรือเครื อง ซักผ าได โปรดดูปริมาณที แนะนำของบริษัท ผู ผลิตได ที บรรจุภัณฑ ห ามใช เครื องซักผ าเพื อซักผ าที เสริมโครงลวด วัสดุที ไม เย บขอบหรือขาด ไม ควรซ อมเครื องด วยตนเอง การซ อมโดย ผู ที ไม มี...

Page 48: ...สะดวก ตรวจสอบให แน ใจเสมอว าไม มีน ำรั วไหลตาม ท อหรือจุดเชื อมต อต างๆ หลังการติดตั ง งานประปาที จำเป นในการติดตั งเครื องต องทำ โดยช างประปาที ผ านการอบรมแล ว งานไฟฟ าที จำเป นในการติดตั งเครื องต องทำ โดยช างไฟฟ าผู เชี ยวชาญเท านั น ซักแต ผ าที สามารถซักด วยเครื องได เท านั น โปรดปฏิบัติตามคำแนะนำบนเสื อผ าแต ละชิ น อย าบรรจุผ าเกินปริมาณที กำหนด โปรดดู รายละเอียดส วนที เกี ยวข องในคู มือการใช...

Page 49: ...รือผลิตภัณฑ ที ใกล เคียง ไม ควรจะนำมาใช กับเครื องซัก อบผ า เพื อ กำจัดผลกระทบของไฟฟ าสถิต ยกเว นว าได รับ คำแนะนำจากผู ผลิตน ำยาปรับผ านุ ม หรือ ผลิตภัณฑ นั นๆ ห ามอบชุดชั นในที มีส วนประกอบของวัสดุที เป น โลหะในเครื องซัก อบผ า เครื องซัก อบผ าของท านอาจเสียหายได ถ า ส วนที เป นโลหะหลุดออกมาจากผ า ให ใส ชุด ดังกล าวไว ในถุงที ออกแบบมาเพื อการอบผ า โดยเฉพาะ ห ามบรรจุสิ งต อไปนี ในเครื องซัก อบผ า...

Page 50: ...ดเครื องด านหน า ประตูเครื อง ตัวกรองป มระบายน ำ ท อน ำเข า สลักยึดสำหรับขนย าย ที เก บสาย สลักยึดสำหรับขนย าย ที เก บสาย ปลั กไฟ ท อน ำทิ ง ฝาป ดด านบน แผงควบคุมการทำงาน สลักยึดสำหรับขนย าย ช องเติมผงซักฟอก น ำยาปรับผ านุ ม ดูข อมูลเพิ มเติมในหน า 64 ดูข อมูลเพิ มเติมในหน า 85 ดูข อมูลเพิ มเติมในหน า 52 ดูข อมูลเพิ มเติมในหน า 75 ดูข อมูลเพิ มเติมในหน า 86 ...

Page 51: ...ระบายน ำ ช องเติมผงซักฟอก น ำยาปรับผ านุ ม ประตูเครื อง เมื อเป ดประตู ดูข อมูลเพิ มเติมในหน า 63 สลักยึดสำหรับขนย าย เมื อถอดออก โปรดตรวจสอบให แน ใจว าได นำสลักยึด สำหรับขนย าย 3 ชิ น ออกจากเครื อง เรียบร อยแล ว ก อนการใช งานเครื อง ตัวกรองป มระบายน ำ เมื อเป ดประตู ขาตั งเครื องแบบปรับระดับได ใบพัดช วย กระจายผ า ถังซักสแตนเลส น ำยาปรับผ านุ ม เพิ มรอบการซัก การซักหลัก ประตูตัวกรอง ป มระบายน ำ ตั...

Page 52: ...ระบบสััมผััส C ปุ ม เปิิด ปิิด K ตััวเลืือก ระดัับความแห ง ระบบสััมผััส D ตััวเลืือก อุุณหภููมิิ ระบบสััมผััส L ตััวเลืือก หยุุดเพื อเพิ มผ า E ตััวเลืือก รอบป น ระบบสััมผััส M ตััวเลืือก เริ ม หยุุด ระบบสััมผััส F ตััวเลืือก ไอน ำำ ระบบสััมผััส N ตััวเลืือก บัันทึึกโปรแกรมที ใช เป นประจำำ G ตััวเลืือก เพิ มรอบซััก ระบบสััมผััส O ตััวเลืือก ล างน ำำ เพิ ม H ตััวเลืือก ตั งเวลาล วงหน า ระบบสััมผััส...

Page 53: ...เลือกไม ระบายน ำล างผ า C สัญลักษณ ล างน ำเพิ ม D รอบป นหมาด E สัญลักษณ หยุดเพื อเพิ มผ า F สัญลักษณ ตั งเวลาอบ G สัญลักษณ ระดับความแห ง H สัญลักษณ ขั นตอนการลดรอยยับ I ระยะเวลาการทำงานของโปรแกรม A I H G E F B D C อบผ าให แห งพิเศษ อบผ าเพื อพับเก บ อบผ าเพื อรีด ...

Page 54: ... ผ าขาวและผ าสีไม ตก เลือกโปรแกรมนี เพื อให ได ผลการ ซักที ดีและลดการใช พลังงาน ซึ งเวลาของโปรแกรมซัก จะเพิ มขึ น Cottons ผ าฝ าย Mixed ผ าผสม ผ าฝ ายขาวหรือสี ผ าสังเคราะห หรือรวมทุกเนื อผ า น ำเย น ถึง 90 C น ำเย น ถึง 60 C น ำเย น ถึง 60 C น ำเย น ถึง 40 C ซัก อบ 1200 รอบ นาที ผ าฝ ายสำหรับเด กและผ าถักที บอบบางสกปรกไม มาก Baby Care เสื อผ าเด ก Tub Clean ล างถัง 60 C โปรแกรมสำหรับทำความสะอาดถั...

Page 55: ...Woolmark เป นสัญลักษณ รับรองที ใช กันอย างแพร หลาย ในหลาย ประเทศทั วโลก โปรแกรม อุณหภูมิที เลือกได 1200 รอบ นาที 1 5 กก 5 5 กก ประเภทของผ าและระดับความสกปรก รอบป น หมาดสูง สุด น ำหนักผ าสูงสุด ผ าแห ง Quick 15 ซัก 15 นาที ผ าใยสังเคราะห หรือรวมทุกเนื อผ าที สกปรกน อยๆ น ำเย น ถึง 30 C ซัก อบ 1200 รอบ นาที 30 C ถึง 40 C โปรแกรมออกแบบมาสำหรับผ าที สวมใส ประจำวัน ที สกปรกไม มาก เช น เสื อเชิ ต เสื อผ...

Page 56: ...ป ซึ งช วยประหยัดพลังงาน การลดความเร วในการป นหมาดสามารถทำได หลังจากเลือกตัวเลือกเสริม อบผ าแล วเท านั น 1 2 โปรแกรมนี สามารถเลือกได เพียงตัวเลือก Cupboard dry อบผ าเพื อพับเก บ เท านั น 3 โปรแกรม ตัวเลือก Cottons Mixed Bedding Baby Care Energy Saver Tub Clean Spin Rinse Spin Quick 15 Daily 39 Wool Delicates Favourite WashDry 60 1 2 3 2 Dryness Level Prewash Time Dry Hygienic Care No Spin Rinse Ho...

Page 57: ...ิ นสุด รอบการล างผ า ไฟแอลอีดีที สัญลักษณ ตัวเลือกนี จะติดสว าง เพื อแสดงว าตัวเลือกได ถูกเลือกแล ว ไอน ำ ระบบสัมผัส อาจมองไม เห นไอน ำในถังระหว างรอบการซัก ด วยไอน ำ ไอน ำจะเกิดขึ นด านล างของถัง และ จะลอยขึ นเข าไปสัมผัสเนื อผ าตามธรรมชาติ ในตอนท ายของรอบไอน ำ ผ าจะอุ นและนุ ม และจะแยกตัวไม ติดกับถังซัก หากเลือกตัวเลือกไอน ำ อุณหภูมิการล างน ำจะถูก เพิ มขึ น ข อควรทราบ ระหว างรอบการซักด วยไอน ำ ...

Page 58: ...องเครื องชั วคราว ตั งเวลาล วงหน า ระบบสัมผัส ตัวเลือกนี ช วยให สามารถเลือกตั งเวลาล วงหน า การทำงานหลังจากเวลาป จจุบัน 30 60 หรือ 90 นาที และทุกๆ ชั วโมงจาก 2 ชั วโมง ถึง 20 ชั วโมง ระยะหน วงเวลาเริ มต นทำงานที เลือกจะปรากฏ ขึ นบนจอแสดงผล เวลาสิ นสุดการทำงานจะเพิ มขึ น ตามที ได เลือกตั งเวลาล วงหน าไว ควรเลือกตัวเลือกนี หลังจากที ได เลือกโปรแกรม การทำงานที ต องการแล วและก อนที จะกดปุ ม เริ ม หยุด...

Page 59: ...เครื องยังคงล อคอยู ประเภทของผ า น ำหนัก กิโลกรัม รอบการป นหมาด รอบต อนาที เวลาที แนะนำ ชั วโมง ผ าฝ าย และผ าลินิน เสื อคลุมอาบน ำ ผ าเช ดตัว เป นต น คำแนะนำสำหรับตัวเลือก ตั งเวลาอบผ า Max 1 2 5 4 5 2 1200 1200 1200 3 4 2 3 1 2 ผ าใยสังเคราะห และผ าผสม เสื อจัมเปอร เสื อสตรี ชุดชั นใน ผ าลินิน เป นต น ผ าขนสัตว และผ าขนสัตว ที ซักด วยมือได 3 1 1200 1200 2 3 1 1 1200 2 หากคุณต องการเป ดประตูเครื ...

Page 60: ...มอาบน ำ ผ าเช ดตัว เป นต น สูงสุด Max 1 กก สูงสุด Max กก สูงสุด Max กก Cupboard dry อบผ าเพื อพับเก บ เหมาะสำหรับผ าที ต องการรีด Iron dry อบผ าเพื อรีด ผ าฝ าย และผ าลินิน เสื อคลุมอาบน ำ ผ าเช ดตัว เป นต น ผ าใยสังเคราะห และคละ เสื อจัมเปอร เสื อสตรี ชุดชั นใน ผ าลินิน เป นต น ผ าฝ ายและผ าลินิน ผ าปูที นอน ผ า ปูโต ะ เสื อเชิ ต เป นต น สูงสุด 3 กก คำแนะนำในการใช ตัวเลือก ระดับความแห ง หลังจากอบ...

Page 61: ...ากการเล นกับเครื อง ป ดใช งานฟ งก ชั นนี โดยสัมผัสที ปุ ม เพิ มรอบซัก และ ตั งเวลาล วงหน า พร อมกันค างไว 2 วินาที จนกระทั งที จอแสดงผลแสดงสัญลักษณ ปฏิบัติตามขั นตอนดังต อไปนี การตั งค าฟ งก ชั นนี จะยังคงอยู แม ว า จะมีการป ดเครื องและเป ดใช งานเครื อง อีกครั งก ตาม ให ตั งค าตัวเลือกนี หลังจากกดปุ ม เริิ ม หยุด หากมีการกดปุ มใดๆ ขณะที ฟ งก ชั นนี ทำงาน สัญลักษณ จะกระพริบ ที จอแสดงผล 3 ครั งพร อม...

Page 62: ...ุณได เลือกโปรแกรมและตัวเลือก อื นที ต องการแล ว ให กดปุ มนี เพื อให โปรแกรม เริ มทำงาน ไฟแอลอีดีที ปุ มนี จะหยุดกระพริบ และติดสว างค างไว จนกระทั งเครื องได ทำการ เติมน ำจนถึงระดับที โปรแกรมคำนวณไว ประมาณระดับขอบล างของประตู จากนั น ไฟแอลอีดีที ปุ มนี จะดับลง ถ าหากคุณได เลือกใช ตัวเลือก หน วงเวลาจบ หลังจากกดปุ มนี เครื องจะทำการนับถอยหลัง และแสดงเวลาที จอแสดงผลเพื อเข าสู โปรแกรม เพื อเพิ มผ า ให...

Page 63: ...เพื อนำสิ งตกค าง จากการผลิตออกจากถังซักและจุดต างๆ จากนั นเริ มการทำงานของเครื อง 5 1 การบรรจุผ าลงถังซัก เป ดก อกน ำ 1 เสียบปลั กเข ากับเต ารับไฟฟ า 2 3 4 บรรจุผ าลงในถังซักทีละชิ น คลี ให กระจาย ออก มากที สุดเท าที ทำได โปรดศึกษาราย ละเอียดในหัวข อ คำแนะนำในการซักผ า หน า 70 5 ป ดประตูเครื อง 6 ข อควรระวัง อย าให มีผ าหลงเหลือ ระหว างยางขอบประตูและประตูเครื อง การใช งานประจำวัน การซักผ า เพียงอ...

Page 64: ...ำหรับเติมน ำยาปรับผ านุ ม และน ำยาอัดกลีบ ผงซักผ าหรือน ำยาซักผ า บานพับเลือกประเภทสารซักฟอก ตวงปริมาณของสารซักผ าที ต องการ จากนั น เติมลงในช องการซักหลัก อย าใช น ำยาซักผ าที เป นเจลหรือเหนียวข น อย าเติมมากกว าระดับสูงสุดที กำหนด อย าตั งค าหน วงเวลาจบการทำงาน Delay Start อย าเลือกตัวเลือกเสริม Prewash หากคุณใช น ำยาซักผ า ให ปฏิบัติดังนี ดึงช องจ ายออกมาจนสุด หากเลือก เพิ มรอบซัก Prewash ให เต...

Page 65: ...ี ป ข อควรทราบ 5 4 เริ มการทำงานของโปรแกรม เริ มโปรแกรมโดยกดปุ ม เริ ม หยุด ไฟ แสดงการทำงานที เกี ยวข องจะหยุดกะพริบ และเวลาการทำงานเบื องต นของโปรแกรมจะ แสดงที หน าจอแสดงผล หลังโปรแกรมเริ มทำงานประมาณ 15 นาที ข อควรทราบ หากกดปุ มใดๆ ขณะที เครื องกำลังทำงาน ที จอ แสดงผลจะแสดงสัญลักษณ พร อม เสียงบี ป ยกเว นปุ ม เริ ม หยุด และ ปุ ม เป ด ป ด 5 5 หยุดการทำงานของโปรแกรม หยุดการทำงานของโปรแกรม กด เริ ม ...

Page 66: ...สียงจะดังขึ น จอแสดงผลจะแจ งเวลาเป น ไฟแอลอีดีที ปุ ม Start Pause จะดับลง สัญลักษณ ล อคประตู จะหายไป นำผ าออกจากเครื อง ตรวจสอบให แน ใจว า นำ ผ าออกหมดแล ว เป ดประตูทิ งไว สักครู เพื อป องกันราหรือกลิ น ป ดก อกน ำ ในช วงสุดท ายของการทำงานของโปรแกรม เวลาคงเหลือสามารถเป นไปได ตั งแต 7 นาที หรือ น อยกว าจนถึง 0 นาที เนื องจากการคำนวณเวลา การทำงานที มากเกินจริงในช วงการตรวจสอบ ปริมาณผ า ในบางกรณี กรณี...

Page 67: ...ยยับ จะติดสว าง เครื องจะเพิ มรอบการทำงาน การลดรอยยับ Anti crease เข ามาประมาณ 10 นาที กดปุ ม เริ ม หยุด Start Pause เพื อ เริ มการทำงานของโปรแกรม เวลาการทำงานที เหลือจะเปลี ยนแปลงทุกๆ นาที อีกทางเลือกหนึ ง ก อนสัมผัสสัญลักษณ คุณยังสามารถกดปุ ม ป นหมาด เพื อเลือก ความเร วรอบและคุณสามารถเลือกตัวเลือก ไม ป นหมาด เพื อให เครื องทำการ การระบายน ำเพียงอย างเดียวก ได จากนั น สัมผัสสัญลักษณ เพื อให เครื ...

Page 68: ...รม จะถูกปรับอีกครั งหลังจากเริ มการทำงานของ โปรแกรมผ านไป 15 นาที ซึ งจะขึ นอยู กับ ชนิดของผ าและปริมาณของผ าที บรรจุ จอแสดง ผลจะแสดงเวลาที ถูกปรับเปลี ยนอีกครั ง หลังจากโปรแกรมการลดรอยยับ Anti crease สิ นสุดลง สัญลักษณ ดับลง จอแสดงผลจะแสดงข อความ จบการทำงาน หากคุณต องการเป ดประตูเครื องใน ขณะที เครื องทำงานอยู ในช วง การลด รอยยับ Anti crease หรือต องการ ยกเลิกช วงการทำงานนี ให กดปุ ม Start Pause ...

Page 69: ...ระบุไว เวลาที เหลือของการ ทำงานสามารถลดลงได อย างมาก ตัวอย างเช น เวลาที เหลือ นาที ลดลงเหลือ นาที หากคุณต องการเป ดประตูเครื องในขณะที เครื องกำลังทำงานอยู ในช วง การลดรอยยับ Anti crease หรือต องการยกเลิกช วงการ ทำงานนี ให กดปุ ม Start Pause เริ ม หยุด หากคุณตั งเวลาอบผ าเพียง 10 นาที เครื องจะ ทำงานแค ในช วง ลดความร อน cooling หลังเสร จสิ นรอบการอบ ผ าอาจจะยังมี ความร อนอยู เพื อความปลอดภัยของคุ...

Page 70: ... 90 C 60 C 50 C 40 C 30 C น ำเย น การซักชุดชั นใน ถุงน องและผ าเนื อบาง ให ใส ในถุงซัก ซึ งสามารถหาซื อได ตามร านค าหรือ ห างสรรพสินค าชั นนำทั วไป แยกผ าที ติดขุยง ายออกจากผ า ที มีขุย อย าซักพร อมกัน ปริมาณบรรจุที แนะนำถูกแสดงไว ในตารางโปรแกรม หน า 54 หรือ ใช หลักเกณฑ ทั วไปดังนี ด วยปริมาณบรรจุสูงสุดจะทำให ใช น ำและพลังงานได อย างเต มประสิทธิภาพ สำหรับผ าที สกปรกมากให ลด ปริมาณลง ผ าฝ าย ผ าลิน...

Page 71: ...ล าง ผ าไม มีประสิทธิภาพและมอร เตอร ทำงานหนัก ผงซักฟอกชนิดฟองน อยถูกออกแบบมาเพื อใช สำหรับ เครื องซักผ าฝาหน าโดยเฉพาะ ซึ งที ฉลากบรรจุภัณฑ จะระบุข อความไว ว า สำหรับเครื องฝาหน า หรือ ผงซักฟอกประสิทธิภาพสูง หรือ ผงซักฟอกสูตร เข มข นสำหรับซักด วยเครื อง เป นต น ชนิดและปริมาณของผงซักฟอกที ใช จะขึ นอยู กับ ชนิดของผ า เช น ผ าเนื อบาง ผ าขนสัตว ผ าฝ าย ความกระด างของน ำ อุณหภูมิที ใช ในการซัก ระดับคว...

Page 72: ...อบผ าที อุณหภูมิสูงได อบผ าเฉพาะที อุณหภูมิต ำ ห ามอบผ า ข อควรระวัง คำแนะนำในการอบผ า 9 9 3 ฉลากคำแนะนำในงานอบผ า 9 4 ระยะเวลาในการอบผ า 9 5 การอบผ าเพิ มเติม วัสดุจำพวกผ าเนื อบาง เช น ผ าม านใยสังเคราะห ผ าขนสัตว และผ าไหม เสื อผ าที มีโลหะแทรกอยู ถุง น องไนลอน ผ าผืนใหญ เช นเสื อโค ต ผ าคลุม เตียง ผ านวมคลุมเตียง ถุงนอนและผ าห มนวม ผ าเหล านี ไม สามารถนำมาอบแห งได หลีกเลี ยงการอบผ าสีเข มพร อม...

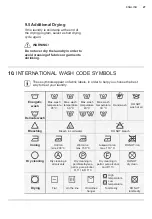
Page 73: ...73 ภาษาไทย 10 สัญลักษณ สากล สำหรับงานซัก สัญลักษณ เหล านี มีแสดงไว ที ฉลากผ า เพื อช วยในการพิจารณาวิธีการดูแลผ าที ดีที สุด ...

Page 74: ...นประจำ ถอดถาดจ ายเติมสารซักฟอกออก ด วยการกดตัว ยึดลงแล วดึงออก เป ดก อกน ำล างทำความสะอาดคราบตกค าง ของ สารซักฟอกออกให หมด 11 5 การทำความสะอาดถาดจ าย สารซักฟอกและน ำยาปรับผ านุ ม เป ดประตูเครื องทิ งไว ชั วครู ทั งนี เพื อช วยป องกัน ไม ให เกิดเชื อราและกลิ นอับเหม น ภายในตัวเครื อง การเป ดประตูทิ งไว หลังจากซักเสร จ จะช วยถนอม รักษายางขอบประตูด วย 11 3 หลังการซักแต ละรอบ การซักผ าที ระดับอุณหภูมิ...

Page 75: ...ื องอาจเกิดเสียงผิดปกติเนื องจากป มระบาย น ำอุดตัน จอแสดงผลจะแจ งรหัสเตือน เนื องจากมีป ญหา กับระบบระบายน ำ ตรวจสอบป มระบายน ำเป นประจำและ ดูแลให สะอาดอยู เสมอ ทำความสะอาดป มระบายน ำหาก 1 2 ถอดปลั กไฟเครื องซัก อบผ า ออกจากเต าจ าย ไฟฟ าทุกครั ง อย านำที กรองออกขณะเครื องทำงาน อย าทำ ความสะอาดป มระบายหากน ำในเครื องร อนอยู น ำจะต องเย นก อนทำความสะอาดป มระบายน ำ คำเตือน การทำความสะอาดป มระบายน ำ 1...

Page 76: ...นะรองน ำ ให ดันช อง ระบายน ำกลับเข าที และเทน ำออกจากภาชนะ รองน ำ แล วทำซ ำข อที 2 3 จนกระทั งไม มีน ำ ไหลออกมาจากป มระบายน ำ 4 ดันช องระบายกลับเข าที แล วหมุนตัวกรอง ทวนเข มนา ิกาเพื อนำออก 6 ตรวจดูว าใบพัดของป มหมุนได หรือไม หากไม หมุนให ติดต อศูนย บริการ 7 ทำความสะอาดตัวกรองใต ก อกน ำ ...

Page 77: ...สะอาด เป นระยะๆ 11 8 การทำความสะอาดตัวกรอง ท อน ำเข า การทำความสะอาดตัวกรองท อน ำเข า 1 ป ดก อกน ำ 2 หมุนท อน ำเข าออกจากก อกน ำ 3 ทำความสะอาดตัวกรองในท อน ำเข า ด วย แปรงแข ง 4 หมุนท อน ำเข าด านหลังเครื องออก 5 ทำความสะอาดตัวกรองที วาล วโดยใช แปรงแข ง หรือผ าขนหนู 6 ติดตั งท อน ำเข ากลับเข าที หมุนให แน นเพื อ ป องกันน ำรั วไหล 7 เป ดก อกน ำ ไกด ตั งขึ น ...

Page 78: ...ไฟเครื องซัก อบผ าออกจากเต าจ าย ไฟฟ าและป ดก อกน ำ 3 ปลดท อระบายน ำออกจากฐานรองด านหลัง และปลดปลายท อน ำทิ งออกจากซิงค หรือ หัวก อก วางปลายท อน ำทิ งและท อน ำเข าไว บนภาชนะ รองน ำแล วปล อยให น ำระบายออก 4 5 เมื อไม มีน ำไหลออกมาแล ว เก บท อระบายน ำ และท อน ำเข าเข าที เดิม เมื อต องการจะใช งานเครื องอีกครั ง ควรตรวจสอบ ให แน ใจว าอุณหภูมิห องสูงกว า 0 องศาเซลเซียส ข อแนะนำ การระบายน ำในกรณีฉุกเฉิ...

Page 79: ...ก อกน ำ เครื องไม ทำงาน น ำไม เข าเครื อง น ำเข าเครื องและ ระบายออกทันที เครื องไม ระบาย น ำทิ งและ หรือ ไม ป นหมาด ตัวเลือกเสริม Rinse Hold ถูกใช งาน กดปุ ม Start Pause เพื อระบายน ำ หรือ เลือก Spin โปรแกรม ผ าไม ได กระจายตัวอยู ในถังซักอย างทั วถึง หยุดเครื องชั วคราว รอประตูเครื องคลายล อค จากนั นเป ดประตูเครื องแล วทำการกระจายผ า ออกให ทั วถัง ความผิดปกติที เกิด สาเหตุที เป นไปได แนวทางแก ไข ...

Page 80: ...องทำการระบายน ำออกจากถังซัก เพื อให ประตูคลายล อค ศึกษารายละเอียดที หัวข อ การเป ดประตูเครื อง หน า 66 ป ญหานี อาจเกิดจากข อผิดพลาด ของเครื องเอง กรุณาติดต อศูนย บริการและหากต องการเป ดประตู เครื อง กรุณาอ านหัวข อ การเป ดประตูกรณี ฉุกเฉิน ในหน า 82 ไม สามารถเป ด ประตูเครื องได เครื องสั นหรือ ส งเสียงดัง เวลาการทำงาน ที ใช จริง นานกว า ที แสดงไว เครื องได ทำการคำนวณเวลาการทำงานใหม โดยอ างอิงกับปร...

Page 81: ...เครื อง และวันที ซื อเครื อง ศูนย บริการจำเป นต องใช ข อมูลเหล านี ข อแนะนำ เครื องกำลังเพิ มประสิทธิภาพการอบผ า ให สอดคล องกับประเภทของผ าและ ปริมาณผ า ซึ งจะขึ นอยู กับการดูดซับน ำ ของเนื อผ าแต ละชนิด กรณีดังกล าวถือเป นเรื องปกติของเครื องและไม เป น สาเหตุให ประสิทธิภาพในการทำงานของเครื องลดลง แต อย างใด ยังไม ได เลือกตัวเลือก Time Dry หรือ Dryness Level ให เลือกตัวเลือกดังกล าว ให ทำการเป ดก ...

Page 82: ...ทั งถังซักหยุดหมุน ต องแน ใจว าระดับน ำภายในถังซักไม สูงเกินไป หากจำเป น กรุณาทำการระบายน ำออกจากถัง กรุณาอ านหัวข อ การระบายน ำในกรณี ฉุกเฉิน หน า 78 การเป ดประตู กรุณาปฏิบัติดังนี 1 กดปุ ม เป ด ป ด เพื อป ดการทำงานของ เครื อง 2 ถอดปลั กเครื องซัก อบผ า 3 เป ดฝาป ดตัวกรองป มระบายน ำ 4 ใช อุปกรณ ที เหมาะสมเกี ยวดึงสายตัวปลด ล อกกรณีฉุกเฉิน สีแดง กระตุกลง 2 ครั ง และให ดันค างไว คุณจะได ยินเสียง คล...

Page 83: ...ป นหมาด สูงสุด ต ำสุด 1200 400 รอบต อนาที 85 X 60 X 57 5 เซนติเมตร แหล งจ ายไฟ แรงดันไฟฟ า ความถี กำลังไฟทั งหมด แรงดันน ำ สูงสุด ต ำสุด 0 8 0 05 เมกะปาสคาล 220 240 โวลต 50 เฮิรตซ ซัก 2000 วัตต อบ 1500 วัตต ฟ วส ป องกันขั นต ำ 10 แอมป ซัก โปรแกรม อบ 1 ปริมาณผ าสูงสุดที บรรจุได ขึ นอยู กับรุ นเครื องซัก อบผ า โปรดดูที ระบุไว ที แผงควบคุม Max 1 กก 4 กก 4 กก 3 กก 4 กก Max กก Max กก Max กก 2 กก 1 5 กก...

Page 84: ...ทับสายน ำทางด านหลังจนพับ หักงอ ดังภาพ ดันเครื องให อยู ตำแหน งตั งตามเดิม เป ดประตูเครื อง นำสิ งของด านในทั งหมด ออกมาดังภาพ 3 7 8 9 ดึงที เก บท อพลาสติกออก 10 ป ดรูด วยหมวกพลาสติกที มาพร อมกับเครื อง ซึ ง สามารถหาได จากในถุงบรรจุคู มือการใช งาน นำสายไฟ ท อระบายน ำและท อน ำเข าออก จากที เก บท อ A ทางด านหลังเครื อง ดัง ภาพ หมุนสลักเกลียวสามตัวออก A ...

Page 85: ...รื องมีความ เหมาะสม เครื องซัก อบผ าจะต องมั นคงและได ระดับ กับพื น เพื อให แน ใจว าการทำงานถูกต อง เครื องจะต องไม ติดตั งอยู ด านหลังประตูที ล อคได ประตูเลื อนหรือประตูที บานพับอยู ตรงกันข ามกับ ประตูเครื องซัก อบผ า ต อท อน ำเข าเข ากับเกลียว BSP ขนาด 3 4 นิ ว ใช ท อที จัดมาให พร อมกับเครื องซัก อบผ า อย าใช ท อเก า ปลายอีกข างหนึ งของท อน ำเข าซึ งต ออยู กับเครื อง สามารถหมุนไปในทิศทางใดก ได เ...

Page 86: ...ะรัดด วย สายรัดให แน น ตรวจสอบให แน ใจว าไม มีแรงดัน ไหลวนในท อเพื อป องกันน ำเสียจากอ างไหลเข า สู เครื องซัก อบผ า ในกรณีนี โปรดตรวจสอบให แน ใจว าปลายท อ ไม หลุดออกจากปลอกเมื อเครื องปล อยน ำออก ต อกับท อที แยกออกจากท อน ำทิ งของ อ างน ำ ปลายท อระบายน ำสามารถจัดตำแหน งได สามวิธี ดังนี เกี ยวไว กับขอบอ างล างจาน โดยใช ปลอกพลาสติกที ให มาพร อมเครื อง 14 4 ระบบระบายน ำ 45 35 การประกอบท อน ำกับปลอกพ...

Page 87: ...บุไว ใน แผ นป ายระบุหมายเลขเครื อง กับแหล งจ ายไฟฟ าภายในบ านของคุณว า เป นอัตราแรงดันไฟฟ าเดียวกันหรือไม ข อควรระวัง โปรดเชื อมต อเครื องเข ากับเต าจ ายไฟ ที ต อสายดินไว เมื อติดตั งเครื องแล ว ควรให สายไฟอยู ในตำแหน ง ที สะดวกต อการใช งาน หากสายไฟชำรุดและต องการเปลี ยน ใช สายไฟใหม ขอให ติดต อศูนย บริการ ใกล บ าน สูงสุด 90 ซม ต ำสุด 60 ซม ลงสู ท อระบายน ำ ปลายท อระบายน ำจะต องสามารถระบายน ำออก ดั...

Page 88: ...ส การทิ งผลิตภัณฑ นี อย างถูกต อง จะช วยลด ผลกระทบที มีต อสภาพแวดล อม และ สุข อนามัย หากท านทิ งผลิตภัณฑ นี อย างไม ถูกต อง เหมาะสม จะก อให เกิดผลเสียต อสภาพ แวดล อมและสุขอนามัย สอบถามข อมูลเพิ มเติมเกี ยวกับการรีไซเคิล ผลิตภัณฑ ได จากหน วยงานในพื นที ผู ให บริการจัดเก บขยะประจำพื นที ของคุณ หรือ ร านที จำหน ายผลิตภัณฑ นี 15 1 วัสดุบรรจุภัณฑ 15 3 คำแนะนำด านระบบนิเวศน 15 2 เครื องเก า ข อมูลเพื อก...

Page 89: ...www electrolux co th G0032389 002 A20691905 ...

Reviews: