background image

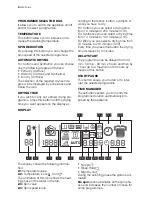
• Drain 
• Spin 
When you set the washing programme, all
washing programme phase icons are

shown. After the programme has started,
the only icon of the running phase stays on.

FIRST USE

• Ensure that the electrical and water

connections comply with the installa-
tion instructions.

• Remove the polystyrene block and

any material from the drum.

• Before the first wash, run a cotton

cycle at the highest temperature

without any laundry in the machine,
to remove any manufacturing residue
from the drum and tub. Pour 1/2 a
measure of detergent into the main
wash compartment and start the
machine.

PERSONALISATION

ACOUSTIC SIGNALS

The machine is provided with an acoustic
device, which sounds in the following ca-
ses:
• at the end of the cycle
• if there is a fault.
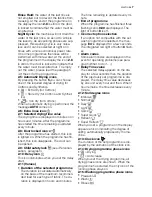
By pressing the 

5

 and 

6

 buttons simultane-

ously for about 

6 seconds

, the acoustic

signal is deactivated (except if there is a
fault). By pressing these 2 buttons again,
the acoustic signal is reactivated.

CHILD SAFETY LOCK

This device permits you to leave the appli-
ance unattended and not to worry that chil-

dren might be injured by or cause damage
to the appliance. This function remains ena-
bled also when the washing machine is not
working.
There are two different ways to set this op-
tion:
1. Before pressing button 

8

: it will be im-

possible to start the machine.

2. After pressing button 

8

: it will be im-

possible to change any other pro-
gramme or option.

To enable or disable this option press si-
multaneously for about 6 seconds buttons

6

 and 

7

 until on the display, the icon 

 ap-

pears or disappears.

DAILY USE

Load the laundry

Open the door by carefully pulling the door
handle outwards. Place the laundry in the
drum, one item at a time, shaking them out
as much as possible. Close the door.
Make sure that no laundry stays between
the seal and the door. There is a risk of wa-
ter leakage or damage to the laundry. 

Measure out the detergent and the fab-
ric softener

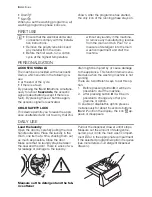
Pull out the dispenser drawer until it stops.
Measure out the amount of detergent re-
quired, pour it into the main wash compart-
ment 

 or in the appropriate compartment

if the selected programme/option it requires
(see more details in «Detergent dispenser
drawer»).

electrolux

Summary of Contents for EWW 168543 W

Page 1: ...EWW 168543 W EN WASHER DRYER USER MANUAL ...

Page 2: ... check the appli ance for any damage incurred during transport Never connect up a damaged appliance If parts are damaged contact your supplier If the appliance is delivered in the winter months when there are minus tempera tures Store it at room temperature for 24 hours before using for the first time GENERAL SAFETY It is dangerous to alter the specifications or attempt to modify this product in a...

Page 3: ...s paint ink rust and grass before washing Under wired bras must NOT be machine wash ed Garments which have been in contact with volatile petroleum products should not be machine washed If volatile clean ing fluids are used care should be taken to ensure that the fluid is removed from the garment before placing in the ma chine As some duvets and eiderdowns should be washed dried in large commercial...

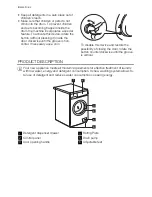
Page 4: ...f necessary use a coin To disable this device and restore the possibility of closing the door rotate the button counterclockwise until the groove is vertical PRODUCT DESCRIPTION Your new appliance meets all modern requirements for effective treatment of laundry with low water energy and detergent consumption Its new washing system allows to tal use of detergent and reduces water consumption so sav...

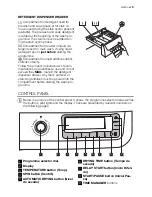
Page 5: ... recom mendations on quantities to use and do not exceed the MAX mark in the detergent dispenser drawer Any fabric softener or starching additives must be poured into the compartment before starting the wash pro gramme CONTROL PANEL Below is a picture of the control panel It shows the programme selector dial as well as the buttons pilot lights and the display These are presented by relevant number...

Page 6: ...cs you can select a drying time from 10 minutes to 130 minutes 2 10 For Wool you can select a drying time from 10 minutes to 210 minutes 3 30 Every time you press this button the drying time increases by 5 minutes DELAY START The programme can be delayed from 30 min 60 min 90 min 2 hours and then by 1 hour up to a maximum of 20 hours by means of this button START PAUSE This button allows you to st...

Page 7: ... see Personali sation paragraph 2 10 Delay icon This icon illuminates when you set the delay start 2 11 Values Duration of the selected programme The duration is calculated automatically on the basis of the maximum recommen ded load for each type of fabric The du ration is displayed in hours and minutes The time remaining is updated every mi nute End of programme When the programme has finished th...

Page 8: ...to leave the appli ance unattended and not to worry that chil dren might be injured by or cause damage to the appliance This function remains ena bled also when the washing machine is not working There are two different ways to set this op tion 1 Before pressing button 8 it will be im possible to start the machine 2 After pressing button 8 it will be im possible to change any other pro gramme or o...

Page 9: ...ng a programme the appliance proposes automatically the maximum spin speed provided for that programme Press button 4 repeatedly to change the spin speed if you want your laundry to be spun at a different speed SELECT AN ADDITIONAL RINSE This appliance is designed for saving water However for people with a very delicate skin allergic to detergents it may be nec essary to rinse the laundry using an...

Page 10: ...r refreshing a very few items only 1 We recommend you to reduce the load sizes see Washing programmes table 2 When you select this option the relevant icon appears just for a while and then it disappears immediately ALTERING AN OPTION OR A RUNNING PROGRAMME It is possible to change some options be fore the programme carries them out Before you make any change you must PAUSE the appliance by pressi...

Page 11: ...bled The brightness of the display is reduced By pressing any but ton the appliance will come out of the ener gy saving status USE DRYING DRYING ONLY Warning The recommended load size is 4 kg for cot tons and linen 3 kg for synthetic items and 1 5 kg for wool Important For wool items the timed drying is the only drying available Drying Time button By pressing Drying Time button it is also possible...

Page 12: ... cotton and 3 kg for synthetic Caution Do not use a dosing device ball when carrying out a washing and drying programme 1 Load the laundry 2 Add detergent and fabric softener 3 Switch the machine on by turning the selector dial to the set washing pro gramme fabric 4 Select the required options by pressing the relevant buttons If possible do not select a spin speed lower than that proposed by the a...

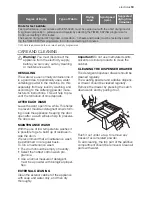
Page 13: ...clothes it is recommended To do not wash dark fabrics after you washed and dried light colored fabrics new sponge wool sweatshirt especially and vice versa To air dry this type of fabrics when they are washed the first time To clean the drain filter After the drying phase thoroughly clean the empty drum the gasket and the door with a wet rag To remove the fluff inside the drum run a special progra...

Page 14: ...ns moisten with turpen tine lay the garment on a soft surface and dab the stain with the fingertips and a cot ton cloth Rust oxalic acid dissolved in hot water or a rust removing product used cold Be careful with rust stains which are not recent since the cellulose structure will already have been damaged and the fabric tends to hole Mould stains treat with bleach rinse well whites and fast colour...

Page 15: ...uring the drying cycle Attention Before starting the drying programme re duce the loads of washed laundry in order to obtain good performances LAUNDRY NOT SUITABLE FOR DRYING Particularly delicate items such as syn thetic curtains woollen and silk gar ments with metal inserts nylon stock ings bulky garments such as anoraks bed covers quilts sleeping bags and du vets must not be machine dried Avoid...

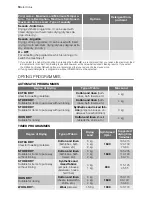
Page 16: ...es Spin at the maximum speed Max load 8 kg Reduced load 4 kg White and coloured cotton normally soiled items SPIN REDUCTION NIGHT CYCLE RINSE HOLD NO SPIN EXTRA RINSE TIME MANAGER1 Algodón Prelavado 90 Cold Prewash Main wash Rinses Spin at the maximum speed Max load 8 kg Reduced load 4 kg White or coloured cottons with prewash phase heavily soiled items SPIN REDUCTION NIGHT CYCLE RINSE HOLD NO SPI...

Page 17: ...mmes with the option selected which ends with water left in the tub Spin Drain and long spin Spin at the maximum speed Max load 8 kg Separate spin for hand washed garments and after programmes with the option selected which ends with water left in the tub You can choose the spin speed by pressing the relevant button to adapt it to the fabrics to be spun SPIN REDUCTION Algodón Económico 90 40 Main ...

Page 18: ...ype of Fabric Max Load EXTRA DRY Ideal for towelling materials Cotton and linen bath robes bath towels etc 4 kg STORE DRY Suitable for items to put away without ironing Cotton and linen bath robes bath towels etc 4 kg STORE DRY Suitable for items to put away without ironing Synthetics and mixed fab rics jumpers blouses un derwear household linen 3 kg IRON DRY Suitable for ironing Cotton and linen ...

Page 19: ...EACH WASH Leave the door open for a while This helps to prevent mould and stagnant smells form ing inside the appliance Keeping the door open after a wash will also help to preserve the door seal MAINTENANCE WASH With the use of low temperature washes it is possible to get a build up of residues in side the drum We recommend that a maintenance wash be performed on a regular basis To run a maintena...

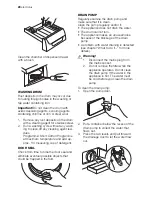
Page 20: ... objects that could be trapped in the fold DRAIN PUMP Regularly examine the drain pump and make sure that it is clean Clean the pump regularly and or if The appliance does not drain the water The drum cannot turn The appliance makes an unusual noise because of the blockage of the drain pump A problem with water draining is detected see chapter What to do if for more details Warning 1 Disconnect th...

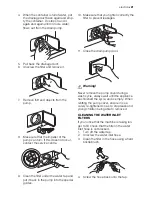
Page 21: ...uides 10 Make sure that you tighten correctly the filter to prevent leakages 2 1 11 Close the drain pump door Warning Never remove the pump cover during a wash cycle always wait until the appliance has finished the cycle and is empty When refitting the pump cover ensure it is se curely re tightened so as to stop leaks and young children being able to remove it CLEANING THE WATER INLET FILTERS If y...

Page 22: ...chine is installed in a place where the temperature could drop below 0 C re move the remaining water from the inlet hose and the drain pump 1 disconnect the mains plug from the mains socket 2 close the water tap 3 unscrew the water inlet hose from the tap 4 put the two ends of the inlet hose in a container and let the water flow out of the hose 5 empty the drain pump as described in the Emergency ...

Page 23: ...re details The door is not properly closed Close the door firmly The machine fills then emp ties immediately The end of the drain hose is too low Refer to relevant paragraph in Water drainage section The machine does not empty and or does not spin The drain hose is squashed or kinked Check the drain hose connection The drain filter is clogged Clean the drain filter An option or a programme that en...

Page 24: ...dis tributed by reverse rotation of the drum This may happen several times before the unbalance disappears and normal spinning can resume If after 10 minutes the laundry is still not evenly distrib uted in the drum the machine will not spin In this case redistrib ute the load manually and select the spin programme Redistribute the laundry The load is too small Add more items redistribute the load ...

Page 25: ...all power Fuse Information on the electrical connection is given on the rating plate on the inner edge of the appliance door Water Supply Pressure Minimum Maximum 0 05 MPa 0 8 MPa Level of protection against ingress of solid particles and moisture IPX4 Maximum Load Cotton 8 kg Maximum Dry Load Cotton Cotton Big Capacity Synthetic 4 Kg 6 Kg 3 Kg Spin Speed Maximum 1600 rpm CONSUMPTION VALUES Progra...

Page 26: ...advised to keep all transit devices so that they can be refitted if the machine ever has to be transported again 1 After removing all the packaging care fully lay machine on it s back to remove the polystyrene base from the bottom 2 Remove the power supply cable and the draining and inlet hose from the hose holders on the rear of the appli ance 3 Unscrew the three bolts 4 Slide out the relevant pl...

Page 27: ...ailable from your authorized dealer The rubber feet are particularly recommen ded on floating slippery and wooden floors Mount the rubber feet to prevent vibration noises and displacement of the appliance during operation Read carefully the instructions supplied with the kit WATER INLET Warning This appliance must be connected to a cold water supply 1 Connect the water inlet hose supplied with the...

Page 28: ...m above the ground Directly into a drain pipe at a height of not less than 60 cm and not more than 90 cm The end of the drain hose must always be ventilated i e the inside diam eter of the drain pipe must be larger than the outside diameter of the drain hose The drain hose must not be kinked The drain hose may be extended to a maximum of 4 metres An additional drain hose and joining piece is avail...

Page 29: ...s product please contact your local council your household waste disposal service or the shop where you purchased the product PACKAGING MATERIALS The materials marked with the symbol are recyclable PE polyethylene PS polystyrene PP polypropylene This means that they can be recycled by disposing of them properly in appropriate collection containers ECOLOGICAL HINTS To save water energy and to help ...

Page 30: ...30 electrolux ...

Page 31: ...electrolux 31 ...

Page 32: ...www electrolux com shop 132936871 A 502011 ...

Reviews: