background image

1. Set the washing machine to PAUSE by

pressing button 

8

 .

2. Press button 

6

 once until the symbol 

0’

 is

displayed

3. Press button 

8

 again to start the pro-

gramme.

Important!

 The selected delay can be

changed only after selecting the washing
programme again.
The Delay Start 

can not

 be selected with

DRAIN

 programme.

Start the programme by pressing button
8

To start the selected programme, press the
button 

8

 , the green pilot light of the button

8

 stops blinking.

To interrupt a programme which is running,
press the button 

8

 : the green pilot light starts

blinking.
To restart the programme from the point at
which it was interrupted, press the button 

8

again

 . If you have chosen a delayed start,

the machine will begin the countdown. If an
incorrect option is selected, the 

red

 pilot light

of the button 

8

 blinks for 3 times the message

Err

 is displayed for a few seconds.

Select the Time Manager option by
pressing buttons 10

By pressing these buttons repeatedly, the
duration of the washing cycle can be in-
creased or decreased. The soil level icon will
appear on the display to indicate the chosen
degree of soil. This option is available only
with 

Cotton

 , 

Synthetic

 and 

 Delicate

 pro-

grammes.

Soil Level

Icon

Type of fabric

Intensive

For heavy soiled
items

Normal

For normal soiled
items

Daily

For daily soiled items

Light

For slightly soiled
items

Quick

For very slightly
soiled items

Super Quick 

1)

For items used or
worn for a short time

1) We recommend you to reduce the load sizes

(see Washing programmes table).

Important!

 The Time Manager cannot be

selected with the 

Economy

 programmes.

The availability of these soil level icons
change according to the type of fabric as
shown in the following chart.

Fabric

Soil Level

Cottons

95°/90°C

X

X

X

X

X

X

60°C/50°C

X

X

X

X

X

X

40°C

X

X

X

X

X

X

30°C

X

X

X

X

X

X

Cold

X

X

X

X

X

X

Synthetics


60°C/50°C


X

X

X


X

40°C


X

X

X


X

30°C


X

X

X


X

Cold


X

X

X


X

Delicates


40°C


X

X

X


X

30°C


X

X

X


X

Cold


X

X

X


X

Altering an option or a running
programme

It is possible to change some options before
the programme carries them out .
Before you make any change, you must
PAUSE the appliance by pressing the button

8

 (if you wish to change the Time Manager

option, you must cancel the running pro-
gramme and make your selection again).
Changing a running programme is possible
only by resetting it. Turn the programme se-
lector dial to 

 and then to the new pro-

gramme position. Start the new programme
by pressing the button 

8

 again. The washing

water in the tub will be not emptied out.

Interrupting a programme

Press the button 

8

 to interrupt a programme

which is running, the corresponding green
pilot light starts blinking.
Press the button again to 

restart

 the pro-

gramme.

Cancelling a programme

Turn the selector dial to 

 to cancel a pro-

gramme which is running.
You can select now a new programme.

10 

 electrolux

Summary of Contents for EWS 10570 W

Page 1: ...user manual Washing Machine EWS 10570 W ...

Page 2: ...d appliance If parts are damaged contact your supplier If the appliance is delivered in the winter months when there are minus tempera tures Store it at room temperature for 24 hours before using for the first time General safety It is dangerous to alter the specifications or attempt to modify this product in any way During high temperature wash pro grammes the door glass may get hot Do not touch ...

Page 3: ... empty and buttons and zips are fas tened Avoid washing frayed or torn arti cles and treat stains such as paint ink rust and grass before washing Under wired bras must NOT be machine washed Garments which have been in contact with volatile petroleum products should not be machine washed If volatile cleaning fluids are used care should be taken to ensure that the fluid is removed from the garment b...

Page 4: ...e or for stain remover used during the stain action phase if availa ble The prewash and soak detergent is added at the beginning of the wash pro gramme The stain remover is added during the stain action phase Compartment for powder or liquid deter gent used for main wash If using liquid de tergent pour it just before starting the pro gramme Compartment for liquid additives fabric softener starch F...

Page 5: ...ogramme Temperature This button allows you to increase or de crease the washing temperature Spin Reduction By pressing this button you can change the spin speed of the selected programme Night Cycle By selecting this function the machine will not drain the water of the last rinse and all spin ning phases will be suppressed so as not to wrinkle the laundry This washing cycle is very quiet and it ca...

Page 6: ...ened The machine in working or has stopped with water left in the tub light off the door can be opened The pro gramme is finished or the water has been emptied out light flashing the door is opening Display 7 4 7 5 7 1 7 2 7 3 The display shows the following information 7 1 Duration of the selected programme After selecting a programme the duration is displayed in hours and minutes for ex ample 2 ...

Page 7: ...the tub 7 4 Soil degree icons When selecting a programme on the display appears an icon indicating the degree of soil ing automatically proposed by the machine Intensive Normal Daily Light Quick Super Quick 7 5 Child safety lock This device permits you to leave the appli ance unattended during it s functioning Table of Symbols Cottons Cottons Prewash Synthetics Synthetics Prewash Delicates Spin De...

Page 8: ...chine is not work ing There are two different ways to set this op tion 1 Before pressing button 8 it will be im possible to start the machine 2 After pressing button 8 it will be impos sible to change any other programme or option To enable or disable this option press simul taneously for about 6 seconds buttons 5 and 6 until on the display the icon appears or disappears Daily use Load the laundry...

Page 9: ...n speed provided for that programme Press button 3 repeatedly to change the spin speed if you want your laundry to be spun at a different speed The relevant light illumi nates Select the available option by pressing buttons 3 4 and 5 Depending on the selected programme dif ferent functions can be combined before pressing the button 8 By selecting an option the relevant pilot light illuminates If a...

Page 10: ...t For slightly soiled items Quick For very slightly soiled items Super Quick 1 For items used or worn for a short time 1 We recommend you to reduce the load sizes see Washing programmes table Important The Time Manager cannot be selected with the Economy programmes The availability of these soil level icons change according to the type of fabric as shown in the following chart Fabric Soil Level Co...

Page 11: ...d care fully check that the drum is empty If you do not intend to carry out another wash close the water tap Leave the door open to pre vent the formation of mildew and unpleasant smells Stand By If your laundry is not removed within 10 minutes after the programme is fin ished the back light of the display switches off and the energy saving system will be en abled Only the pilot light of the butto...

Page 12: ...inse well whites and fast coloureds only Grass soap lightly and treat with bleach whites and fast coloureds only Ball point pen and glue moisten with ace tone1 lay the garment on a soft cloth and dab the stain Lipstick moisten with acetone as above then treat stains with methylated spirits Treat any residual marks with bleach Red wine soak in water and detergent rinse and treat with acetic or citr...

Page 13: ...f Laundry Options Detergent Com partment COTTONS 90 Cold Main wash Rinses Maximum spin speed 1000 rpm Max load 6 kg Reduced load 3 kg 1 White and coloured cotton normally soiled items SPIN RINSE HOLD NIGHT CYCLE EASY IRON EXTRA RINSE TIME MANAGER COTTONS WITH PREWASH 90 Cold Prewash Main wash Rinses Maximum spin speed 1000 rpm Max load 6 kg Reduced load 3 kg 1 White or coloured cottons with prewas...

Page 14: ...efficiency so saving energy SPIN RINSE HOLD NIGHT CYCLE EASY IRON EXTRA RINSE COTTONS ECONOMY WITH PREWASH 90 40 Prewash Main wash Rinses Maximum spin speed 1000 rpm Max load 6 kg For white or coloured cottons with prewash phase This programme can be selected for normally soiled cotton items with stains The temperature will decrease and the washing time will be extended SPIN RINSE HOLD NIGHT CYCLE...

Page 15: ...pin speed 1000 rpm Max load 2 kg Special programme for delicate fabrics with hand washing care symbol SPIN RINSE HOLD NIGHT CYCLE LINGERIE 40 Main wash Rinses Maximum spin speed 900 rpm Max load 1 kg This programme is suitable for very delicate items as lingerie bras and underwear etc SPIN RINSE HOLD NIGHT CYCLE SILK 30 Main wash Rinses Maximum spin speed 700 rpm Max load 1 kg Delicate washing pro...

Page 16: ...tergent for the soak programme into the appropriate compart ment At the end of the soak after having emptied out the water you can select the washing programme first turn the programme selector dial to O then to the pro gramme and press the button 8 2 RINSES Rinses Maximum spin speed 1000 rpm Max load 6 kg With this programme it is possible to rinse and spin cotton garments which have been washed ...

Page 17: ...ry washing and according to the softening powder manufac turer s instructions This will help to prevent the formation of lime deposits After each wash Leave the door open for a while This helps to prevent mould and stagnant smells form ing inside the appliance Keeping the door open after a wash will also help to preserve the door seal Maintenance wash With the use of low temperature washes it is p...

Page 18: ...shing to clean off any cleaning agent residues Programme Short Cotton Programme at maximum temperature and add approx 1 4 measuring cup of detergent Door seal Check from time to time the door seal and eliminate eventual possible objects that could be trapped in the fold Drain pump The pump should be inspected regularly and particularly if the machine does not empty and or spin the machine makes an...

Page 19: ...rew the pump cover using a pliers and remove the filter Always keep a rag nearby to dry up spillage of water when removing the cover 1 2 7 Remove any objects from the pump im peller by rotating it 8 Replace the filter into the pump paying attention to insert it properly When done screw it firmly 9 Replace the emergency emptying cap into the filter cover and fix it firmly electrolux 19 ...

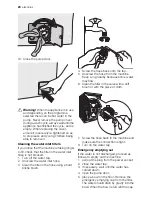
Page 20: ...nlet hose 3 Clean the filter in the hose using a hard bristle brush 4 Screw the hose back onto the tap 5 Unscrew the hose from the machine Keep a rug nearby because some water may flow 6 Clean the filter in the valve with a stiff brush or with the piece of cloth 7 Screw the hose back to the machine and make sure the connection is tight 8 Turn on the water tap Emergency emptying out If the water is...

Page 21: ...play and some acoustic signals sound ev ery 20 seconds to indicate that the machine is not working problem with the water supply problem with the water draining door open Once the problem has been eliminated press the button 8 to restart the programme If after all checks the problem persists con tact your local Service Centre Problem Possible cause Solution The machine does not start The door has ...

Page 22: ...ated prior to washing Use commercial products to treat the stubborn stains The correct temperature was not selected Check if you have selected the correct temperature Excessive laundry load Reduce the laundry load The door will not open The programme is still running Wait the end of washing cycle The door lock has not been released Wait until the pilot light 9 goes off There is water in the drum S...

Page 23: ... and purchase date of your machine the Service Centre will require this informa tion Mod Prod No Ser No M od Pr od N o Se r N o Technical data Dimensions Width Height Depth Depth Overall dimensions 60 cm 85 cm 43 cm 48 cm Electrical connection Voltage Overall power Fuse Information on the electrical connection is given on the rating plate on the inner edge of the appliance door Water supply pressu...

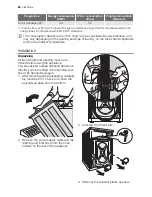
Page 24: ...dry on the inlet water temperature and on the ambient temperature Installation Unpacking All transit bolts and packing must be re moved before using the appliance You are advised to keep all transit devices so that they can be refitted if the machine ever has to be transported again 1 After removing all the packaging carefully lay machine on it s back to remove the polystyrene base from the bottom...

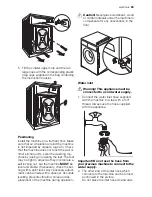
Page 25: ...he set ting with a spirit level Any necessary adjust ment can be made with a spanner Accurate levelling prevents vibration noise and dis placement of the machine during operation Caution Never place cardboard wood or similar materials under the machine to compensate for any unevenness in the floor Water inlet Warning This appliance must be connected to a cold water supply 1 Connect the water inlet...

Page 26: ... hose can be positioned in three ways Hooked over the edge of a sink using the plastic hose guide supplied with the machine In this case make sure the end cannot come unhooked when the ma chine is emptying This could be done by tying it to the tap with a piece of string or attaching it to the wall In a sink drain pipe branch This branch must be above the trap so that the bend is at least 60 cm abo...

Page 27: ...u will help prevent potential negative consequences for the environment and human health which could otherwise be caused by inappropriate waste handling of this product For more detailed information about recycling of this product please contact your local council your household waste disposal service or the shop where you purchased the product Packaging materials The materials marked with the sym...

Page 28: ...132952990 00 192009 www electrolux com web portal 1 web portal 2 ...

Reviews: