background image

In a sink drain pipe branch.

 This branch

must be above the trap so that the bend is

at least 60 cm above the ground.

Directly into a drain pipe

 at a height of

not less than 60 cm and not more than 90

cm. The end of the drain hose must always

be ventilated, i.e. the inside diameter of the

drain pipe must be larger than the outside

diameter of the drain hose. The drain hose

must not be kinked.

The drain hose may be extended to a maximum of 4 metres. An additional drain hose and

joining piece is available from your local Service Centre.

Electrical connection

Information on the electrical connection is

given on the rating plate on the inner edge of

the appliance door.

Check that your domestic electrical installa-

tion can take the maximum load required, al-

so taking into account any other appliances

in use.

Connect the machine to an earthed

socket.
The manufacturer does not accept

any responsibility for damage or

injury through failure to comply with

the above safety precaution.
The power supply cable must be

easily accessible after installing the

machine.
Should the appliance power supply

cable need to be replaced, this must

be carried out by a Service Centre.

Environment concerns

The symbol     on the product or on its

packaging indicates that this product may

not be treated as household waste. Instead

it should be taken to the appropriate

collection point for the recycling of electrical

and electronic equipment. By ensuring this

product is disposed of correctly, you will help

prevent potential negative consequences for

the environment and human health, which

could otherwise be caused by inappropriate

waste handling of this product. For more

detailed information about recycling of this

product, please contact your local council,

your household waste disposal service or the

shop where you purchased the product.

Packaging materials

The materials marked with the symbol   are

recyclable.

>PE<=polyethylene

>PS<=polystyrene

>PP<=polypropylene

This means that they can be recycled by dis-

posing of them properly in appropriate col-

lection containers.

electrolux 

 23

Summary of Contents for EWF 14180 W

Page 1: ...user manual Washing Machine EWF 14180 W ...

Page 2: ...hs when there are minus tempera tures Store it at room temperature for 24 hours before using for the first time General safety It is dangerous to alter the specifications or attempt to modify this product in any way During high temperature wash pro grammes the door glass may get hot Do not touch it Make sure that small pets do not climb into the drum To avoid this please check into the drum before...

Page 3: ...ains such as paint ink rust and grass before washing Under wired bras must NOT be machine washed Garments which have been in contact with volatile petroleum products should not be machine washed If volatile cleaning fluids are used care should be taken to ensure that the fluid is removed from the garment before placing in the machine Never pull the power supply cable to re move the plug from the s...

Page 4: ...or stain remover used during the stain action phase if availa ble The prewash and soak detergent is added at the beginning of the wash pro gramme The stain remover is added during the stain action phase Compartment for powder or liquid deter gent used for main wash If using liquid de tergent pour it just before starting the pro gramme Compartment for liquid additives fabric softener starch Follow ...

Page 5: ... button 6 START PAUSE button 7 DELAY START button 8 Indicator Pilot Lights Table of Symbols Rinse hold Super Quick No spin Washing Cold Door locked Prewash End Economy Extra rinse Cottons Synthetics Easy iron Delicates Wool Handwash Silk Soak Mini 30 Rinses Delicate rinses Drain Spin Delicate spin Control panel Programme Selector Dial It allows you to switch the appliance on off and or to select a...

Page 6: ...eshening up We rec ommend you to reduce the fabrics loading Extra Rinse This appliance is designed for saving energy If it necessary to rinse the laundry using an extra quantity of water extra rinse select this option Some additional rinses will be performed This option is recommended for people who are allergic to detergents and in areas where the water is very soft Delay Start The start of the p...

Page 7: ...amount used must not exceed the MAX mark in the drawer Close the drawer gently Select the required programme by turning the programme selector dial 1 Turn the programme selector dial to the re quired programme The washing machine will automatically select a spin value for the programme you have chosen You can change this value by turning the relevant dial The green pilot light of the button 6 star...

Page 8: ...the desired delay The relevant light illuminates You must select this option after you have set the programme and before you start the pro gramme You can cancel or modify the delay time at any moment before you press button 6 Selecting the delayed start 1 Select the programme and the required options 2 Select the delay start by pressing the but ton 7 3 Press button 6 the machine starts its hourly ...

Page 9: ...e and options again and to press button 6 At the end of the programme The machine stops automatically The pilot light of button 6 the pilot lights 8 1 and 8 2 go off The light 8 3 illuminates If a programme or an option that ends with water left in the tub has been selected the pilot light 8 2 remains on and the door is locked to indicate that the water must be emptied out before opening the door ...

Page 10: ...the garment on a soft cloth and dab the stain treat several times Dried grease stains moisten with turpen tine lay the garment on a soft surface and dab the stain with the fingertips and a cotton cloth Rust oxalic acid dissolved in hot water or a rust removing product used cold Be careful with rust stains which are not recent since the cellulose structure will already have been damaged and the fab...

Page 11: ...y or from your local authority A water softener must be added when water has a medium high degree of hardness from degree of hardness II Follow the manufacturer s instructions The quantity of detergent can then al ways be adjusted to degree of hardness I soft Level Charac teristic Degrees of water hardness German dH French T H 1 soft 0 7 0 15 2 medium 8 14 16 25 3 hard 15 21 26 37 4 very hard 21 3...

Page 12: ...cs acrylics viscose polyester NO SPIN RINSE HOLD PREWASH SUPER QUICK EX TRA RINSE 2 WOOL 40 Cold Main wash Rinses Maximum spin speed 900 rpm Max load 2 kg Washing programme for machine washable wool as well as for hand washable woollens and delicate fabrics Note A single or bulky item may cause imbalance If the appliance doesn t perform the final spin phase add more items redistribute the load man...

Page 13: ...he end of the soak after having emptied out the water you can select the washing programme First turn the programme selector dial to O then to the pro gramme and press the button 6 MINI 30 30 Main wash Rinses Maximum spin speed 700 rpm Max load 2 kg Complete programme for slightly soiled items which need to be freshened up NO SPIN RINSES Rinse with fabric softener if needed Maximum spin speed 1400...

Page 14: ...water we use normally contains lime It is a good idea to periodically use a water softening powder in the machine Do this separately from any laundry washing and according to the softening powder manufac turer s instructions This will help to prevent the formation of lime deposits After each wash Leave the door open for a while This helps to prevent mould and stagnant smells form ing inside the ap...

Page 15: ...cur due to rusting foreign bodies in the washing or tap water containing iron Important Do not clean the drum with acidic descaling agents scouring agents containing chlorine or iron or steel wool 1 Remove any rust deposits on the drum with a cleaning agent for stainless steel 2 Run a washing cycle without any washing to clean off any cleaning agent residues Programme Short Cotton Programme at max...

Page 16: ... When no more water comes out un screw the pump and remove it Always keep a rag nearby to dry up spillage of water when removing the pump 7 Remove any objects from the pump im peller by rotating it 8 Refit the cap on the emergency empty ing hose and place the latter back in its seat 9 Screw the pump fully in 10 Close the pump door Warning When the appliance is in use and depending on the programme...

Page 17: ...rew the wa ter inlet hose from the tap 2 place the end of the emergency emptying hose and that of the inlet hose in a bowl placed on the floor and let water drain out 3 screw the water inlet hose back on and reposition the emergency emptying hose after having put the cap on again By doing this any water remaining in the ma chine is removed avoiding ice forming and consequently damage to the applia...

Page 18: ...kinked the button 6 red light blinks Check the drain hose connection The drain filter is clogged the button 6 red light blinks Clean the drain filter An option or a programme that ends with the water still in the tub or a that eliminates all the spinning phases has been selected Select the draining or spinning programme The laundry is not evenly distributed in the drum Redistribute the laundry The...

Page 19: ...imes before the unbalance disappears and normal spinning can re sume If after 10 minutes the laundry is still not evenly distributed in the drum the machine will not spin In this case redistribute the load manually and select the spin programme Redistribute the laundry The load is too small Add more items redistribute the load manually and then select the spinning programme The machine makes an un...

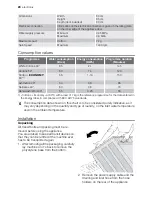
Page 20: ...ith a load of 7 kg is the reference programme for the data entered in the energy label in compliance with EEC 92 75 standards The consumption data shown on this chart is to be considered purely indicative as it may vary depending on the quantity and type of laundry on the inlet water temperature and on the ambient temperature Installation Unpacking All transit bolts and packing must be re moved be...

Page 21: ...und the machine is not impeded by carpets rugs etc Check that the machine does not touch the wall or other kitchen units Level the washing ma chine by raising or lowering the feet The feet may be tight to adjust as they incorporate a self locking nut but the machine MUST be level and stable If necessary check the set ting with a spirit level Any necessary adjust ment can be made with a spanner Acc...

Page 22: ...orrectly by loosening the ring nut After positioning the inlet hose be sure to tighten the ring nut again to prevent leaks The inlet hose must not be lengthened If it is too short and you do not wish to move the tap you will have to purchase a new longer hose specially designed for this type of use Important Before connecting up the machine to new pipework or to pipework that has not been used for...

Page 23: ... failure to comply with the above safety precaution The power supply cable must be easily accessible after installing the machine Should the appliance power supply cable need to be replaced this must be carried out by a Service Centre Environment concerns The symbol on the product or on its packaging indicates that this product may not be treated as household waste Instead it should be taken to th...

Page 24: ... to save deter gent water and time the environment is protected too The machine works more economically if it is fully loaded With adequate pre treatment stains and limited soiling can be removed the laundry can then be washed at a lower tempera ture Measure out detergent according to the water hardness the degree of soiling and the quantity of laundry being washed 24 electrolux ...

Page 25: ...electrolux 25 ...

Page 26: ...26 electrolux ...

Page 27: ...electrolux 27 ...

Page 28: ...132958610 00 512008 www electrolux com web portal 1 web portal 2 ...

Reviews: