background image

63

Major Appliance Warranty Information

Your appliance is covered by a one year limited warranty. For one year from your original date of purchase, Electrolux will
repair or replace any parts of this appliance that prove to be defective in materials or workmanship when such appliance is
installed, used, and maintained in accordance with the provided instructions. In addition, the glass cooktop or radiant surface
element of your appliance (excluding built-in and free-standing range appliances) is covered by a two through five year
limited warranty.  During the 2nd through 5th years from your original date of purchase, Electrolux will provide a replacement
glass cooktop or radiant surface element for your appliance which has proven to be defective in materials or workmanship
when such appliance is installed, used, and maintained in accordance with the provided instructions.

Exclusions

This warranty does not cover the following:

1.

Products with original serial numbers that have been removed, altered or cannot be readily determined.

2.

Product that has been transferred from its original owner to another party or removed outside the USA or Canada.

3.

Rust on the interior or exterior of the unit.

4.

Products purchased “as-is” are not covered by this warranty.

5.

Products used in a commercial setting.

6.

Service calls which do not involve malfunction or defects in materials or workmanship, or for appliances not in
ordinary household use or used other than in accordance with the provided instructions.

7.

Service calls to correct the installation of your appliance or to instruct you how to use your appliance.

8.

Expenses for making the appliance accessible for servicing, such as removal of trim, cupboards, shelves, etc.,
which are not a part of the appliance when it is shipped from the factory.

9.

Service calls to repair or replace appliance light bulbs, air filters, water filters, other consumables, or knobs,
handles, or other cosmetic parts.

10.

Labor or in-home service costs during the additional limited warranty periods beyond the first year from your
original date of purchase.

11.

Pickup and delivery costs; your appliance is designed to be repaired in the home.

12.

Surcharges including, but not limited to, any after hour, weekend, or holiday service calls, tolls, ferry trip charges, or
mileage expense for service calls to remote areas, including the state of Alaska.

13.

Damages to the finish of appliance or home incurred during transportation or installation, including but not limited to
floors, cabinets, walls, etc.

14.

Damages caused by: services performed by unauthorized service companies; use of parts other than genuine
Electrolux parts or parts obtained from persons other than authorized service companies; or external causes such
as abuse, misuse, inadequate power supply, accidents, fires, or acts of God.

DISCLAIMER OF IMPLIED WARRANTIES; LIMITATION OF REMEDIES

CUSTOMER’S SOLE AND EXCLUSIVE REMEDY UNDER THIS LIMITED WARRANTY SHALL BE REPAIR OR REPLACE-
MENT AS PROVIDED HEREIN. CLAIMS BASED ON IMPLIED WARRANTIES, INCLUDING WARRANTIES OF MER-
CHANTABILITY OR FITNESS FOR A PARTICULAR PURPOSE, ARE LIMITED TO ONE YEAR OR THE SHORTEST
PERIOD ALLOWED BY LAW, BUT NOT LESS THAN ONE YEAR.
 ELECTROLUX SHALL NOT BE LIABLE FOR CONSE-
QUENTIAL OR INCIDENTAL DAMAGES SUCH AS PROPERTY DAMAGE AND INCIDENTAL EXPENSES RESULTING FROM
ANY BREACH OF THIS WRITTEN LIMITED WARRANTY OR ANY IMPLIED WARRANTY. SOME STATES AND PROVINCES
DO NOT ALLOW THE EXCLUSION OR LIMITATION OF INCIDENTAL OR CONSEQUENTIAL DAMAGES, OR LIMITATIONS ON
THE DURATION OF IMPLIED WARRANTIES, SO THESE LIMITATIONS OR EXCLUSIONS MAY NOT APPLY TO YOU. THIS
WRITTEN WARRANTY GIVES YOU SPECIFIC LEGAL RIGHTS. YOU MAY ALSO HAVE OTHER RIGHTS THAT VARY FROM
STATE TO STATE.

If You Need Service

Keep your receipt, delivery slip, or some other appropriate payment record to establish the warranty period should service be
required. If service is performed, it is in your best interest to obtain and keep all receipts. Service under this warranty must be
obtained by contacting Electrolux at the addresses or phone numbers below.

This warranty only applies in the USA, Puerto Rico and Canada. In the USA and Puerto Rico, your appliance is warranted by
Electrolux Major Appliances North America, a division of Electrolux Home Products, Inc. In Canada, your appliance is war-
ranted by Electrolux Canada Corp. Electrolux authorizes no person to change or add to any obligations under this warranty.
Obligations for service and parts under this warranty must be performed by Electrolux or an authorized service company.
Product features or specifications as described or illustrated are subject to change without notice.

Canada
1-800-265-8352
Electrolux Canada Corp.
5855 Terry Fox Way
Mississauga, Ontario, Canada  L5V 3E4

USA
1-877-435-3287
Electrolux Major Appliances  North America
P.O. Box 212378
Augusta, GA  30907

Summary of Contents for EW3LDF65G S

Page 1: ...316520002 Rev B Use Care Guide 30 Free Standing Dual Fuel Range ...

Page 2: ... SAFETY 3 6 Features 7 9 Getting Started 10 12 About burner caps and heads 10 Power up control display modes timers 11 Control lock oven lights 12 Settings for Best Results 13 14 Surface Cooking 15 Setting Surface Controls 16 Setting cooktop controls 16 Burner locations 16 Setting Oven Controls 18 39 Rapid preheat 18 Bake 19 Using cook time 20 Using cook time with end time 21 Broil 22 23 Convectio...

Page 3: ...stallation If the information in this manual is not followed exactly a fire or explosion may result causing property damage personal injury or death For your safety Do not store or use gasoline or other flammable vapors and liquids in the vicinity of this or any other appliance Installation and service must be performed by a qualified installer servicer or the gas supplier What to do if you smell ...

Page 4: ...kbooks plasticware and towels as well as flammable liquids Do not store explosives such as aerosol cans on or near the range Read all of the following safety instructions before using this appliance Important safety instructions Do not leave children alone Children should not be left alone or unattended in the area where appliance is in use They should never be allowed to sit or stand on any part ...

Page 5: ...sils Only certain types of glass glass ceramic ceramic earthenware or other glazed utensils are suitable for cook top service without breaking due to the sudden change in temperature Check the manufacturer srecommendationsforcooktop use Important instructions for using your oven Use care when opening oven door or lower oven drawer if equipped Stand to the side of the range when opening the door of...

Page 6: ... No commercial oven cleaner or oven liner protective coating of any kind should be used in or around any part of the oven Do not clean door gasket The door gasket is essential for a good seal Care should be taken not to rub damage or move the gasket The health of some birds is extremely sensitive to the fumes given off during the self cleaning cycle of any range Move birds to another well ventilat...

Page 7: ...8 Cooking time Cook time pg 20 End time pg 21 9 Probe pg 28 29 Features 10 11 10 Rapid preheat pg 18 11 Convection convert pg 25 12 Clean pg 50 51 12 6 7 8 9 1 4 2 3 5 Minimum maximum control settings 550 F 288 C 450 F 232 C Hi 100 F 38 C 550 F 288 C 550 F 288 C 550 F 288 C 550 F 288 C 190 F 88 C Hi 275 F 135 C 225 F 108 C 550 F 288 C 170 F 76 C 170 F 76 C Lo 85 F 30 C 300 F 148 C 170 F 76 C 170 F...

Page 8: ... adjust or reset pg 47 Factory default reset pg 48 15 Oven display 16 Timers pg 11 17 Cancel Start 18 Numeric key pad Oven control display keys Minimum maximum time settings Feature Min time Max time Timer 1 Timer 2 Clock 12 hr Clock 24 hr Cook time 12 hr Cook time 24 hr End time 12 hr End time 24 hr Clean duration 1 min 1 min 1 00 hr 0 00 hr 1 min 1 min 1 00 hr 0 00 hr Lite 2 hr 11 hr 59 min 11 h...

Page 9: ...tch 13 Theatre style Luxury Lighting halogen upper oven interior lights 14 Convection fan cover 15 2 fully extendable Luxury Glide interior oven racks 16 1 offset interior oven rack not shown 17 Oven glide rack sensor 18 Large 1 piece metal oven door handles 19 Color coordinated or stainless steel oven exterior panels trim Wave Touch Range features 1 2 3 4 5 6 8 9 7 10 11 12 13 14 17 15 18 19 20 2...

Page 10: ...ing Slow preheat ensures even heat distribution during the cooking process DO NOT preheat the griddle on HI burner setting Preheating on HI may warp the griddle and prevent even heat distribution After each use DO NOT CLEAN GRIDDLE IN DISHWASHER After each use clean with a stiff brush and hot water only Dry immediately and apply a light coating of vegetable oil to griddle before storing To prevent...

Page 11: ...e is a hot element Only the clock will display during this mode You will need to wake the control to begin any function Awake mode To awake the control Fig 2 touch within the display panel If the control panel is not touched again within 2 minutes the control will return to the sleep mode To start cooking you must select either the upper oven lower oven or a surface element User preferences will b...

Page 12: ... operate at the same time with unique settings It is very important to understand that before setting or modifying either oven you must first select which oven you desire to set or modify The display will provide which oven is currently selected for setting changes by displaying a small red triangle indicator next to the upper or lower oven text Fig 1 If the upper oven text symbol displays the red...

Page 13: ...re for proper air circulation and be sure pans and cookware do not touch each other the oven door sides or back of the oven cavity The hot air must be able to circulate around the pans and cookware in the oven for even heat to reach around the food The offset Fig 1 oven rack may be used in all of the rack positions The offset design provides additional height options For maximum available space if...

Page 14: ...ightly and continue to pull rack away from oven Fig 3 Be sure to hold on both upper and lower rack portions when removing from or handling rack outside of the the oven these rack portions move independently and are difficult to handle unless held together To replace grasping both upper and lower portions of glide rack lift and place the rack resting evenly between the oven cavity walls Tilt the fr...

Page 15: ...available are Aluminum Excellent heat conductor Some types of food will cause it to darken Anodized aluminum cookware resists staining pitting Copper Excellent heat conductor but discolors easily Stainless steel Slow heat conductor with uneven cooking results Is durable easy to clean and resists staining Cast iron A poor heat conductor however will retain heat very well Cooks evenly once cooking t...

Page 16: ...will lite 3 Visually check that both the inner and outer rings are lit Fig 4 When both burners are lit continue to turn the control knob counterclockwise to adjust to the desired flame size 4 If only the inner burner is needed continue to rotate the gas control knob counterclockwise somewhere past grey area Fig 2 5 Adjust the inner flame to desired size Fig 3 OperatingMin 2 Max double burner Fig 2...

Page 17: ...ation AbbreviantionsChart This is an example of a fault code that you may see These codes will help your servicer repair your appliance CLn Self clean CLO Setting the clock dEF Defrost d O Dooropen End End of cycle F10 Faultcodeerror HE Hotelement Hi Hi setting Hot Hotoven Lo Lo setting Loc Controllock SAb Sabbathmode Sd Demomode SF Sabbath mode failure CF Check food ...

Page 18: ...w to set a rapid preheat with bake to start immediately using default temperature When START is pressed the oven will preheat quickly The control will display PRE HEATING during this time While PREHEATING the Convection fan may operate After a few minutes a beep will sound and PRE HEATING will no longer display Place prepared food on a single oven rack The oven will continue to bake at the set tem...

Page 19: ... temperature settings apply to the bake feature Auto suggest default setting 350 F 176 C Min bake setting 170 F 77 C Max bake setting 550 F 288 C Example 1 Press UPPER OVEN Step Press 2 Press BAKE 1 Press UPPER OVEN 3 Press START Example Step Press Place food items in rack positions 2 or 4 When using the offset oven rack place in rack position 2 or 3 When placing multiple food items in the oven al...

Page 20: ...eadproof Keep warm Example Step Press 7 Press START 6 Enter 30 minutes 5 Press COOK TIME 4 Press COOK OPTIONS 3 Press START 2 Press BAKE 1 Press UPPER OVEN NOTE You may press CANCEL any time when setting the control or during the cooking process See example below to set the upper oven for bake starting immediately with preheating to the auto suggest default setting of 350 F 176 C and then to autom...

Page 21: ...ss NOTE When setting the END TIME option be sure the correct time of day is set You may press CANCEL any time when setting the control or during the cooking process You may also choose to use COOK TIME with no END TIME See pg 20 9 Press START 7 Press END TIME 6 Enter 50 minutes 5 Press COOK TIME 4 Press COOK OPTIONS 3 Enter 375 F 2 Press BAKE 1 Press UPPER OVEN 8 Enter 5 30 Once START is pressed t...

Page 22: ... follow all warnings and cautions 2 Arrange the interior oven rack p 23 Figs 2 3 for position recommendations Be sure to place the prepared food and pan directly under broil element Leave the oven door open slightly about 4 inches in the broil position p 23 Fig 1 4 Press BROIL 3 Press UPPER OVEN 5 Press START Step Press Use the recommended pans and oven rack positions for the type of meat being pr...

Page 23: ...s Steak 1 thick 4th or 5th 550 F 6 4 Medium Steak 1 thick 4th or 5th 550 F 7 5 Medium well Steak 1 thick 4th or 5th 550 F 8 7 Well Pork chops 3 4 thick 5th 550 F 8 6 Well Chicken bone in 4th 450 F 20 10 Well Chicken boneless 5th 450 F 8 6 Well Fish 5th 500 F 13 n a Well Shrimp 4th 550 F 5 n a Well Hamburger 1 thick 5th 550 F 9 7 Medium Hamburger 1 thick 5th 550 F 10 8 Well The broil pan insert if ...

Page 24: ... may be set with the following options Convconvert Cook time or cook time with end time Probe Rapid preheat The following temperature settings apply to the conv bake feature Auto suggest default setting 350 F 176 C Min bake setting 170 F 76 C Max bake setting 550 F 288 C You may press CANCEL any time when setting the control or when cooking NOTE When baking with a single rack use rack positions 2 ...

Page 25: ...est results You may press CANCEL any time when setting the control or during the cooking process NOTE 2 Press CONV BAKE 1 Press UPPER OVEN 5 Press START Example Example Step Press Once START is pressed the oven display shows PRE HEATING After the oven reaches the converted set temperature PRE HEATING will turn off and a beep will indicate the oven is ready The added conv convert option will automa...

Page 26: ...ple Example Step Press See example below to set convection roast to start immediately with the auto suggest default setting Preheating is not necessary for most meats and poultry Place food items using the recommended rack positions for the type of food being prepared When placing multiple food items in the oven allow 2 4 5 10cm of space between the food items for proper air circulation Be sure to...

Page 27: ...nding rib roast 4 to 6 lbs 350 F 25 30 Fig 2 Setting Oven Controls Roasting recommendations Fig 1 Roasting rack instructions When preparing meats for convection roasting you may use the broiler pan insert and the roasting rack supplied with your appliance The broiler pan will catch grease spills and the insert will help prevent grease splatters The roasting rack fits on top of the insert allowing ...

Page 28: ...rnal temperature without any guesswork Your oven will automatically change from cooking to keep warm once the probe has reached the set temperature The following temperature settings apply to the probefunction Default 170 F 76 C Minimum 130 F 54 C Maximum 210 F 98 C About the probe function Fig 1 Setting the probe Fig 2 IMPORTANT Use only the probe supplied with your appliance any other may result...

Page 29: ...door p 28 Fig 2 Setting Oven Controls By the default your oven will adjust to the keep warm setting once the probe has reached the set temperature NOTE Any time during the cooking process you may press PROBE once to see the current internal meat temperature reported by the probe Press PROBE twice to review or change the probe target temperature 7 Press PROBE 6 Press COOK OPTIONS 8 Enter 180 3 Pres...

Page 30: ... and pan directly under broil element Close the oven door p 23 Fig 1 Step Press 4 Press CONV BROIL 3 Press UPPER OVEN 5 Press START To add or change any cook settings after this feature has started Wake control panel from the sleep mode if necessary Select the UPPER or LOWER oven you wish to change Make temperature changes using the or keys Each press of or will adjust the temperature by 5 F or2 C...

Page 31: ... FOOD POISONING HAZARD Do not let food sit for more than one hour before or after cooking Doing so may cause bacteria to grow which can result in food poisoning orsickness To prevent food from contacting the broil element and to prevent grease splattering do not use the roasting rack when broiling Example NOTE You may press CANCEL any time when setting the control or during the cooking process To ...

Page 32: ...ten or leave the door open when checking foods The more heat that is lost the longer the food will need to cook Cover the foods to keep them moist or use a loose or vented type cover to allow foods to turn crisp or brown Roasts may be left uncovered so browning can occur Cook times will vary depending on the weight fat content bone the shape of the roast Use the probe to check the temperature to d...

Page 33: ...ature It is not recommended to modify the perfect turkey settings once cooking has started Doing so may not provide the best results Heated air circulates around the turkey from all sides sealing in juices and flavors Poultry cooked with this feature are crispy brown on the outside while staying moist on the inside Perfect turkey combines a cook cycle with the convection fan The probe is used to m...

Page 34: ...ER OVEN 3 Press START Example Example Step Press See the example below to set dehydrate at the default temperature of 120 F For best results Dry most fruits and vegetables at 140 F Dry herbs at 100 f Drying times vary depending on the moisture and sugar content of the food the size of the pieces the amount being dried and the humidity in the air Treat fruits with antioxidants to avoid discoloratio...

Page 35: ...roof feature Auto suggest default setting 100 F 38 C Min bread proof setting 85 F 30 C Max bread proof setting 100 F 38 C For best results Lightly cover the dough Place a bowl of hot water on the rack below Use the oven light to check progress Do not open the oven door Example NOTE You may press CANCEL any time when setting the control or during the cooking process To add or change any cook settin...

Page 36: ... light in the display when they are available for setting or recalling Each key will allow you to store a cooking feature oven set temperature and a cook time for either the upper oven or lower oven All the favorite keys will display after selecting the upper or lower oven The example below shows how to save a favorite cooking instruction for the upper oven Example Example Step Press 1 Press UPPER...

Page 37: ...T Press START a total of 2 times to program only 2 stages and begin cooking Setting Oven Controls NOTES You may press CANCEL 1 time to clear the current stage Press CANCEL 2 times to exit the muti stage feature 3 Press BAKE 4 Enter 350 F 6 Enter 60 minutes 7 Press START 1 Press UPPER OVEN 2 Press MULTI STAGE Setting multi stage See the example to program a multi stage feature for a casserole For s...

Page 38: ...ss START 2 times to begin cooking You may review your input after stages 2 or 3 have been programmed After you have accepted your input in stages 2 or 3 by pressing start you will be directed to a review screen Fig 1 To return to the review screen to view the total cooking time for all stages programmed press MULTISTAGEonce See the example below to review edit the cooking feature set temperature a...

Page 39: ... and the Sabbath mode is active the oven light will remain on until the Sabbath mode is turned off and the oven lights are turned off The oven door will not activate the oven interior lights when the oven door is opened or closed For further assistance guidelines for proper usage and a complete list of models with the Sabbath feature please vist the web at http www star k org Fig 1 It is recommend...

Page 40: ...bbath mode Example Canceling Sabbath mode The example below shows how to cancel the Sabbath mode Fig 1 Step Press Step Press Setting Oven Controls Example NOTES The only keys available once the appliance is set for the Sabbath mode are the numeric keys 0 9 You may change the oven temperature and any cooktop settings once baking has started Jewish holidays only Choose oven and press BAKE enter the ...

Page 41: ...food in the lower oven always use a baking sheet or pan with 4 raised sides to prevent food from sliding off DO NOT LINE THE OVEN DRAWER WITH FOIL OR COVER THE OVEN RACK WITH FOIL This may result in damage to your oven The maximum height of foods and utensils that may be used in the lower oven is 2 1 2 The maximum width is 16 Pay close attention to foods that have potential to rise beyond the reco...

Page 42: ...ds warm When using keep warm always start with hot food Do not heat cold food Keep warm may be set with the following options Cook time Cook time with end time The following temperature settings apply to the keep warm feature Auto suggest default setting 170 F 76 C Min keep warm setting 150 F 66 C Max keep warm setting 190 F 88 C If you enter a temperature beyond this range your control will autom...

Page 43: ...t at serving temperatures at 170 F When a combination of foods are to be kept warm for example a meat with 2 vegetables and rolls use 170 F For easier clean up the lower oven should be cleaned as soon as the oven cools down Clean after each use to minimize build up of spatter and food leftovers When cooking foods that spatter cover the food with heat proof lid or foil Use a mild detergent and wate...

Page 44: ...ccept a new option entry or press USER PREF to advance to the next preference Press CANCEL after pressing START to exit the preferences mode NOTE User preference options are not available while cooking or when using the kitchen timer Setting clock CLO 1 Press USER PREF 2 Enter 1 30 or use hi lo to advance to 1 30 3 Press START to accept or press CANCEL to reject See the example below to set the cl...

Page 45: ...g 2 or 3 Press START to accept Example Step Press Fig 1 Fig 2 Setting 12 or 24 hour mode Changing between F or C F C Your control has the ability to display and set Fahrenheit or Celsius temperatures The factory pre set temperature display is Fahrenheit See the example below to change the default temperature display to Celsius or 2 Use the hi or lo to toggle to the C option Fig 2 Example 1 Press a...

Page 46: ...2 hr enery saving mode Example Step Press 3 Press START to accept or press CANCEL to reject Setting audio mode AUD 1 Press and continue to press USER PREF until you reach the pre set AUd mode 2 Use the hi or lo to choose desired audio level Fig 1 or to choose the off option Fig 2 or The audio mode allows you choose between 5 levels of audio volume for the oven control You may turn the audio off an...

Page 47: ... Press and continue to press USER PREF until you reach the pre set UPO mode Fig 1 2 Press lo to adjust the temperaturelower 3 Use lo to advance to 10 Fig 2 Example Step Press To set the temperature higher use the hi key Fig 1 4 Press START to accept or press CANCEL to reject Example 1 Press and continue to press USER PREF until you reach the pre set UPO mode Fig 1 Adjusting lower oven temperature ...

Page 48: ...l settings or favorites that you havesaved See the example below reset your control Example 1 Press and continue to press USER PREF until you reach the factory default reset mode Fig 1 Example Step Press Fig 1 3 Press CANCEL if you decide not to reset Fig 2 2 Use the hi or lo to toggle to the yes option to reset Fig 1 or ...

Page 49: ...tion User preferences chart The following chart will help you navigate through the user preferences F or C 12 or 24 hour mode 12hr energy save mode Audio mode UPO upper oven UPO lower oven Setting clock Reset to factory pre sets Clock display Audio mode provides 6 possible settings ...

Page 50: ...t use any cleaning materials on the door gasket Leaving chemical residue can damage the door gasket DO NOT force the oven door open The automatic door locking system can be damaged Remove the broiler pan insert all utensils and any aluminum foil These items cannot withstandhighcleaningtemperatures All oven racks MUST be removed If they are left in while attempting to set a self clean cycle the dis...

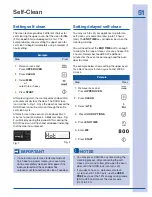
Page 51: ...e upper oven for a lite 2 hour self clean cycle to end at 8 00 o clock 3 Select LITE After pressing start the motorized oven door latch will automatically lock the door The DOOR lock icon will flash Fig 1 Once the door has locked the DOOR lock icon will remain on through the entire self clean cycle After self clean the oven may take about 30 40 minutes to cool and unlock A Hot message Fig 2 will d...

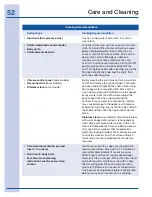
Page 52: ...ing a dishcloth Be sure to squeeze excess water from the cloth before wiping the panel especially when wiping around the controls Excess water in or around the controls may cause damage to the appliance To replace knobs after cleaning line up the flat sides of both the knob and the shaft then push the knob into place Stainless steel some models Clean the stainless with warm soapy water using a cle...

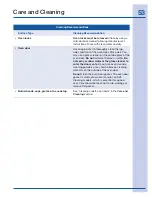
Page 53: ...e outside glass of the oven door Do not immerse the door in water Do not spray or allow water or the glass cleaner to enter the door vents Do not use oven cleaners cleaning powders or any harsh abrasive cleaning materials on the outside of the oven door Do not clean the oven door gasket The oven door gasket is made of a woven material on Self Cleaning models which is essential for a good seal Care...

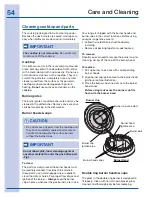
Page 54: ... make sure to Follow the installation instructions before installing Remove all packing tape from cooktop area To remove Should you ever need to remove the burner cap for cleaning simply lift the cap off the burner head Toreplace 1 Pair up burner caps sizes with corresponding burner heads 2 Align burner cap ignition area to the burner head ignition area See illustration 3 Place the burner cap vane...

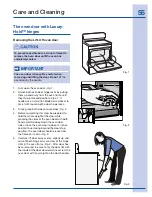
Page 55: ...out 4 inches and continue closing beyond the door stop position The oven door should release from the frame on its own Fig 3 5 Carefully lift door away evenly slightly up and out until both hinge arms are clear of the hinge slots in the oven frame Fig 3 After door has been removed be sure to lay the door flat with the inside of the door downward never rest the oven door with any weight on the door...

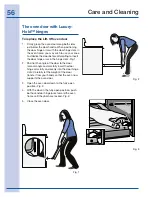
Page 56: ...ots Fig 1 2 Position the angle of the door to the door removal angle and carefully insert the door hinge arms fully and evenly into the door hinge slots Carefully let the weight of the door transfer from your hands so that the oven now supports the oven door 3 Open the oven door down to the fully open position Fig 2 4 With the door in the fully open position push both oven door hinge locks toward ...

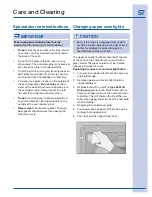
Page 57: ...cle Special door care instructions IMPORTANT Most oven doors contain glass that can break Read the following recommendations Changing upper oven lights Be sure the range is unplugged and all parts are COOL before replacing oven light Wear a leather faced glove for protection against possible broken glass or burns The upper oven light bulbs are located at the rear of the oven cavity and both are co...

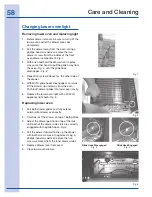
Page 58: ...r glides into lower oven cavity 6 Replace the lower oven light with a 40 Watt appliance light bulb Fig 5 Glide Hook Disengaged Fig 3 Glide Hook Engaged Fig 4 Fig 5 Removing lower oven and replacing light Fig 1 Fig 2 1 Pull both drawer glides and fully extend outward from lower oven cavity 2 Carefully rest the drawer on top of both glides 3 Adjust the drawer position on top of the rails until both ...

Page 59: ...ent may make range appear not level Be sure cabinets are square have sufficient room for appliance clearance Beforeyoucall Surface Control knob has not been completely turned to lite Push in and turn the surface control knob to lite until burner ignites and then turn control knob to desired flame size Burner ports are clogged With the burners OFF use a small gauge wire or needle to clean ports See...

Page 60: ...The time of day must first be set in order to operate the oven See Setting the clock at power up in the Getting Started section Make sure cord plug is plugged correctly into outlet Service wiring is not complete Contact your dealer installing agent or authorized service agent Electrical power outage Call your local electric company for service Poor baking results Many factors affect baking results...

Page 61: ...d grease or food spatters cause excessive smoking Flames inside oven or smoking from oven vent Excessive spillovers in oven For example this will happen for pie spillovers or large amounts of grease left on the oven bottom Wipe up excessive spillovers before starting oven If flames or excessive smoke are present see About broiling in the Setting Oven Controls section Solutions to Common Problems Q...

Page 62: ...62 Notes ...

Page 63: ...remote areas including the state of Alaska 13 Damages to the finish of appliance or home incurred during transportation or installation including but not limited to floors cabinets walls etc 14 Damages caused by services performed by unauthorized service companies use of parts other than genuine Electrolux parts or parts obtained from persons other than authorized service companies or external cau...

Page 64: ......

Reviews: