background image

1. 

  SAFETY INFORMATION

In the interest of your safety and to ensure
the correct use, before installing and first
using the appliance, read this user manual
carefully, including its hints and warnings.
To avoid unnecessary mistakes and acci-
dents, it is important to ensure that all
people using the appliance are thoroughly
familiar with its operation and safety fea-
tures. Save these instructions and make
sure that they remain with the appliance if
it is moved or sold, so that everyone using
it through its life will be properly informed
on appliance use and safety.
For the safety of life and property keep
the precautions of these user's instruc-
tions as the manufacturer is not responsi-
ble for damages caused by omission.

1.1 

Children and vulnerable

people safety

• This appliance is not intended for use

by persons (including children) with re-
duced physical, sensory or mental ca-
pabilities, or lack of experience and
knowledge, unless they have been giv-
en supervision or instruction concerning
use of the appliance by a person re-
sponsible for their safety.
Children should be supervised to en-
sure that they do not play with the ap-
pliance.

• Keep all packaging well away from chil-

dren. There is risk of suffocation.

• If you are discarding the appliance pull

the plug out of the socket, cut the con-
nection cable (as close to the appliance
as you can) and remove the door to
prevent playing children to suffer elec-
tric shock or to close themselves into it.

• If this appliance featuring magnetic

door seals is to replace an older appli-
ance having a spring lock (latch) on the
door or lid, be sure to make that spring
lock unusable before you discard the
old appliance. This will prevent it from
becoming a death trap for a child.

1.2 

General safety

WARNING!

Keep ventilation openings, in the appli-
ance enclosure or in the built-in structure,
clear of obstruction.
• The appliance is intended for keeping

foodstuff and/or beverages in a normal
household as explained in this instruc-
tion booklet.

• Do not use a mechanical device or any

artificial means to speed up the thawing
process.

• Do not use other electrical appliances

(such as ice cream makers) inside of re-
frigerating appliances, unless they are
approved for this purpose by the manu-
facturer.

• Do not damage the refrigerant circuit.
• The refrigerant isobutane (R600a) is

contained within the refrigerant circuit of
the appliance, a natural gas with a high
level of environmental compatibility,
which is nevertheless flammable.
During transportation and installation of
the appliance, be certain that none of
the components of the refrigerant cir-
cuit become damaged.
If the refrigerant circuit should become
damaged:
– avoid open flames and sources of ig-

nition

– thoroughly ventilate the room in

which the appliance is situated

• It is dangerous to alter the specifica-

tions or modify this product in any way.
Any damage to the cord may cause a
short-circuit, fire and/or electric shock.

WARNING!

Any electrical component (power
cord, plug, compressor) must be
replaced by a certified service
agent or qualified service person-
nel to avoid hazard.

1.

Power cord must not be length-
ened.

2.

Make sure that the power plug is
not squashed or damaged by the
back of the appliance. A squashed
or damaged power plug may over-
heat and cause a fire.

3.

Make sure that you can come to
the mains plug of the appliance.

ENGLISH

21

Summary of Contents for EUF2042AOW

Page 1: ...EUF2745AOW EUF2745AOX NL VRIEZER GEBRUIKSAANWIJZING 2 EN FREEZER USER MANUAL 20 DE GEFRIERGERÄT BENUTZERINFORMATION 36 ...

Page 2: ...he resultaten zult krijgen Welkom bij Electrolux Ga naar onze website voor Advies over gebruik brochures het oplossen van problemen en onderhoudsinformatie www electrolux com Registreer uw product voor een betere service www electrolux com productregistration Koop accessoires verbruiksartikelen en originele reserveonderdelen voor uw apparaat www electrolux com shop KLANTENSERVICE Wij raden altijd ...

Page 3: ...aat afdankt trek dan de stekker uit het stopcontact snij de voe dingskabel door zo dicht mogelijk bij het apparaat en verwijder de deur om te voorkomen dat kinderen een elektri sche schok krijgen of zichzelf in het ap paraat opsluiten Als dit apparaat dat voorzien is van een magnetische deursluiting een ouder apparaat vervangt dat voorzien is van een veerslot slot op de deur of het deksel zorg er ...

Page 4: ...t op nieuw worden ingevroren als het een maal ontdooid is Bewaar voorverpakte diepvriesproduc ten volgens de aanwijzingen van de fa brikant U dient zich strikt te houden aan de aanbevelingen van de fabrikant van het apparaat met betrekking tot het bewa ren van voedsel Raadpleeg de betref fende aanwijzingen Leg geen koolzuurhoudende of mous serende dranken in de vriezer deze veroorzaken druk op de ...

Page 5: ...rd te worden door een ge kwalificeerd elektricien of competent persoon Dit product mag alleen worden onder houden door een erkend onderhouds centrum en er dient alleen gebruik te worden gemaakt van originele reser veonderdelen 1 7 Bescherming van het milieu Dit apparaat bevat geen gassen die de ozonlaag kunnen beschadi gen niet in het koelcircuit en evenmin in de isolatiematerialen Het apparaat ma...

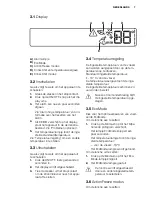
Page 6: ...ts 3 Display 4 Toets om de temperatuur lager te zet ten 5 Toets om de temperatuur hoger te zetten 6 Drink Chill toets Het is mogelijk om het vooraf ingestelde geluid van toetsen te wijzigen in een hard geluid door de Mode toets en de toets om de temperatuur kouder te zetten te gelijkertijd gedurende enkele seconden in te drukken U kunt deze wijziging onge daan maken 6 www electrolux com ...

Page 7: ...et stopcontact om de stroomtoevoer naar het appa raat af te sluiten 3 4 Temperatuurregeling De ingestelde temperatuur van de vriezer kan worden aangepast door op de tem peratuurknop te drukken Standaard ingestelde temperatuur 18 C voor de vriezer De temperatuurweergave toont de inge stelde temperatuur De ingestelde temperatuur zal binnen 24 uur worden bereikt Na een stroomonderbreking blijft de in...

Page 8: ...Het DrinksChill lampje gaat uit U kunt de tijd tijdens het aftellen en na af loop altijd wijzigen door de drukken op de toets om de temperatuur kouder te zetten en de toets om de temperatuur warmer te zetten 3 8 Alarm bij hoge temperatuur Een temperatuurstijging in het vriesvak bijvoorbeeld doordat de stroom is uitge vallen of doordat de deur open staat wordt aangegeven door knipperende indicatiel...

Page 9: ...r duren 4 3 Het bewaren van ingevroren voedsel Als u het apparaat voor het eerst of na een periode dat het niet gebruikt is in schakelt het apparaat minstens 2 uur la ten werken voordat u er producten in plaatst De vriesmanden zorgen ervoor dat u het voedselpakket dat u wenst snel en mak kelijk kan vinden Indien grote hoeveelhe den voedsel moeten worden bewaard verwijder dan alle lades behalve de ...

Page 10: ...ten worden opgetild 1 aan elke kant en dan naar achteren worden getrokken 2 De glazen legplanken die uitgerust zijn met uitschuifbare rollers zijn bevestigd d m v slotpennen 2 1 1 1 Om deze te verwijderen gaat u als volgt te werk 1 Gebruik een schroevendraaier om de slotpen aan elke zijde van de uit schuifbare roller los te maken 2 Trek dan beide slotpennen naar bui ten 1 3 Trek daarna de glazen l...

Page 11: ...dsel eenmaal ontdooid is be derft het snel en kan het niet opnieuw worden ingevroren bewaar het voedsel niet langer dan de door de fabrikant aangegeven bewaar periode 6 ONDERHOUD EN REINIGING 6 1 De binnenkant schoonmaken Voordat u het apparaat voor de eerste keer gebruikt wast u de binnenkant en de interne accessoires met lauwwarm water en een beetje neutrale zeep om de typi sche geur van een nie...

Page 12: ...angedreven ventilator 7 PROBLEEMOPLOSSING WAARSCHUWING Voordat u storingen opspoort de stekker uit het stopcontact trek ken Het opsporen van storingen die niet in deze handleiding vermeld zijn dient te worden verricht door een gekwalificeerd technicus of competent persoon Probleem Mogelijke oorzaak Oplossing Het apparaat werkt niet Het controle lampje knippert niet Het apparaat is uitgescha keld S...

Page 13: ...aatst Bewaar de producten op een manier die een koude luchtcirculatie mogelijk maakt Er is te veel rijpvor ming Het product is niet goed verpakt Verpak het op de juiste ma nier De temperatuurregelaar is niet goed ingesteld Stel een hogere tempera tuur in 7 1 De deur sluiten 1 Maak de afdichtingen van de deur schoon 2 Stel de deur indien nodig af Raad pleeg Montage 3 Vervang indien nodig de defecte...

Page 14: ...n kelijk zijn 8 3 Elektrische aansluiting Zorg er vóór het aansluiten voor dat het voltage en de frequentie op het typepla tje overeenkomen met de stroomtoevoer in uw huis Het apparaat moet geaard zijn De net snoerstekker is voorzien van een contact voor dit doel Als het stopcontact niet ge aard is sluit het apparaat dan aan op een afzonderlijk aardepunt in overeenstem ming met de geldende regels ...

Page 15: ...lp van iemand an ders die de deuren van het appa raat tijdens de werkzaamheden stevig vasthoudt Om de draairichting van de deur te veran deren gaat u als volgt te werk Trek de stekker uit het stopcontact Schroef de onderste pen los en mon teer deze weer aan de tegenoverliggen de kant Verwijder de deur A C B Verwijder de plint Verwijder het kapje A en plaats het aan de tegenoverliggende kant Schroe...

Page 16: ...ht gaat Als de omgevingstemperatuur laag is bijv in de winter kan het zijn dat het deurrub ber niet precies op de kast past Wacht in dat geval tot de deurrubber zich op een natuurlijke wijze zet Als u bovenstaande handelingen liever niet zelf uitvoert neem dan contact op met de dichtstbijzijnde klantenservice Een vakman van de klantenservice zal de draairichting van de deuren op uw kosten verander...

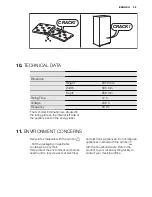
Page 17: ...CLICK CLICK BRRR BRRR BLUBB BLUBB HISSS HISSS NEDERLANDS 17 ...

Page 18: ...etingen Hoogte 2010 mm Breedte 595 mm Diepte 658 mm maximale bewaartijd bij stroomuitval 12 h Voltage 230 V Tijd 50 Hz De technische gegevens staan op het ty peplaatje aan de linker binnenkant van het apparaat en op het energielabel 18 www electrolux com ...

Page 19: ...t te recyclen Help om het milieu en de volksgezondheid te beschermen en recycle het afval van elektrische en elektronische apparaten Gooi apparaten gemarkeerd met het symbool niet weg met het huishoudelijk afval Breng het product naar het milieustation bij u in de buurt of neem contact op met de gemeente NEDERLANDS 19 ...

Page 20: ...knowledge that you ll get great results every time Welcome to Electrolux Visit our website for Get usage advice brochures trouble shooter service information www electrolux com Register your product for better service www electrolux com productregistration Buy Accessories Consumables and Original spare parts for your appliance www electrolux com shop CUSTOMER CARE AND SERVICE We recommend the use ...

Page 21: ...e door or lid be sure to make that spring lock unusable before you discard the old appliance This will prevent it from becoming a death trap for a child 1 2 General safety WARNING Keep ventilation openings in the appli ance enclosure or in the built in structure clear of obstruction The appliance is intended for keeping foodstuff and or beverages in a normal household as explained in this instruc ...

Page 22: ...aning Before maintenance switch off the ap pliance and disconnect the mains plug from the mains socket Do not clean the appliance with metal objects Do not use sharp objects to remove frost from the appliance Use a plastic scraper Never use a hair drier or other heating appliances to speed up defrosting Ex cessive heat may damage the plastic interior and humidity could enter the electric system ma...

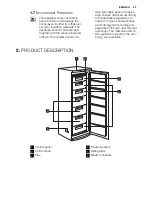
Page 23: ...he insulation foam con tains flammable gases the appli ance shall be disposed according to the applicable regulations to obtain from your local authorities Avoid damaging the cooling unit especially at the rear near the heat exchanger The materials used on this appliance marked by the sym bol are recyclable 2 PRODUCT DESCRIPTION 1 2 3 5 6 4 1 Control panel 2 Cold module 3 Flap 4 Freezer baskets 5 ...

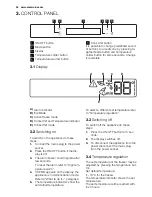
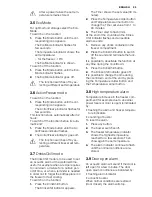
Page 24: ... operate after few seconds To reset the alarm refer to High tem perature alarm 4 If DEMO appears on the display the appliance is in demonstration mode Refer to What to do if paragraph 5 The temperature indicators show the set default temperature To select a different set temperature refer to Temperature regulation 3 3 Switching off To switch off the appliance do these steps 1 Press the ON OFF butt...

Page 25: ...e DrinkChill button The DrinksChill indicator appears The Timer shows the set value 30 mi nutes 2 Press the Temperature colder button and Temperature warmer button to change the Timer set value from 1 to 90 minutes 3 The Timer start to flash min At the end of the countdown the Drinks Chill indicator flashes and an audible alarm sounds 1 Remove any drinks contained in the freezer compartment 2 Pres...

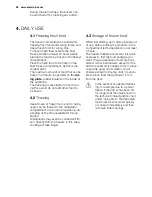
Page 26: ...at room temperature de pending on the time available for this op eration Small pieces may even be cooked still fro zen directly from the freezer in this case cooking will take longer 4 3 Storage of frozen food When first starting up or after a period out of use before putting the products in the compartment let the appliance run at least 2 hours The freezer baskets ensure that it is quick and easy...

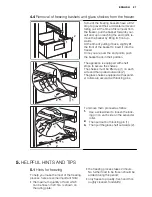
Page 27: ...re the shelves The shelves must be lifted up 1 on each side and than pulled outwards 2 The glass shelves equipped with expand er rollers are secured with locking pins 2 1 1 1 To remove them proceed as follow 1 Use a screwdriver to loosen the lock ing pin on each side on the expander roller 2 Then pull out both locking pin 1 3 Then pull the glass shelf outwards 2 5 HELPFUL HINTS AND TIPS 5 1 Hints ...

Page 28: ...ND CLEANING 6 1 Cleaning the interior Before using the appliance for the first time wash the interior and all internal ac cessories with lukewarm water and some neutral soap so as to remove the typical smell of a brand new product then dry thoroughly Do not use detergents or abrasive powders as these will damage the finish CAUTION Unplug the appliance before car rying out any maintenance opera tio...

Page 29: ... does not operate The Pi lot light does not flash The appliance is switched off Switch on the appliance The mains plug is not con nected to the mains sock et correctly Connect the mains plug to the mains socket correctly The appliance has no power There is no voltage in the mains socket Connect a different electri cal appliance to the mains socket Contact a qualified electri cian The Pilot light f...

Page 30: ...ion There is too much frost Food is not wrapped cor rectly Wrap the food correctly The temperature regulator is not set correctly Set a higher temperature 7 1 Closing the door 1 Clean the door gaskets 2 If necessary adjust the door Refer to Installation 3 If necessary replace the defective door gaskets Contact the Service Center 8 INSTALLATION WARNING Read the Safety Information carefully for your...

Page 31: ...therefore be easily accessible after installation 8 3 Electrical connection Before plugging in ensure that the volt age and frequency shown on the rating plate correspond to your domestic power supply The appliance must be earthed The pow er supply cable plug is provided with a contact for this purpose If the domestic power supply socket is not earthed con nect the appliance to a separate earth in...

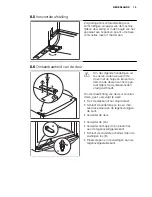
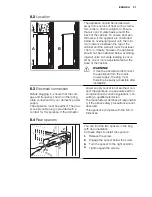
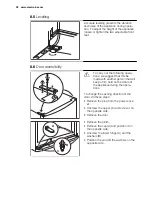
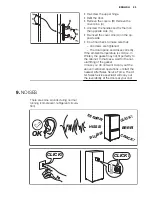
Page 32: ... made with another person that will keep a firm hold on the doors of the appliance during the opera tions To change the opening direction of the door do these steps Remove the plug from the power sock et Unscrew the upper pin and screw it on the opposite side Remove the door A C B Remove the plinth Remove the cap A and position it on the opposite side Unscrew the lower hinge C and the washers B Po...

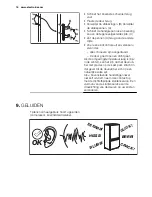
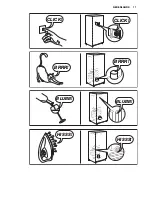
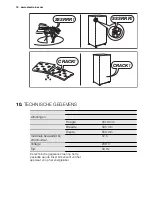
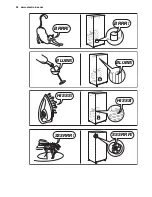
Page 33: ...ient temperature is cold i e in Winter the gasket may not fit perfectly to the cabinet In that case wait for the nat ural fitting of the gasket In case you do not want to carry out the above mentioned operations contact the nearest After Sales Service Force The Af ter Sales Service specialist will carry out the reversibility of the doors at your cost 9 NOISES There are some sounds during normal ru...

Page 34: ...BRRR BRRR BLUBB BLUBB HISSS HISSS SSSRRR SSSRRR 34 www electrolux com ...

Page 35: ...iance and in the energy label 11 ENVIRONMENT CONCERNS Recycle the materials with the symbol Put the packaging in applicable containers to recycle it Help protect the environment and human health and to recycle waste of electrical and electronic appliances Do not dispose appliances marked with the symbol with the household waste Return the product to your local recycling facility or contact your mu...

Page 36: ...erzielen werden Willkommen bei Electrolux Besuchen Sie uns auf unserer Website um Anwendungshinweise Prospekte Fehlerbehebungs und Service Informationen zu erhalten www electrolux com Ihr erworbenes Produkt zu registrieren um den besten Service dafür zu gewährleisten www electrolux com productregistration Zubehör Verbrauchsmaterial und Original Ersatzteile für Ihr Gerät zu erwerben www electrolux ...

Page 37: ...das Netzkabel so nah wie möglich am Gerät ab und entfernen Sie die Tür so dass spielende Kinder vor elektrischem Schlag geschützt sind und sich nicht in dem Gerät einschließen können Wenn dieses Gerät mit magnetischer Türdichtung ein älteres Modell mit Schnappverschluss Türlasche an der Tür oder auf dem Deckel ersetzt ma chen Sie den Schnappverschluss vor dem Entsorgen des Altgerätes un brauchbar ...

Page 38: ...sprechend den Herstellerangaben auf bewahren Die Lagerempfehlungen des Geräte herstellers sollten strikt eingehalten wer den Halten Sie sich an die betreffenden Anweisungen Keine kohlensäurehaltigen Getränke oder Sprudel in den Tiefkühlschrank stellen da der Druckanstieg in den Be hältern zur Explosion führen und das Gerät beschädigen kann Eis am Stiel kann Kälteverbrennungen verursachen wenn es d...

Page 39: ...dürfen die se nur von einem qualifizierten Elektriker oder einem Elektro Fachmann durch geführt werden Wenden Sie sich für Reparaturen und Wartung nur an Fachkräfte der autori sierten Kundendienststellen und verlan gen Sie stets Original Ersatzteile 1 7 Umweltschutz Das Gerät enthält im Kältekreis oder in dem Isoliermaterial keine ozonschädigenden Gase Das Gerät darf nicht wie normaler Hausmüll en...

Page 40: ...OFF 2 Taste Mode 3 Display 4 Taste zum Senken der Temperatur 5 Taste zum Erhöhen der Temperatur 6 Taste Drink Chill Der voreingestellte Tastenton lässt sich auf einen lauten Ton einstellen Halten Sie dazu die Taste Mode und die Taste zum Senken der Temperatur mehrere Sekun den gedrückt Die Änderung lässt sich rückgängig machen 40 www electrolux com ...

Page 41: ...Das Display wird ausgeschaltet 3 Ziehen Sie den Gerätestecker aus der Steckdose um das Gerät vom Netz zu trennen 3 4 Temperaturregelung Die Temperatur des Gefriergeräts wird mit der Temperaturtaste eingestellt Stellen Sie die Standardtemperatur ein 18 C für den Gefrierschrank Die Temperaturanzeige zeigt die einge stellte Temperatur Die eingestellte Temperatur wird innerhalb von 24 Stunden erreicht...

Page 42: ...rierraum 2 Schalten Sie den Alarmton und die Funktion mit der Taste DrinkChill aus Diese Funktion kann während des Count downs jederzeit ausgeschaltet werden 1 Drücken Sie die Taste DrinkChill 2 Die Anzeige DrinksChill erlischt Die Zeit kann während des Countdowns geändert werden indem Sie die Tasten zur Erhöhung und Verringerung der Tem peratur drücken 3 8 Temperaturwarnung Ein Anstieg der Temper...

Page 43: ...ratur aufge taut werden Kleinere Teile können sogar direkt aus dem Gefrierraum entnommen und an schließend sofort gekocht werden In die sem Fall dauert der Garvorgang etwas länger 4 3 Lagerung gefrorener Lebensmittel Lassen Sie das Gerät bei der ersten In betriebnahme oder wenn das Gerät einige Zeit nicht benutzt wurde mindestens 2 Stunden lang eingeschaltet bevor sie Le bensmittel hineingeben Die...

Page 44: ...Sie die Vorderseite des Korbs leicht an und setzen ihn in das Gefriergerät ein Sobald der Gefrierkorb über die Endpunk te hinweg ist schieben Sie ihn in seine ur sprüngliche Position 1 2 1 Die Ablagen des Geräts sind mit Anschlä gen ausgestattet die zu ihrer Sicherung dienen Heben Sie die Ablagen auf jeder Seite an 1 und ziehen Sie sie heraus 2 Die mit Expanderrollen ausgestatteten Glasablagen sin...

Page 45: ...rfach verwen det können Sie zu Frostbrand auf der Haut führen es empfiehlt sich das Einfrierdatum auf jeder einzelnen Packung zu notieren um einen genauen Überblick über die Lagerzeit zu haben 5 2 Hinweise zur Lagerung gefrorener Produkte So erzielen Sie die besten Ergebnisse mit Ihrem Gerät Vergewissern Sie sich dass die gefro renen Lebensmittel vom Händler ange messen gelagert wurden Achten Sie ...

Page 46: ...ltsreiniger für Küchen enthal ten Chemikalien die den im Gerät ver wendeten Kunststoff angreifen können Aus diesem Grund ist es empfehlenswert das Gerät außen nur mit warmem Wasser und etwas flüssigem Tellerspülmittel zu reinigen Schließen Sie das Gerät nach der Reini gung wieder an die Netzversorgung an 6 3 Abtauen Ihr Gerät ist ein No Frost Gerät Dies be deutet dass sich während des Gerätebet ri...

Page 47: ...or Sie sie in das Gerät legen Die Raumtemperatur ist zu hoch Senken Sie die Raumtem peratur Die Temperatur im Gefrierraum ist zu niedrig Der Temperaturregler ist nicht richtig eingestellt Stellen Sie eine höhere Temperatur ein Die Fast Freeze Funktion ist eingeschaltet Siehe hierzu Fast Freeze Funktion Die Temperatur im Gefrierraum ist zu hoch Der Temperaturregler ist nicht richtig eingestellt Ste...

Page 48: ...ellt wurde Al lerdings sollte die Aufstellung des Geräts unter einem Hängeschrank nach Möglich keit vermieden werden Die ordnungsge mäße waagrechte Ausrichtung des Gerä tes kann mit Hilfe eines oder mehrerer verstellbarer Füße am Sockel des Gehäu ses erfolgen WARNUNG Es muss möglich sein das Gerät von der Hauptstromversorgung zu trennen daher sollte der Stecker nach der Installation leicht zu gäng...

Page 49: ...agrechte Ausrich tung lassen sich Vibrationen und Geräu sche während des Betriebs minimieren Lösen oder ziehen Sie zum Ausrichten des Geräts die beiden vorderen Schraub füße an 8 6 Wechseln des Türanschlags Die nachfolgend beschriebenen Schritte sollten von mindestens zwei Personen durchgeführt wer den um ein Herunterfallen der Tü ren zu vermeiden Zum Wechseln des Türanschlags muss wie folgt vorge...

Page 50: ...ringen Sie die Haltestifte A an der ge genüber liegenden Seite wieder an Führen Sie eine Endkontrolle durch um sicherzustellen dass alle Schrauben fest angezogen sind Die Tür ordnungsgemäß öffnet und schließt Bei niedrigen Umgebungstemperaturen z B im Winter kann es vorkommen dass die Türdichtung nicht richtig am Gerät an liegt Warten Sie in diesem Fall ab bis sich die Dichtung allmählich anpasst ...

Page 51: ...BRRR HISSS CLICK BLUBB CRACK SSSRRR OK CLICK CLICK BRRR BRRR BLUBB BLUBB DEUTSCH 51 ...

Page 52: ...HISSS HISSS SSSRRR SSSRRR CRACK CRACK 10 TECHNISCHE DATEN Abmessungen Höhe 2010 mm Breite 595 mm Tiefe 658 mm Lagerzeit bei Störung 12 Std Spannung 230 V Frequenz 50 Hz 52 www electrolux com ...

Page 53: ...aterialien mit dem Symbol Entsorgen Sie die Verpackung in den entsprechenden Recyclingbehältern Recyceln Sie zum Umwelt und Gesundheitsschutz elektrische und elektronische Geräte Entsorgen Sie Geräte mit diesem Symbol nicht mit dem Hausmüll Bringen Sie das Gerät zu Ihrer örtlichen Sammelstelle oder wenden Sie sich an Ihr Gemeindeamt DEUTSCH 53 ...

Page 54: ...54 www electrolux com ...

Page 55: ...DEUTSCH 55 ...

Page 56: ...www electrolux com shop 280150246 A 152012 ...

Reviews: