16
Connecting the appliance to the
gas supply
The gas supply connection ramp is located in the upper
side of the oven, right behind the control panel.
To carry out the gas connection:
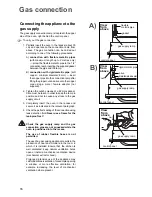
1. Partially insert the oven in the recess (about 30
cm) and operate on the connection ramp from
above. The gas connection can be carried out
according to one of the following procedures:
A)
connection with flexible metallic pipes
(with maximum length up to 2 metres only)
— screw the flexible metallic pipe to the 1/2“
connection ramp, inserting the supplied gasket
between the pipe and the ramp;
B)
connection with rigid metallic pipe
(soft
copper - minimum diameter: 8 mm) — insert
the copper pipe into the connection ramp after
fitting the proper nut and olive onto the copper
pipe using a male / female adapter (not
supplied).
2. Tighten the nuts by means of a 22 mm spanner.
Care must be taken in order to keep the ramp in
position and not to cause any stress to the gas
supply circuit.
3. Completely insert the oven in the recess and
secure it as indicated in the relevant paragraph.
4. Check the perfect sealing of the connection using
leak detection fluid.
Never use a flame for the
leak-proof test !
Check the gas supply ramp and the gas
connection pipe are not squeezed while the
oven is positioned into the recess.
The use of rubber flexible hoses is not
permitted.
The use of a gas cooking appliance results in the
production of heat and moisture in the room in
which it is installed. Ensure that the kitchen is
well ventilated: keep natural ventilation holes
open or install a mechanical ventilation device
(mechanical extractor hood).
Prolonged intensive use of the appliance may
call for additional ventilation, for example opening
a window, or more effective ventilation, for
example increasing the level of mechanical
ventilation where present.
Gas connection
flexible
metallic pipe
gasket
rigid metallic pipe
olive
nut
nut
gas supply ramp
male/female adapter
gas supply ramp
control panel
View
from
above
gas supply ramp
control panel
View
from
above
control panel
View
from
above
A)
B)
Summary of Contents for ESOGBR
Page 2: ......


