background image

End of the programme

When the programme is completed the

display shows 0:00 .

1.

Press the on/off button or wait for the

Auto Off function to automatically

deactivate the appliance.

2.

Close the water tap.

10. 

HINTS AND TIPS

10.1 

General

The following hints will ensure optimal

cleaning and drying results in daily use

and also help to protect the environment.
• Remove larger residues of food from

the dishes into the waste bin.

• Do not pre-rinse dishes by hand. When

needed, use the prewash programme

(if available) or select a programme with

a prewash phase.

• Always use the whole space of the

baskets.

• When loading the appliance, make

sure that the dishes can be completely

reached and washed by the water

released from the spray arm nozzles.

Make sure that items do not touch or

cover each other.

• You can use dishwasher detergent,

rinse aid and salt separately or you can

use the multi-tablets (e.g. ''3in1'',

''4in1'', ''All in 1''). Follow the

instructions written on the packaging.

• Select the programme according to the

type of load and degree of soil. With

the ECO programme you have the

most efficient use of water and energy

consumption for crockery and cutlery

with normal soil.

10.2 

Using salt, rinse aid and

detergent

• Only use salt, rinse aid and detergent

for dishwasher. Other products can

cause damage to the appliance.

• Multi-tablets are usually suitable in

areas with a water hardness up to 21

°dH. In areas exceeding this limit, rinse

aid and salt must be used in addition to

the multi-tablets. However, in areas

with hard and very hard water we

recommend to use solo-detergent

(powder, gel, tablets without additional

functions), rinse aid and salt separately

for optimal cleaning and drying results.

• If you use multi-tablets you can select

the Multitab option (if available). This

option increases the cleaning and

drying results with the use of multi-

tablets.

• Detergent tablets do not fully dissolve

with short programmes. To prevent

detergent residues on the tableware,

we recommend that you use the

tablets with long programmes.

• Do not use more than the correct

quantity of detergent. Refer to the

instructions on the detergent

packaging.

10.3 

What to do if you want to

stop using multi-tablets

Before you start to use separately

detergent, salt and rinse aid do the

following procedure.

1.

Set the highest level of the water

softener.

2.

Make sure that the salt and rinse aid

containers are full.

3.

Start the shortest programme with a

rinsing phase. Do not add detergent

and do not load the baskets.

4.

When the programme is completed,

adjust the water softener according to

the water hardness in your area.

5.

Adjust the released quantity of rinse

aid.

10.4 

Loading the baskets

• Only use the appliance to wash items

that are dishwasher-safe.

• Do not put in the appliance items made

of wood, horn, aluminium, pewter and

copper.

• Do not put in the appliance items that

can absorb water (sponges, household

cloths).

• Remove remaining food from the

items.

www.electrolux.com

34

Summary of Contents for ESL5340LO

Page 1: ...ESL5340LO NL AFWASAUTOMAAT GEBRUIKSAANWIJZING 2 EN DISHWASHER USER MANUAL 22 ET NÕUDEPESUMASIN KASUTUSJUHEND 41 ...

Page 2: ...gebruikt kunt u er op vertrouwen dat u keer op keer fantastische resultaten zult krijgen Welkom bij Electrolux Ga naar onze website voor Advies over gebruik brochures het oplossen van problemen en onderhoudsinformatie www electrolux com Registreer uw product voor een betere service www registerelectrolux com Koop accessoires verbruiksartikelen en originele reserveonderdelen voor uw apparaat www el...

Page 3: ...entuele gevaren begrijpen Laat kinderen niet met het apparaat spelen Houd alle reinigingsmiddelen uit de buurt van kinderen Houd kinderen en huisdieren uit de buurt van het apparaat als de deur open is Reiniging en onderhoud mag niet worden uitgevoerd door kinderen zonder toezicht 1 2 Algemene veiligheid Dit apparaat is bedoeld voor huishoudelijk gebruik of gelijksoortige toepassingen zoals boerde...

Page 4: ...lige installaties wordt geïnstalleerd 2 2 Aansluiting op het elektriciteitsnet WAARSCHUWING Gevaar voor brand en elektrische schokken Dit apparaat moet worden aangesloten op een geaard stopcontact Controleer of de elektrische informatie op het typeplaatje overeenkomt met de stroomvoorziening Zo niet neem dan contact op met een elektromonteur Gebruik altijd een correct geïnstalleerd schokbestendig ...

Page 5: ...borden pas uit het apparaat als het programma is voltooid Er kan vaatwasmiddel op de borden zitten Het apparaat kan hete stoom laten ontsnappen als u de deur opent terwijl er een programma wordt uitgevoerd Plaats geen ontvlambare producten of items die vochtig zijn door ontvlambare producten in bij of op het apparaat 2 5 Servicedienst Contact opnemen met de klantenservice voor reparatie van het ap...

Page 6: ...ukenvloer onder de deur van het apparaat verschijnt Wanneer het programma start gaat de rode lichtstraal aan De lichtstraal blijft gedurende het volledige programma zichtbaar Wanneer het programma is voltooid gaat het groene lampje branden Als er een storing in het apparaat optreedt gaat het rode licht knipperen De Beam on Floor gaat uit wanneer het apparaat wordt uitgeschakeld 4 BEDIENINGSPANEEL ...

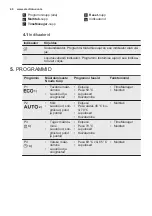
Page 7: ...in werking is 5 PROGRAMMA S Programma Mate van vervuil ing Type wasgoed Programmafasen Opties P1 1 Normaal bevuild Serviesgoed en bestek Voorspoelen Wassen 50 C Spoelgangen Drogen TimeManager Multitab P2 2 Alle Serviesgoed bestek en pan nen Voorspoelen Wassen van 45 C tot 70 C Spoelgangen Drogen Multitab P3 3 Sterk bevuild Serviesgoed bestek en pan nen Voorspoelen Wassen 70 C Spoelgangen Drogen Ti...

Page 8: ... Met dit programma kunt u een pas vervuilde lading afwassen Het biedt goede afwasresul taten in een kort tijdsbestek 5 Met dit programma kunt u snel serviesgoed afspoelen om te voorkomen dat etensresten vastkoeken en het apparaat gaat stinken U hoeft voor dit programma geen afwasmiddel te gebruiken 5 1 Verbruiksgegevens Programma 1 Water l Energie kWh Programmaduur min P1 9 9 0 932 195 P2 7 12 0 6...

Page 9: ... manier instellen Houd tegelijkertijd Reset ingedrukt tot het apparaat in de programmakeuzemodus staat 6 2 De waterontharder De waterontharder verwijdert mineralen uit van de watertoevoer die een nadelige invloed hebben op de wasresultaten en het apparaat Hoe hoger het gehalte van deze mineralen des te harder is het water De waterhardheid wordt gemeten in de volgende gelijkwaardige schalen De wate...

Page 10: ...iveert blijft het glansmiddeldoseerbakje glansmiddel afgeven Maar u kunt de glansmiddeldosering uitschakelen In dat geval is het mogelijk dat de droogresultaten niet goed zijn Als het glansmiddeldoseerbakje is uitgeschakeld is het indicatielampje altijd uit Het uitschakelen van het glansmiddeldoseerbakje Het apparaat moet in de programmakeuzemodus staan 1 Om de gebruikersmodus in te voeren drukt u...

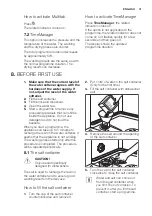
Page 11: ...n aan 7 1 Multitab Activeer deze optie als u multitabletten gebruikt met zout glansmiddel en wasmiddel in één tablet Ze bevatten ook andere schoonmaakmiddelen of spoelmiddelen Deze optie schakelt de afgifte van zout uit Het zoutindicatielampje gaat niet branden Met deze optie wordt de programmaduur verlengd om de schoonmaak en droogresultaten te verbeteren met het gebruik van multitabletten Multit...

Page 12: ... is De procedure wordt periodiek herhaald 8 1 Het zoutreservoir LET OP Gebruik uitsluitend zout dat specifiek is bedoeld voor gebruik in vaatwassers Het zout wordt gebruikt om de hars in de waterontharder te herladen en voor goede wasresultaten voor dagelijks gebruik Het zoutreservoir vullen 1 Draai de dop linksom om het zoutreservoir te openen 2 Doe 1 liter water in het zoutreservoir alleen de ee...

Page 13: ...ul het glansmiddeldoseerbakje als het indicatielampje van het glansmiddel brandt 3 Ruim de korven in 4 Voeg vaatwasmiddel toe Activeer de Multitab optie als u multitabletten gebruikt 5 U dient het juiste programma in te stellen en te starten voor het type lading en de mate van vervuiling 9 1 Vaatwasmiddel gebruiken 30 20 A B D C 20 30 B A D C 1 Druk op de ontgrendelknop B om de deksel te openen C ...

Page 14: ...e uitgestelde start annuleren tijdens het aftellen Als u de uitgestelde start annuleert moet u het programma en de opties opnieuw instellen Houd tegelijkertijd Reset ingedrukt tot het apparaat in de programmakeuzemodus staat Het programma annuleren Houd tegelijkertijd Reset ingedrukt tot het apparaat in de programmakeuzemodus staat Controleer of er afwasmiddel in het afwasmiddeldoseerbakje aanwezi...

Page 15: ...multitabletten Doe het volgende voordat u begint met het gebruiken van apart wasmiddel zout en glansmiddel 1 Stel het hoogste niveau van de waterontharder in 2 Zorg ervoor dat het zout en het glansmiddeldoseerbakje gevuld zijn 3 Start het kortste programma met een spoelfase Voeg geen afwasmiddel toe en ruim de mandjes niet in 4 Als het programma is voltooid wijzigt u de waterontharder in de waterh...

Page 16: ...het programma kan er water aan de zijkanten en de deur van het apparaat achterblijven 11 ONDERHOUD EN REINIGING WAARSCHUWING Schakel het apparaat uit en trek de stekker uit het stopcontact voordat u onderhoudshandelingen verricht Vuile filters en verstopte sproeiarmen verminderen de wasresultaten Controleer regelmatig de filters en reinig deze zo nodig 11 1 De filters reinigen Het filtersystem bes...

Page 17: ...orwerp 11 3 Buitenkant reinigen Maak het apparaat schoon met een vochtige zachte doek Gebruik alleen neutrale schoonmaakmiddelen Gebruik geen schuurmiddelen schuursponsjes of oplosmiddelen 11 4 De binnenkant van de machine reinigen Reinig het apparaat zorgvuldig inclusief de rubberen afdichting van de deur met een zachte vochtige doek Als u regelmatig korte programma s gebruikt dan kunnen er vetre...

Page 18: ...e van het aftellen Het apparaat is begonnen met de oplaadprocedure van de hars in de waterontharder De duur van de pro cedure is ongeveer 5 minuten Het apparaat neemt geen water Op het display verschijnt Controleer of de waterkraan is geopend Zorg dat de waterdruk niet te laag is Neem hiervoor zo nodig contact op met uw lokale waterleidingbedrijf Controleer of de waterkraan niet verstopt is Contro...

Page 19: ...t juist in de korven gerangschikt Raadpleeg de folder over het laden van de korven Zorg ervoor dat de sproeiarmen vrij rond kunnen draaien Het apparaat maakt kort sluiting De stroomsterkte is onvoldoende om alle tegelijk wer kende apparaten van stroom te voorzien Controleer de stroomsterkte van het stopcontact en het vermo gen op de meter of zet één van de in gebruik zijnde apparaten uit Interne e...

Page 20: ...of activeer het glans middeldoseerbakje en gebruik het glansmiddel sa men met de multitabletten De binnenkant van het appa raat is nat Dit is geen fout van het apparaat Het wordt veroor zaakt door de vochtigheid in de lucht die tegen de wanden condenseert Opvallend veel schuim tijdens het wassen Gebruik alleen wasmiddel voor afwasautomaten Het glansmiddeldoseerbakje is lek Neem contact op met een ...

Page 21: ...in max bar MPa 0 5 0 05 8 0 8 Watertoevoer Koud water of warm wa ter2 max 60 C Vermogen Couverts 13 Energieverbruik Modus aan laten W 0 99 Energieverbruik Uit modus W 0 10 1 Zie het typeplaatje voor andere waarden 2 Als het hete water door alternatieve milieuvriendelijkere energiebronnen geproduceerd wordt bijv zonnepanelen en windenergie gebruik dan een heetwatervoorziening om het en ergieverbrui...

Page 22: ...can be safe in the knowledge that you ll get great results every time Welcome to Electrolux Visit our website for Get usage advice brochures trouble shooter service information www electrolux com Register your product for better service www registerelectrolux com Buy Accessories Consumables and Original spare parts for your appliance www electrolux com shop CUSTOMER CARE AND SERVICE Always use ori...

Page 23: ...y from children Keep children and pets away from the appliance door when it is open Cleaning and user maintenance shall not be made by children without supervision 1 2 General Safety This appliance is intended to be used in household and similar applications such as farm houses staff kitchen areas in shops offices and other working environments by clients in hotels motels bed breakfast and other r...

Page 24: ...grees with the power supply If not contact an electrician Always use a correctly installed shockproof socket Do not use multi plug adapters and extension cables Make sure not to cause damage to the mains plug and to the mains cable Should the mains cable need to be replaced this must be carried out by our Authorised Service Centre Connect the mains plug to the mains socket only at the end of the i...

Page 25: ...The appliance can release hot steam if you open the door while a programme operates Do not put flammable products or items that are wet with flammable products in near or on the appliance 2 5 Service Contact the Authorised Service Centre to repair the appliance We recommend only the use of original spare parts When you contact the Authorised Service Centre ensure that you have the following inform...

Page 26: ...oor The Beam on Floor is a light that shows on the kitchen floor below the appliance door When the programme starts a red light comes on and stays on for all the duration of the programme When the programme is completed a green light comes on When the appliance has a malfunction the red light flashes The Beam on Floor goes off when the appliance is deactivated 4 CONTROL PANEL 1 2 9 3 4 5 6 7 8 1 O...

Page 27: ...ry Wash 60 C or 65 C Rinses Multitab P5 5 All Prewash 1 With this programme you have the most efficient use of water and energy consumption for crockery and cutlery with normal soil This is the standard programme for test institutes 2 The appliance senses the degree of soil and the quantity of items in the baskets It auto matically adjusts the temperature and the quantity of water the energy consu...

Page 28: ...ollowing settings can be changed The level of the water softener according to the water hardness The activation or the deactivation of the acoustic signal for end of programme The deactivation of the rinse aid dispenser when you want to use the Multitab option without rinse aid These settings will be saved until you change them again How to set the programme selection mode The appliance is in prog...

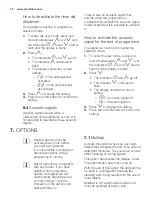
Page 29: ...ory setting 2 Do not use salt at this level How to set the water softener level The appliance must be in programme selection mode 1 To enter the user mode press and hold simultaneously and until the indicators and start to flash and the display is blank 2 Press The indicators and go off The indicator continues to flash The display shows the current setting e g level 5 3 Press again and again to ch...

Page 30: ...indicators and start to flash and the display is blank 2 Press The indicators and go off The indicator continues to flash The display shows the current setting Acoustic signal off Acoustic signal on 3 Press to change the setting 4 Press the on off button to confirm the setting 7 OPTIONS Desired options must be activated every time before you start a programme It is not possible to activate or deac...

Page 31: ...to remove any processing residuals that can still be inside the appliance Do not use detergent and do not load the baskets When you start a programme the appliance can take up to 5 minutes to recharge the resin in the water softener It seems that the appliance is not working The washing phase starts only after this procedure is completed The procedure will be repeated periodically 8 1 The salt con...

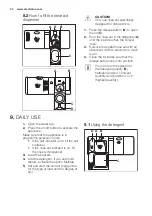
Page 32: ...ou can turn the selector of the released quantity B between position 1 lowest quantity and position 4 or 6 highest quantity 9 DAILY USE 1 Open the water tap 2 Press the on off button to activate the appliance Make sure that the appliance is in programme selection mode If the salt indicator is on fill the salt container If the rinse aid indicator is on fill the rinse aid dispenser 3 Load the basket...

Page 33: ...ions 5 Close the appliance door to start the programme Starting a programme with delay start 1 Set a programme 2 Press again and again until the display shows the delay time you want to set from 1 to 24 hours The delay indicator comes on 3 Close the appliance door to start the countdown While a countdown is running it is possible to increase the delay time but not to change the selection of the pr...

Page 34: ...ess up to 21 dH In areas exceeding this limit rinse aid and salt must be used in addition to the multi tablets However in areas with hard and very hard water we recommend to use solo detergent powder gel tablets without additional functions rinse aid and salt separately for optimal cleaning and drying results If you use multi tablets you can select the Multitab option if available This option incr...

Page 35: ...multi tablets The position of the items in the baskets is correct The programme is applicable for the type of load and for the degree of soil The correct quantity of detergent is used 10 6 Unloading the baskets 1 Let the tableware cool down before you remove it from the appliance Hot items can be easily damaged 2 First remove items from the lower basket then from the upper basket At the end of the...

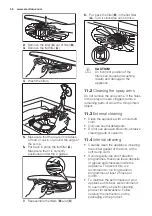
Page 36: ...arms are clogged remove remaining parts of soil with a thin pointed object 11 3 External cleaning Clean the appliance with a moist soft cloth Only use neutral detergents Do not use abrasive products abrasive cleaning pads or solvents 11 4 Internal cleaning Carefully clean the appliance including the rubber gasket of the door with a soft damp cloth If you regularly use short duration programmes the...

Page 37: ... water softener The duration of the procedure is approximately 5 minutes The appliance does not fill with water The display shows Make sure that the water tap is open Make sure that the pressure of the water supply is not too low For this information contact your local water authority Make sure that the water tap is not clogged Make sure that the filter in the inlet hose is not clog ged Make sure ...

Page 38: ...taneously all the appliances in use Check the socket amperage and the capacity of the meter or turn off one of the ap pliances in use Internal electrical fault of the appliance Contact an Au thorised Service Centre Refer to Before first use Daily use or Hints and tips for other possible causes Once you have checked the appliance deactivate and activate the appliance If the problem occurs again con...

Page 39: ...shwashers only There is a leak in the rinse aid dispenser Contact an Authorised Service Centre Traces of rust on cutlery There is too much salt in the water used for washing Refer to The water softener Silver and stainless steel cutlery were placed togeth er Avoid to put silver and stainless steel items close together There are residues of deter gent in the dispenser at the end of the program The ...

Page 40: ... other values 2 If the hot water comes from alternative source of energy e g solar panels aeolian energy use the hot water supply to decrease energy consumption 14 ENVIRONMENT CONCERNS Recycle the materials with the symbol Put the packaging in applicable containers to recycle it Help protect the environment and human health and to recycle waste of electrical and electronic appliances Do not dispos...

Page 41: ...statud ka teid Ükskõik millal te seda ka ei kasuta suurepärastes tulemustes võite te alati kindel olla Teretulemast Electroluxi Külastage meie veebisaiti Kasutusnõuanded brošüürid veaotsing teave teeninduse kohta www electrolux com Registreerige oma toode parema teeninduse saamiseks www registerelectrolux com Ostke lisaseadmeid tarvikuid ja originaalvaruosi www electrolux com shop KLIENDITEENINDUS...

Page 42: ...e lubage lastel seadmega mängida Hoidke pesuained lastele kättesaamatuna Hoidke lapsed ja lemmikloomad seadme uksest eemal kui see on avatud Ilma järelvalveta ei tohi lapsed seadet puhastada ega hooldustoiminguid läbi viia 1 2 Üldine ohutus See seade on mõeldud kasutamiseks koduses majapidamises või muudes sarnastes kohtades näiteks talumajapidamistes personalile mõeldud köökides kauplustes kontor...

Page 43: ...ud Kontrollige kas andmesildil toodud elektrilised parameetrid vastavad vooluvõrgu näitajatele Vastasel juhul võtke ühendust elektrikuga Kasutage alati nõuetekohaselt paigaldatud ohutut pistikupesa Ärge kasutage mitmikpistikuid ega pikenduskaableid Veenduge et te ei vigastaks toitepistikut ega juhet Kui seadme toitekaabel tuleb välja vahetada siis pöörduge meie hoolduskeskusse Ühendage toitepistik...

Page 44: ...vate ukse pesuprogrammi töötamise ajal võib ukse vahelt välja paiskuda kuuma auru Ärge pange süttivaid või süttiva ainega määrdunud esemeid seadmesse selle lähedusse või peale 2 5 Hooldus Seadme remontimiseks võtke ühendust tootja volitatud hoolduskeskusega Soovitame alati kasutada ainult originaalvaruosi Hooldusesse pöördumisel veenduge et teil on olemas järgnev andmeplaadil kirjas olev teave Mud...

Page 45: ...mine korv 11 Ülemine korv 3 1 Beam on Floor Beam on Floor on tuli mis suunatakse seadme ukse ette põrandale Kui programm käivitub süttib punane tuli ja põleb kuni programmi lõppemiseni Kui programm on lõppenud süttib roheline tuli Seadme rikke korral vilgub punane tuli Beam on Floor kustub kui seade lülitatakse välja 4 JUHTPANEEL 1 2 9 3 4 5 6 7 8 1 Sisse välja nupp 2 Ekraan 3 Delay nupp 4 Program...

Page 46: ...misaste Nõude tüüp Programmi faasid Funktsioonid P1 1 Tavaline määr dumine Lauanõud ja söögiriistad Eelpesu Pesu 50 C Loputused Kuivatamine TimeManager Multitab P2 2 Kõik Lauanõud söö giriistad potid ja pannid Eelpesu Pesu alates 45 C ku ni 70 C Loputused Kuivatamine Multitab P3 3 Tugev määrdu mine Lauanõud söö giriistad potid ja pannid Eelpesu Pesu 70 C Loputused Kuivatamine TimeManager Multitab ...

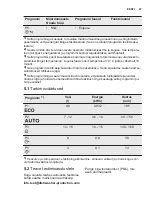
Page 47: ...vähemalt 10 minutit 4 See programm sobib äsja kasutatud nõude pesemiseks Seda kasutades saate head pe sutulemused lühikese ajaga 5 Selle programmiga saate nõusid kiiresti loputada et takistada toidujääkide kuivamist nõude külge ja hoida ära ebameeldiva lõhna tekkimist Ärge kasutage selle programmi pu hul pesuainet 5 1 Tarbimisväärtused Programm 1 Vesi l Energia kWh Kestus min P1 9 9 0 932 195 P2 7...

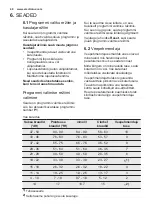
Page 48: ...elt Vajutage ja hoidke Reset kuni seade jõuab programmi valimise režiimi 6 2 Veepehmendaja Veepehmendaja eemaldab vees olevad mineraalid mis halvendavad nii pesutulemust kui ka seadet ennast Mida kõrgem on mineraalide tase seda karedam on vesi Vee karedust mõõdetakse vastavate skaaladega Veepehmendajat tuleks reguleerida vastavalt teie piirkonna vee karedusele Teavet oma piirkonna vee kareduse koh...

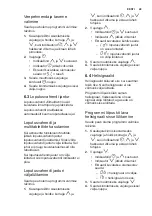
Page 49: ...litamine Seade peab olema programmi valimise režiimis 1 Kasutajarežiimi sisestamiseks vajutage ja hoidke korraga ja kuni indikaatorid ja hakkavad vilkuma ja ekraan läheb tühjaks 2 Vajutage Indikaatorid ja kustuvad Indikaator jätkab vilkumist Ekraanil kuvatakse kehtiv seade loputusvahendi jaotur on sisse lülitatud loputusvahendi jaotur on välja lülitatud 3 Seade muutmiseks vajutage 4 Seade kinnitam...

Page 50: ...väheneb ligikaudu 50 Pesutulemus on sama mis tavalise programmi kestuse puhulgi Kuivatustulemused võivad olla kehvemad TimeManager sisselülitamine Vajutage TimeManager süttib vastav indikaator Kui valik programmiga ei sobi ei sütti ka vastav indikaator või vilgub kiiresti paar sekundit ja kustub siis Ekraan näitab programmi uuendatud kestust 8 ENNE ESIMEST KASUTAMIST 1 Kontrollige kas veepehmendaj...

Page 51: ...ndi jaoturi sisselülitamine A B D C MAX 1 2 3 4 A B D C ETTEVAATUST Kasutage vaid nõudepesumasina jaoks mõeldud loputusvahendit 1 Vajutage avamisnuppu D et avada kaas C 2 Kallake loputusvahend jaoturisse A kuni vedelik jõuab tasemeni max 3 Eemaldage mahaläinud loputusvahend imava lapiga et ei tekiks liiga palju vahtu 4 Sulgege kaas Veenduge et vabastusnupp lukustub asendisse Aine eraldumiskogust m...

Page 52: ...programmi lõppu Kui 5 minuti jooksul ei ole programm käivitunud Programmi käivitamine 1 Hoidke seadme uks praokil 2 Vajutage sisse välja nuppu et seade käivitada Veenduge et seade on programmi valimise režiimis 3 Vajutage järjest või kuni ekraanil kuvatakse soovitud programmi number Ekraanil kuvatakse esmalt umbes 3 sekundit programmi number seejärel kuvatakse programmi kestus 4 Valige saadaolevad...

Page 53: ...tatud selliselt et pihustikonsoolidest eralduv vesi pääseks neile juurde ja saaks neid pesta Kontrollige et nõud ei puutu üksteise vastu ega ole üksteise peal Pesemisel võib kasutada eraldi nõudepesumasina pesuainet loputusvahendit ja soola või ka multitablette nt 3in1 4in1 All in 1 Järgige pakendil olevaid juhiseid Valige nõude tüübile ja määrdumisastmele vastav programm Programmiga ECOkasutate t...

Page 54: ...d ja lauanõud üksteise küljes kinni ei oleks Pange lusikad teiste söögiriistade juurde Veenduge et klaasid ei puutuks omavahel kokku Pange väikesed esemed söögiriistade korvi Pange kerged esemed ülemisse korvi Veenduge et esemed liikuma ei pääseks Enne programmi käivitamist veenduge et pihusti tiivik saab vabalt liikuda 10 5 Enne programmi käivitamist Veenduge järgmises Filtrid on puhtad ja õigest...

Page 55: ...t B 3 Eemaldage lame filter A 4 Peske filtrid puhtaks 5 Veenduge ega settevanni äärte ümber pole kogunenud toidujäätmeid või mustust 6 Asetage lame filter A tagasi Veenduge et see paikneb õigesti kahe juhiku all 7 Pange uuesti kokku filtrid B ja C 8 Pange tagasi filter B lameda filtri sees A Keerake päripäeva kuni see kohale lukustub EESTI 55 ...

Page 56: ...iselt kasutada spetsiaalset nõudepesumasinale mõeldud puhastusvahendit Lugege tähelepanelikult tootepakendil olevat juhendit 12 VEAOTSING Seade ei käivitu või seiskub töö käigus Enne hoolduskeskuse poole pöördumist proovige probleem alltoodud tabeli abil ise lahendada HOIATUS Ebaõiged parandustööd võivad seadme kasutajale kaasa tuua tõsise ohu Parandustöid tohib teha ainult kvalifitseeritud töötaj...

Page 57: ...mmi kestuse lühendamiseks valige ajasäästu funktsioon kui see on saadaval Kui olete valinud viitkäivituse siis tühistage see või oodake pöördloenduse lõppemiseni Ekraanil olev järelejäänud aeg pikeneb ja liigub edasi hüplikult kuni programmi lõpuni Tegu ei ole rikkega Seade töötab õigesti Väike leke seadme uksest Seade pole loodis Reguleerige tugijalgu vastavalt vajadusele kui see võimalus on olem...

Page 58: ...loputusvahendi jaotur madalamasse asen disse Pesuaine kogus on liiga suur Plekid ja kuivanud veetil kade jäljed nõudel ja klaasi del Eraldatava loputusvahendi kogus on liiga väike Valige loputusvahendi jaoturi jaoks kõrgem tase Põhjuseks võib olla loputusvahendi kvaliteet Nõud on märjad Programmil puudub kuivatusfaas või kasutatakse madala temperatuuriga kuivatust Loputusvahendi jaotur on tühi Põh...

Page 59: ...e Pange õrnemad esemed ülemisse korvi Vt jaotisi Enne esimest kasutamist Igapäevane kasutamine või Vihjeid ja näpunäiteid et leida muid võimalikke põhjusi 13 TEHNILISED ANDMED Mõõdud Laius kõrgus sügavus mm 596 818 898 555 Elektriühendus 1 Pinge V 200 240 Sagedus Hz 50 60 Veesurve Min maks bar MPa 0 5 0 05 8 0 8 Veevarustus Külm või kuum vesi 2 maks 60 C Jõudlus Kohalikud seaded 13 Voolutarve Oote...

Page 60: ...sümboliga tähistatud seadmeid muude majapidamisjäätmete hulka Viige seade kohalikku ringluspunkti või pöörduge abi saamiseks kohalikku omavalitsusse www electrolux com 60 ...

Page 61: ...EESTI 61 ...

Page 62: ...www electrolux com 62 ...

Page 63: ...EESTI 63 ...

Page 64: ...www electrolux com shop 156981861 B 122015 ...

Reviews: