background image

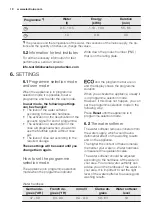
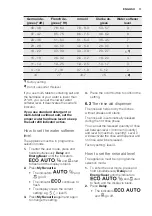
Programme 1)

Water

(l)

Energy

(kWh)

Duration

(min)

9.5 - 10.5

1.10 - 1.30

55 - 65

10

0.9

30

1) 

The pressure and the temperature of the water, the variations of the mains supply, the op-

tions and the quantity of dishes can change the values.

5.2 

Information for test institutes

For all the necessary information for test

performance, send an email to:

[email protected]

Write down the product number (PNC)

that is on the rating plate.

6. 

SETTINGS

6.1 

Programme selection mode

and user mode

When the appliance is in programme

selection mode it is possible to set a

programme and to enter the user mode.

In user mode, the following settings

can be changed:

• The level of the water softener

according to the water hardness.

• The activation or the deactivation of the

acoustic signal for end of programme.

• The activation or deactivation of the

rinse aid dispenser when you want to

use the Multitab option without rinse

aid.

• The level of rinse aid according to the

required dosage.

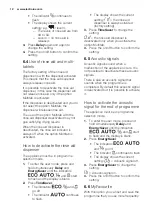
These settings will be saved until you

change them again.

How to set the programme

selection mode

The appliance is in programme selection

mode when the programme indicator

 and the programme bar are on

and the display shows the programme

duration.
When you activate the appliance, usually it

is in programme selection mode.

However, if this does not happen, you can

set the programme selection mode in the

following way:
Press 

Reset

 until the appliance is in

programme selection mode.

6.2 

The water softener

The water softener removes minerals from

the water supply, which would have a

detrimental effect on the washing results

and on the appliance.
The higher the content of these minerals,

the harder your water is. Water hardness

is measured in equivalent scales.
The water softener should be adjusted

according to the hardness of the water in

your area. Your local water authority can

advise you on the hardness of the water in

your area. It is important to set the right

level of the water softener to assure good

washing results.

Water hardness

German de-

grees (°dH)

French de-

grees (°fH)

mmol/l

Clarke de-

grees

Water softener

level

47 - 50

84 - 90

8.4 - 9.0

58 - 63

10

www.electrolux.com

10

Summary of Contents for ESI 8710RAX

Page 1: ...ESI 8710RAX EN DISHWASHER USER MANUAL ...

Page 2: ...e in the knowledge that you ll get great results every time Welcome to Electrolux Visit our website for Get usage advice brochures trouble shooter service information www electrolux com webselfservice Register your product for better service www registerelectrolux com Buy Accessories Consumables and Original spare parts for your appliance www electrolux com shop CUSTOMER CARE AND SERVICE Always us...

Page 3: ...Keep children and pets away from the appliance door when it is open Children shall not carry out cleaning and user maintenance of the appliance without supervision 1 2 General Safety This appliance is intended to be used in household and similar applications such as farm houses staff kitchen areas in shops offices and other working environments by clients in hotels motels bed breakfast and other r...

Page 4: ...power supply If not contact an electrician Always use a correctly installed shockproof socket Do not use multi plug adapters and extension cables Make sure not to cause damage to the mains plug and to the mains cable Should the mains cable need to be replaced this must be carried out by our Authorised Service Centre Connect the mains plug to the mains socket only at the end of the installation Mak...

Page 5: ...dishes The appliance can release hot steam if you open the door while a programme operates Do not put flammable products or items that are wet with flammable products in near or on the appliance 2 5 Internal light WARNING Risk of injury This appliance has an internal lamp that comes on when you open the door and goes off when the door is closed The lamp in this appliance is not suitable for househ...

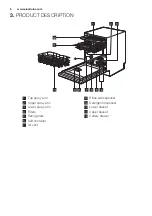
Page 6: ...7 11 12 2 3 1 8 1 Top spray arm 2 Upper spray arm 3 Lower spray arm 4 Filters 5 Rating plate 6 Salt container 7 Air vent 8 Rinse aid dispenser 9 Detergent dispenser 10 Lower basket 11 Upper basket 12 Cutlery drawer www electrolux com 6 ...

Page 7: ...hpad 10 Display 11 Programme bar 12 Indicators 13 TimeManager touchpad 14 Reset touchpad 4 1 Indicators Indicator Description Multitab indicator TimeManager indicator Rinse aid indicator It is always off while the programme operates Salt indicator It is always off while the programme operates Delay indicator XtraPower indicator EnergySaver indicator Door indicator It comes on when the appliance do...

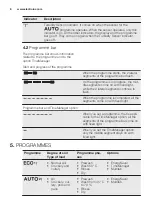
Page 8: ... progress the mid dle segments come on with fixed light while the 2 lateral segments continue to flash When the programme is completed all the segments come on with fixed light Programme bar and TimeManager option When you set a programme that is appli cable to the TimeManager option all the segments of the programme bar come on with fixed light When you set the TimeManager option only the middle ...

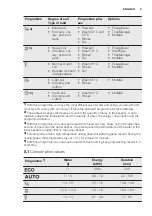
Page 9: ...titutes 2 The appliance senses the degree of soil and the quantity of items in the baskets It auto matically adjusts the temperature and the quantity of water the energy consumption and the programme duration 3 With this programme you can wash a load with mixed soil Very heavy soil in the lower bas ket and normal soil in the upper basket The pressure and the temperature of the water in the lower b...

Page 10: ...hese settings will be saved until you change them again How to set the programme selection mode The appliance is in programme selection mode when the programme indicator and the programme bar are on and the display shows the programme duration When you activate the appliance usually it is in programme selection mode However if this does not happen you can set the programme selection mode in the fo...

Page 11: ...ss and hold simultaneously Delay and EnergySaver until the indicators and start to flash and the display is blank 2 Press MyFavourite The indicators and go off The indicator continues to flash The display shows the current setting e g level 5 3 Press MyFavourite again and again to change the setting 4 Press the on off button to confirm the setting 6 3 The rinse aid dispenser The rinse aid helps to...

Page 12: ...icators and start to flash and the display is blank 2 Press TimeSaver The indicators and go off The indicator continues to flash The display shows the current setting the rinse aid dispenser is always activated factory setting 3 Press TimeSaver to change the setting the rinse aid dispenser is deactivated only when you activate the option Multitab 4 Press the on off button to confirm the setting 6 ...

Page 13: ... of salt The salt indicator does not come on This option also deactivates the release of rinse aid but only when the rinse aid dispenser is deactivated rinse aid indicator does not come on If the rinse aid dispenser is activated rinse aid is released even with the option Multitab activated With the use of this option the programme duration is prolonged to increase the cleaning and drying results w...

Page 14: ...e hardness of the water supply If not adjust the level of the water softener 2 Fill the salt container 3 Fill the rinse aid dispenser 4 Open the water tap 5 Start a programme to remove any processing residuals that can still be inside the appliance Do not use detergent and do not load the baskets When you start a programme the appliance can take up to 5 minutes to recharge the resin in the water s...

Page 15: ...performance is satisfactory the rinse aid refill indication can be disabled We recommend to always use rinse aid for better drying performance also in combination with multi tablets containing rinsing agent 9 DAILY USE 1 Open the water tap 2 Press the on off button to activate the appliance Make sure that the appliance is in programme selection mode If the salt indicator is on fill the salt contai...

Page 16: ...or the on off button The indicators of the running programme and options come on for a few seconds Starting a programme with delay start 1 Set a programme 2 Press Delay again and again until the display shows the delay time you want to set from 1 to 24 hours Only the delay time is visible in the display 3 Close the appliance door 4 Press Start to start the countdown The delay indicator comes on Th...

Page 17: ... that items do not touch or cover each other You can use dishwasher detergent rinse aid and salt separately or you can use the multi tablets e g 3in1 4in1 All in 1 Follow the instructions written on the packaging Select the programme according to the type of load and degree of soil With the ECO programme you have the most efficient use of water and energy consumption for crockery and cutlery with ...

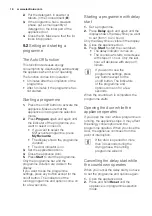
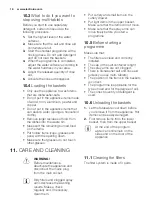
Page 18: ... cutlery and small items in the cutlery drawer Put light items in the upper basket Make sure that the items do not move Make sure that the spray arms can move freely before you start a programme 10 5 Before starting a programme Make sure that The filters are clean and correctly installed The cap of the salt container is tight The spray arms are not clogged There is dishwasher salt and rinse aid un...

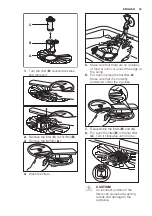
Page 19: ...ues of food or soil in or around the edge of the sump 6 Put back in place the flat filter A Make sure that it is correctly positioned under the 2 guides 7 Reassemble the filters B and C 8 Put back the filter B in the flat filter A Turn it clockwise until it locks CAUTION An incorrect position of the filters can cause bad washing results and damage to the appliance ENGLISH 19 ...

Page 20: ... Do not use abrasive products abrasive cleaning pads or solvents 11 4 Internal cleaning Carefully clean the appliance including the rubber gasket of the door with a soft damp cloth If you regularly use short duration programmes these can leave deposits of grease and limescale inside the appliance To prevent this we recommend to run long duration programmes at least 2 times per month To maintain th...

Page 21: ... local water authority Make sure that the water tap is not clogged Make sure that the filter in the inlet hose is not clog ged Make sure that the inlet hose has no kinks or bends The appliance does not drain the water The display shows Make sure that the sink spigot is not clogged Make sure that the filter in the outlet hose is not clog ged Make sure that the interior filter system is not clogged ...

Page 22: ... of the meter or turn off one of the ap pliances in use Internal electrical fault of the appliance Contact an Au thorised Service Centre Refer to Before first use Daily use or Hints and tips for other possible causes Once you have checked the appliance deactivate and activate the appliance If the problem occurs again contact an Authorised Service Centre For alarm codes not described in the table c...

Page 23: ...s on the walls Unusual foam during wash ing Use the detergent for dishwashers only There is a leak in the rinse aid dispenser Contact an Authorised Service Centre Traces of rust on cutlery There is too much salt in the water used for washing Refer to The water softener Silver and stainless steel cutlery were placed togeth er Avoid to put silver and stainless steel items close together There are re...

Page 24: ...ption Off mode W 0 10 1 Refer to the rating plate for other values 2 If the hot water comes from alternative source of energy e g solar panels aeolian energy use the hot water supply to decrease energy consumption 14 ENVIRONMENTAL CONCERNS Recycle the materials with the symbol Put the packaging in applicable containers to recycle it Help protect the environment and human health and to recycle wast...

Page 25: ...ENGLISH 25 ...

Page 26: ...www electrolux com 26 ...

Page 27: ...ENGLISH 27 ...

Page 28: ...www electrolux com shop 117894781 A 532015 ...

Reviews: