background image

End of the programme

When the programme is completed the

display shows 0:00. The phase indicators

are off.
All buttons are inactive except for the

on/off button.

1. Press the on/off button or wait for the

Auto Off function to automatically

deactivate the appliance.

If you open the door before the

activation of Auto Off, the appliance

is automatically deactivated.

2. Close the water tap.

10. HINTS AND TIPS

10.1 General

The following hints will ensure optimal

cleaning and drying results in daily use

and also help to protect the environment.
• Remove larger residues of food from

the dishes into the waste bin.

• Do not pre-rinse dishes by hand.

When needed, use the prewash

programme (if available) or select a

programme with a prewash phase.

• Always use the whole space of the

baskets.

• When loading the appliance, make

sure that the dishes can be

completely reached and washed by

the water released from the spray arm

nozzles. Make sure that items do not

touch or cover each other.

• You can use dishwasher detergent,

rinse aid and salt separately or you

can use the multi-tablets (e.g. ''3in1'',

''4in1'', ''All in 1''). Follow the

instructions written on the packaging.

• Select the programme according to

the type of load and degree of soil.

With the ECO programme you have

the most efficient use of water and

energy consumption for crockery and

cutlery with normal soil.

10.2 Using salt, rinse aid and

detergent

• Only use salt, rinse aid and detergent

for dishwasher. Other products can

cause damage to the appliance.

• In areas with hard and very hard

water we recommend to use plain

dishwasher detergent (powder, gel,

tablets containing no additional

agents), rinse aid and salt separately

for optimal cleaning and drying

results.

• At least once a month run the

appliance with the use of appliance

cleaner which is particularly suitable

for this purpose.

• Detergent tablets do not fully dissolve

with short programmes. To prevent

detergent residues on the tableware,

we recommend that you use the

tablets with long programmes.

• Do not use more than the correct

quantity of detergent. Refer to the

instructions on the detergent

packaging.

10.3 What to do if you want to

stop using multi-tablets

Before you start to use separately

detergent, salt and rinse aid do the

following procedure.
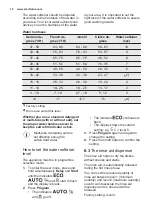
1. Set the highest level of the water

softener.

2. Make sure that the salt and rinse aid

containers are full.

3. Start the shortest programme with a

rinsing phase. Do not add detergent

and do not load the baskets.

4. When the programme is completed,

adjust the water softener according

to the water hardness in your area.

5. Adjust the released quantity of rinse

aid.

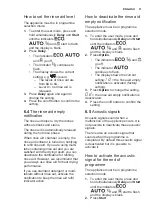
6. Activate the rinse aid empty

notification.

10.4 Loading the baskets

• Only use the appliance to wash items

that are dishwasher-safe.

• Do not put in the appliance items

made of wood, horn, aluminium,

pewter and copper.

www.electrolux.com

16

Summary of Contents for ESF8540ROX

Page 1: ...ESF8540ROX EN Dishwasher User Manual ...

Page 2: ...e in the knowledge that you ll get great results every time Welcome to Electrolux Visit our website for Get usage advice brochures trouble shooter service information www electrolux com webselfservice Register your product for better service www registerelectrolux com Buy Accessories Consumables and Original spare parts for your appliance www electrolux com shop CUSTOMER CARE AND SERVICE Always us...

Page 3: ...d Do not let children play with the appliance Keep detergents away from children Keep children and pets away from the appliance door when it is open Children shall not carry out cleaning and user maintenance of the appliance without supervision 1 2 General Safety This appliance is intended to be used in household and similar applications such as farm houses staff kitchen areas in shops offices and...

Page 4: ...structures 2 2 Electrical connection WARNING Risk of fire and electrical shock The appliance must be earthed Make sure that the electrical information on the rating plate agrees with the power supply If not contact an electrician Always use a correctly installed shockproof socket Do not use multi plug adapters and extension cables Make sure not to cause damage to the mains plug and to the mains ca...

Page 5: ...iance Do not remove the dishes from the appliance until the programme is completed There can be detergent on the dishes The appliance can release hot steam if you open the door while a programme operates Do not put flammable products or items that are wet with flammable products in near or on the appliance 2 5 Service Contact the Authorised Service Centre to repair the appliance We recommend only ...

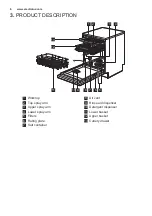
Page 6: ... 13 3 4 2 1 1 Worktop 2 Top spray arm 3 Upper spray arm 4 Lower spray arm 5 Filters 6 Rating plate 7 Salt container 8 Air vent 9 Rinse aid dispenser 10 Detergent dispenser 11 Lower basket 12 Upper basket 13 Cutlery drawer www electrolux com 6 ...

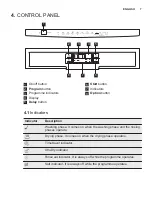
Page 7: ...utton 4 1 Indicators Indicator Description Washing phase It comes on when the washing phase and the rinsing phases operate Drying phase It comes on when the drying phase operates TimeSaver indicator XtraDry indicator Rinse aid indicator It is always off while the programme operates Salt indicator It is always off while the programme operates ENGLISH 7 ...

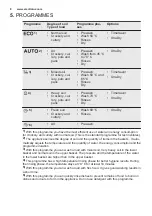
Page 8: ...s 2 The appliance senses the degree of soil and the quantity of items in the baskets It auto matically adjusts the temperature and the quantity of water the energy consumption and the programme duration 3 With this programme you can wash a load with mixed soil Very heavy soil in the lower basket and normal soil in the upper basket The pressure and the temperature of the water in the lower basket a...

Page 9: ... hardness The activation or the deactivation of the acoustic signal for end of programme The activation or deactivation of the rinse aid empty notification The level of rinse aid according to the required dosage These settings will be saved until you change them again How to set the programme selection mode The appliance is in programme selection mode when the programme indicator is on and the dis...

Page 10: ...ardness level to keep the salt refill indicator active Multi tabs containing salt are not effective enough to soften hard water How to set the water softener level The appliance must be in programme selection mode 1 To enter the user mode press and hold simultaneously Delay and Start until the indicators and start to flash and the display is blank 2 Press Program The indicators and go off The indi...

Page 11: ...d detergent or multi tablets without rinse aid activate the notification to keep the rinse aid refill indicator active How to deactivate the rinse aid empty notification The appliance must be in programme selection mode 1 To enter the user mode press and hold simultaneously Delay and Start until the indicators and start to flash and the display is blank 2 Press Option The indicators and go off The...

Page 12: ...ramme 7 OPTIONS Desired options must be activated every time before you start a programme It is not possible to activate or deactivate options while a programme is running Not all options are compatible with each other If you have selected non compatible options the appliance will automatically deactivate one or more of them Only the indicators of the options still active will stay on 7 1 XtraDry ...

Page 13: ...tes to recharge the resin in the water softener It seems that the appliance is not working The washing phase starts only after this procedure is completed The procedure will be repeated periodically 8 1 The salt container CAUTION Only use salt specifically designed for dishwashers The salt is used to recharge the resin in the water softener and to assure good washing results in the daily use How t...

Page 14: ...nd to always use rinse aid for better drying performance also in combination with multi tablets containing rinsing agent 9 DAILY USE 1 Open the water tap 2 Press the on off button to activate the appliance Make sure that the appliance is in programme selection mode If the salt indicator is on fill the salt container If the rinse aid indicator is on fill the rinse aid dispenser 3 Load the baskets 4...

Page 15: ...gramme 2 Press Delay again and again until the display shows the delay time you want to set from 1 to 24 hours The indicator of the selected programme flashes 3 Press Start to start the countdown The indicator of the selected programme is on with fixed light The countdown starts to decrease From 24 to 11 hours the countdown decreases with steps of 1 hour From 10 to 1 hour the countdown decreases w...

Page 16: ...utlery with normal soil 10 2 Using salt rinse aid and detergent Only use salt rinse aid and detergent for dishwasher Other products can cause damage to the appliance In areas with hard and very hard water we recommend to use plain dishwasher detergent powder gel tablets containing no additional agents rinse aid and salt separately for optimal cleaning and drying results At least once a month run t...

Page 17: ...her salt and rinse aid unless you use multi tablets The position of the items in the baskets is correct The programme is applicable for the type of load and for the degree of soil The correct quantity of detergent is used 10 6 Unloading the baskets 1 Let the tableware cool down before you remove it from the appliance Hot items can be easily damaged 2 First remove items from the lower basket then f...

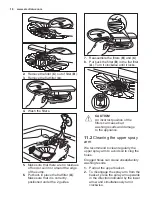
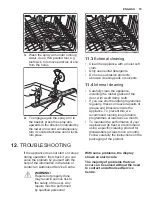
Page 18: ... the flat filter A Turn it clockwise until it locks CAUTION An incorrect position of the filters can cause bad washing results and damage to the appliance 11 2 Cleaning the upper spray arm We recommend to clean regularly the upper spray arm to avoid soil to clog the holes Clogged holes can cause unsatisfactory washing results 1 Pull out the upper basket 2 To disengage the spray arm from the basket...

Page 19: ...ease and limescale inside the appliance To prevent this we recommend running long duration programmes at least twice a month To maintain the performance of your appliance at its best we recommend using a specific cleaning product for dishwashers at least once a month Follow carefully the instructions on the packaging of the product 12 TROUBLESHOOTING If the appliance does not start or it stops dur...

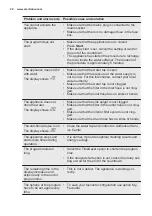
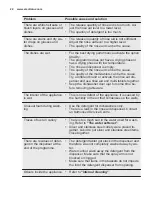
Page 20: ...d Make sure that the inlet hose has no kinks or bends The appliance does not drain the water The display shows Make sure that the sink spigot is not clogged Make sure that the filter in the outlet hose is not clog ged Make sure that the interior filter system is not clog ged Make sure that the drain hose has no kinks or bends The anti flood device is on The display shows Close the water tap and co...

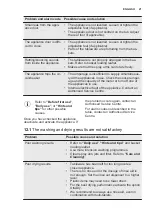
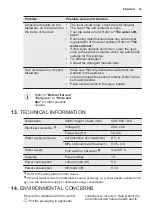
Page 21: ...se Internal electrical fault of the appliance Contact an Authorised Service Centre Refer to Before first use Daily use or Hints and tips for other possible causes Once you have checked the appliance deactivate and activate the appliance If the problem occurs again contact an Authorised Service Centre For alarm codes not described in the table contact an Authorised Service Centre 12 1 The washing a...

Page 22: ...ishwasher door ajar for some time be fore removing tableware The interior of the appliance is wet This is not a defect of the appliance it is caused by the humidity in the air that condenses on the walls Unusual foam during wash ing Use the detergent for dishwashers only There is a leak in the rinse aid dispenser Contact an Authorised Service Centre Traces of rust on cutlery There is too much salt...

Page 23: ...fully Refer to bas ket loading leaflet Place delicate items in the upper basket Refer to Before first use Daily use or Hints and tips for other possible causes 13 TECHNICAL INFORMATION Dimensions Width height depth mm 596 850 610 Electrical connection 1 Voltage V 200 240 Frequency Hz 50 60 Water supply pressure bar minimum and maximum 0 5 8 MPa minimum and maximum 0 05 0 8 Water supply Cold water ...

Page 24: ... electrical and electronic appliances Do not dispose appliances marked with the symbol with the household waste Return the product to your local recycling facility or contact your municipal office www electrolux com 24 ...

Page 25: ...ENGLISH 25 ...

Page 26: ...www electrolux com 26 ...

Page 27: ...ENGLISH 27 ...

Page 28: ...www electrolux com shop 117884840 A 402016 ...

Reviews: