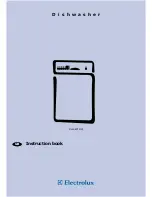
Electrolux ESF 4150 Instruction Book Download Page 11

The upper basket 

The upper basket is designed for plates (dessert plates,
saucers, dinner plates of up to 24 cm in diameter), salad
bowls, cups and glasses. 
Arrange items on and
underneath the cup racks so
that water can reach all
surfaces. 
Glasses with long stems can
be placed upside down in
the cup racks.
For taller items, the cup
racks can be folded
upwards.
Light items (plastic bowls
etc.) must be loaded in the
upper basket and arranged
so they do not move. 

Before closing the door, ensure that the spray arms can
rotate freely. 

Adjusting the height of the upper basket 

If washing very large plates you can load them in the lower
basket after moving the upper basket to the higher position. 

To move to the higher position proceed as
follows:

1. Move the front runner stops (A) of the upper basket 

outwards and slide the basket out. 

2. Refit the basket in the higher position and replace the stops 

(A) in their original position. 

When the basket is in the
higher position you will not
be able to use the cup
rack(s).

After loading your machine always close the door, as an
open door can be a hazard.

Use of detergent 

Only use detergents specifically designed for use in
dishwashers.

Using no more then the correct amount of detergent
contributes to reducing pollution.

Please observe the manufacturer’s dosing and storage
recommendations as stated on the detergent packaging.
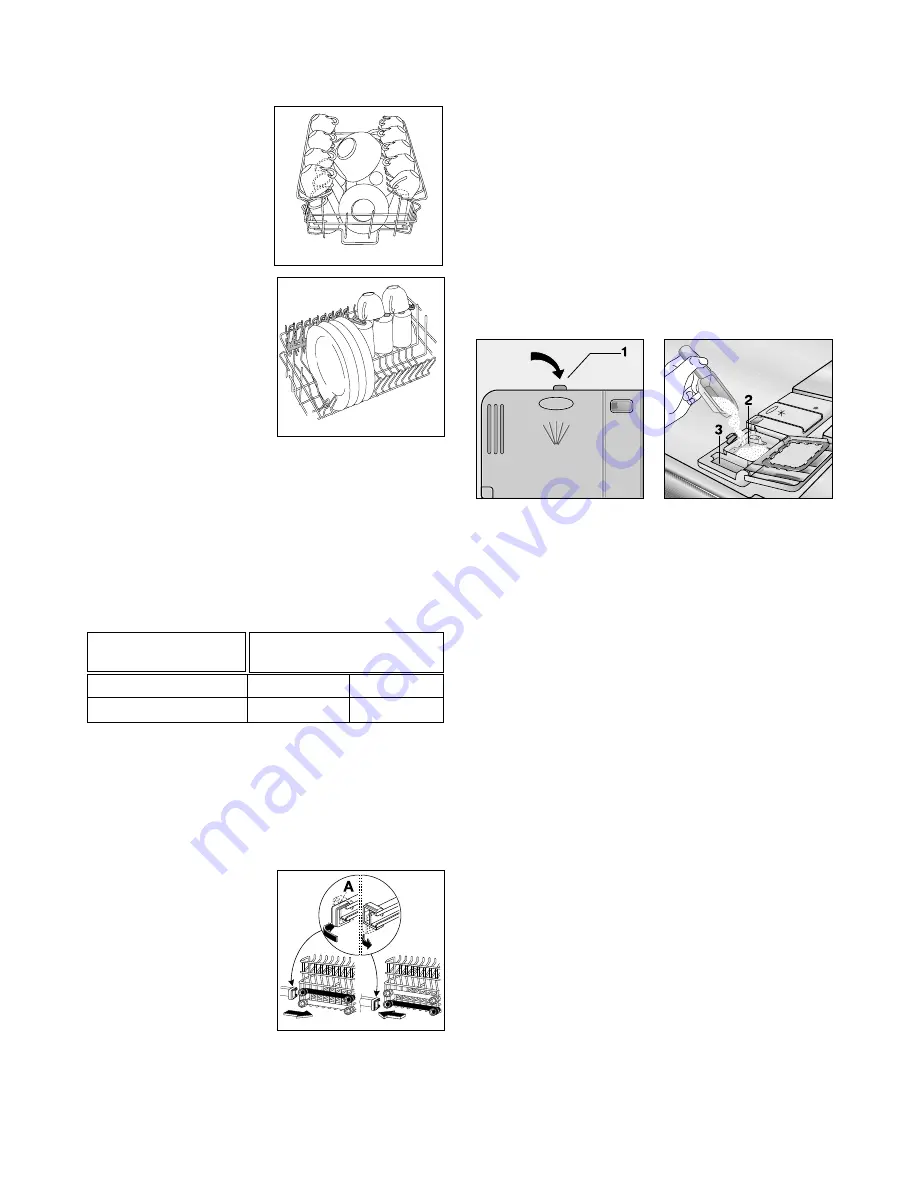
Fill with detergent 

1. If the lid is closed: press release button (1). The lid springs 

open.

2. Fill the detergent dispenser (2) with detergent. 

The marking indicates the dosing levels:
20 = approximately 20 g of detergent
30 = approximately 30 g of detergent

3. All programmes with prewash need an additional detergent 

dose (5/10 g) that must be placed in the prewash detergent 
chamber (3). This detergent will take effect during the 
prewash phase.

4. Close the lid and press until it locks in place.

11

US75

US74

With upper basket raised

20 cm

31 cm

With upper basket lowered

24 cm

27 cm

Maximum height of the dishes in

upper basket

lower basket

RC01

DE19

DE22

Summary of Contents for ESF 4150

Page 1: ...D i s h w a s h e r Instruction book Model ESF 4150 GB ...

Page 2: ... 3 Disposal 3 Economical and ecological dishwashing 3 Installation instructions 4 Fitting under a counter 4 Levelling 4 Water supply connections 4 Water inlet hose with safety valve 4 Water outlet hose connection 5 Electrical connection 5 Description of the appliance 6 The control panel 6 Prior to using for the first time 7 Setting the water softener 7 Filling with salt 8 Rinse aid 9 In daily use ...

Page 3: ...ice ensures that the machine stops Only use products detergent salt and rinse aid specifically designed for use in dishwashers Long bladed knives stored in an upright position are a potential hazard Long and or sharp items of cutlery such as carving knives must be positioned horizontally in the upper basket When finishing loading or unloading close the door as an open door can be a hazard Do not s...

Page 4: ...ction itself the coupling nut fitted to the machine s supply hose is designed to screw onto either a 3 4 inch gas thread spout or to a purpose made quick coupling tap such as the Press block The water pressure must be within the limits given in the Technical specifications Your local Water Authority will advise you on the average mains pressure in your area The water inlet hose must not be kinked ...

Page 5: ...r appliances are supplied with a security device to protect against the return of dirty water back into the machine If the spigot of your sink has a no return valve incorporated this can prevent the correct draining of your dishwasher We advise you therefore to remove it Electrical connection Information concerning the electrical connection is given on the rating plate on the edge of the dishwashe...

Page 6: ...ining time of the running programme the countdown of the delay start fault codes concerning malfunction of the dishwasher Delay start option push button this option allows the start of the programme to be delayed from 1 to 19 hours Description of the appliance The control panel 1 Upper basket stop 2 Water hardness switch 3 Salt container 4 Detergent dispenser 5 Control panel 6 Rating plate 7 Rinse...

Page 7: ... 3 2 6 3 2 1 9 2 5 0 7 1 8 0 7 IV IV IV IV IV III III II I II I 91 125 76 90 65 75 51 64 40 50 33 39 26 32 19 25 7 18 7 2 2 2 2 2 2 1 1 1 1 level 10 level 9 level 8 level 7 level 6 level 5 level 4 level 3 level 2 level 1 yes yes yes yes yes yes yes yes yes no Water hardness Adjusting the water hardness setting Level indicated in the digital display Use of salt Indicator lights have the following m...

Page 8: ... Filling with salt Only use salt specifically designed for use in dishwashers All other types of salt not specifically designed for use in a dishwasher especially table salt will damage the water softener Only fill with salt just before starting one of the complete washing programmes This will prevent any grains of salt or salty water which may have been spilt remaining on the bottom of the machin...

Page 9: ...on the control panel illuminates If you are using dishwasher detergent that includes the rinse aid function it is necessary to deactivate the inflow of rinse aid in order to avoid a double dosage Deactivation activation of the inflow of rinse aid The dishwasher must be switched off When the inflow of rinse aid has been deactivated also the rinse aid indicator light on the control panel is automati...

Page 10: ...her Before loading the dishes you should Remove large left overs Soften remnants of burnt food in pans When loading the dishes and cutlery please note Dishes and cutlery must not impede the rotation of the spray arms Load hollow items such as cups glasses pans etc with the opening downwards so that water cannot collect in the container or a deep base Dishes and items of cutlery must not lie inside...

Page 11: ...riginal position When the basket is in the higher position you will not be able to use the cup rack s After loading your machine always close the door as an open door can be a hazard Use of detergent Only use detergents specifically designed for use in dishwashers Using no more then the correct amount of detergent contributes to reducing pollution Please observe the manufacturer s dosing and stora...

Page 12: ...detergents If you are using dishwasher detergent that includes the rinse aid function this must be placed in the detergent compartment In this case it is necessary to deactivate the inflow of rinse aid in order to avoid a double dosage see Deactivation activation of the inflow of rinse aid Use of 3 in 1 combi detergents General advice These products are detergents with integrated and combined dete...

Page 13: ...ion values are intended as a guide and depends on the pressure and the temperature of the water and also by the variations of the power supply 13 Programme Degree of soil and type of load Heavy soil Crockery cutlery pots and pans Normal soil Crockery and cutlery Normal soil Crockery and cutlery Fresh soil Crockery and cutlery Press the programme button Cycle description 3 Consumption values Hot pr...

Page 14: ...me will be selected check that there is detergent in the detergent dispenser 7 Setting the delay start The setting of the delay start occurs before selecting the programme Press the On Off push button Press the delay start push button until the flashing number of the hours for the delay start will appear in the digital display from 1h to 19h Select a washing programme In the digital display will a...

Page 15: ...ted by pressing the 3 IN 1 function push button indicator light off Select the required washing programme after about 3 seconds the programme will start automatically Once the programme is running the 3 in 1 function can NO longer be changed If you want to exclude the 3 in 1 function you have to cancel the programme setting see To cancel a washing programme in progress and then deactivate the 3 in...

Page 16: ...Put the flat filter D back in the base of the washing compartment 8 Place the coarse fine filter A B in the microfilter C and press together 9 Put the filter combination in place and lock by turning the handle clockwise to the stop During this process ensure that the flat filter does not protrude above the base of the washing compartment Under no circumstances may the dishwasher be used without fi...

Page 17: ...l not drain Indicator light of the programme in progress is flashing in the digital display appears Fault code malfunction Possible cause Solutions The water tap is blocked or furred with limescale The water tap is turned off The filter where present in the threaded hose fitting at the water inlet valve is blocked The water inlet hose has not been correctly laid or it is bent or squashed Clean the...

Page 18: ...pots or a bluish coating on glasses and dishes Decrease rinse aid dosing Water drops have dried onto glasses and dishes Increase rinse aid dosing The detergent may be the cause Contact the detergent manufacturer s consumer care line 18 If after all these checks the problem persists contact your local Service Force Centre quoting the model Mod product number PNC and serial number S N This informati...

Page 19: ... salt dispenser and rinse aid container have been filled with salt and rinse aid respectively and using the test programme see Washing programmes chart 19 Load 9 standard place settings Rinse aid setting position 4 Type III Detergent dosage 5 g 20 g Type B Arrangement lower basket Arrangement upper basket without smaller bowl and salad bowl Arrangement cutlery basket Arrangement upper basket with ...

Page 20: ...iances for kitchen cleaning and outdoor use More than 55 million Electrolux Group products such as refrigerators cookers vacuum cleaners chain saws and lawn mowers are sold each year to a value of approx 14 billion USD in more than 150 countries around the world 152966 71 1 1 02 04 Subject to change without notice ...

Reviews: