Electrolux ES200/300 Use And Care Manual Download Page 10

10

Setting Oven Controls

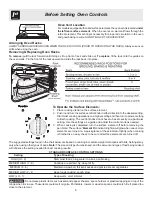
Speed Bake™ Cooking System - (some models)

Speed Bake™ Cooking System uses a fan to circulate the oven's heat uniformly
and continuously around the oven. This improved heat distribution allows for fast,
even cooking and browning results. It also gives better baking results when using
two racks at the same time.

Heated air flows around the food from all sides, sealing in juices and flavors.
Meats cooked with Speed Bake™ Cooking System are juicer. Poultry is crisp
on the outside while staying tender and moist on the inside. Breads and pastry
brown more evenly. Most foods baked in a standard oven can be cooked faster
and more evenly with Speed Bake™ Cooking System.

General Cooking Instructions:

1.

To convert baking times for normal recipes to Speed Bake times, start with
a 30% reduction in time and increase the time until the desired doneness is
obtained. Time reductions will vary depending on the amount and type of
food.

2.

Preheating is not necessary when cooking with Speed Bake, except with
items such as cakes, cookies, biscuits, breads, etc.

3.

When using two racks at
the same time, place in
positions 2 and 5 for the
best results.

4.

When baking cakes with
S p e e d   B a k e ,   s e t
temperature 25F° (13°C)
degrees  lower than the
recommended setting for
best results.

To Set Speed Bake™ Cooking System:

1.

Program the oven as you normally would for baking. Speed Bake may be
used with Bake, Time Bake and Delayed Time Bake features.

2.

Press and release Speed Bake switch. The indicator light will glow and the
fan will come on. The fan stays on when the oven door is closed and shuts
off while the oven door is opened. The fan will continue to operate until baking
is complete.

3.

To cancel Speed baking function, press 

 on the oven control as you would

to cancel any baking function.

NOTE: The Speed Bake feature will not work during a clean cycle.

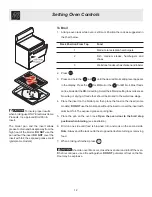
Recommended Foods for

Speed Bake™ Cooking System

Decrease Cook

Food Item

Time by:

Casseroles

25%

Meats

15%

(or 5 min/lb)

Poultry

30%

(or 10 min/lb)

Frozen foods

20%

Refrigerator cookies

25%

(or 2 to 5 min.)

Refrigerator biscuits

25%

(or 2 to 4 min.)

Rolls/Breads/Pizza

25%

(or 5 min.)

Vegetables

25%

Baked Potatoes

25%

Pies/Pastries

30%

Benefits of Speed Bake™ Cooking
System:
—Foods cook up to 30% faster, saving

time and energy.

—Multiple rack baking.
—No special pans or bakeware needed.

Summary of Contents for ES200/300

Page 1: ...p n 316417014 0501 ...

Page 2: ...kYou for choosing our product We hope you consider us for future purchases PLEASE CAREFULLY READ AND SAVETHESE INSTRUCTIONS This Use Care Manual provides specific operating instructions for your model Use your range only as instructed in this manual These instructions are not meant to cover every possible condition and situation that may occur Common sense and caution must be practiced when instal...

Page 3: ...be seriously injured Never Use Your Appliance for Warming or Heating the Room Storage in or on Appliance Flammable materials should not be stored in an oven warmer drawer near surface units or in the storage drawer This includes paper plastic and cloth items such as cookbooks plasticware and towels as well as flammable liquids Do not store explosives such as aerosol cans on or near therange Do Not...

Page 4: ...tion Use potholders and grasp the rack with both hands to reposition Do not let potholders contact the hot heating elements in the oven Remove all utensils from the rack before moving Do not use the broiler pan without its insert The broiler pan and its insert allow dripping fat to drain and be kept away from the high heat of the broiler Do not cover the broiler insert with aluminum foil Exposed f...

Page 5: ...5 Features At A Glance Features will vary according to model some models ...

Page 6: ...URFACE CONTROL SETTINGS Setting Type of Cooking HIGH HI 9 Start most foods bring water to a boil pan broiling MEDIUM HIGH 7 8 Continue a rapid boil fry deep fat fry MEDIUM 5 6 Maintain a slow boil thicken sauces and gravies steam vegetables MEDIUM LOW 2 4 Keep foods cooking poach stew LOW LO 1 Keep warm melt simmer Do not place plastic items such as salt and pepper shakers spoon holders or plastic...

Page 7: ...function previously entered except the time of day and minute timer Press CLEAR to stop cooking Also the CLEAR pad is used to activate oven door lockout setting TIMER PAD Used to set or cancel the minute timer The minute timer does not start or stop cooking Also the TIMER pad is used to set the Continuous Bake feature For a silent control panel When choosing a function a beep will be heard each ti...

Page 8: ...ws the timer count down in minutes until one minute remains Then the display will count down in seconds 4 When the set time has run out the timer will beep 3 times It will then continue to beep 3 times every 60 seconds until is pressed Note The minute timer does not start or stop cooking It serves as an extra timer in the kitchen that will beep when the set time has run out The minute timer can be...

Page 9: ...re that will shut off the oven if the control is left on for more than 11 hours and 59 minutes The oven can be programmed to override this feature for continuous baking To set control for continuous baking 1 Press 0 00 will appear in the display 2 Press and hold down for 5 seconds until tone is heard hr will appear in display for continuous cooking The current time of day will return to the displa...

Page 10: ...ads etc 3 When using two racks at the same time place in positions 2 and 5 for the best results 4 When baking cakes with S p e e d B a k e s e t temperature 25F 13 C degrees lower than the recommended setting for best results To Set Speed Bake Cooking System 1 Program the oven as you normally would for baking Speed Bake may be used with Bake Time Bake and Delayed Time Bake features 2 Press and rel...

Page 11: ... display 6 Press the or until the desired baking time appears in the display 7 The oven will turn on and begin heating To Program Oven for a Delayed Start Time and to Shut Off Automatically 1 Be sure that the clock shows the correct time of day 2 Place the food in the oven 3 Press 4 Within 5 seconds press the or The display will show 350 F 177 C By holding the or the temperature can then be adjust...

Page 12: ...ng SelecttheLObroilsettingtoavoidexcess browning or drying of foods that should be broiled to the well done stage 4 Place the insert on the broiler pan then place the food on the insert some models DONOT usethebroilerpanwithouttheinsertorcovertheinsertwith aluminum foil The exposed grease could ignite 5 Place the pan on the oven rack Open the oven door to the broil stop position when broiling see ...

Page 13: ... food spills with a high sugar or acid content such as milk tomatoes sauerkraut fruitjuicesorpiefilling toremainonthesurfaceasthey may leave a dull spot even after cleaning Clean any soil from the oven frame the door liner outside the oven door gasket and the small area at the front center of the oven bottom These areas heat sufficiently to burn soil on Clean with soap and water During the self cl...

Page 14: ...cle 4 As soon as the or is released CLn appears in the display 5 As soon as the controls are set the motor driven lock will begin to close automatically and the LOCK indicator light will flash DO NOT open the door while the light is flashing it takes about 15 seconds for the oven door to lock 6 The LOCK light will glow until the cleaning cycle is completed or cancelled and the oven temperature has...

Page 15: ... a cloth Do not use cleaners with high concentrations of chlorides or chlorines Do not use harsh scrubbing cleaners Only use kitchen cleaners that are especially made for cleaning stainless steel Always be sure to rinse the cleaners from the surface as bluish stains may occur during heating that cannot be removed Gentle scouring with a soapy scouring pad will remove most spots Rinse with a 1 1 sol...

Page 16: ...ently push back on each rod to release the notched support Hold the range top and slide the lift rods down into the range frame Care Cleaning Be sure the range is cool before removing elements or drip bowls Be careful not to bend terminal ends when replacing elements after cleaning When lowering the lift up range top grasp the sides with finger tips only Be careful not to pinch fingers DO NOT drop...

Page 17: ...vy For safe temporary storage lay the door flat with the inside of the door facing down To Remove Oven Door 1 Open oven door completely horizontal with floor See Fig 1 2 Remove 2 screws located on the inside of the oven door liner See A Fig 2 3 Insert the 2 screws into the door hinge holes located on the side of the hinge arm one into each hinge See B Fig 2 4 Close oven door until the door stops D...

Page 18: ...Incorrect control setting Make sure the correct control is on for the surface element to be used Elementnotmakingcontactinblock Followinstructionsunder SurfaceElements and Drip Bowls in the Care Cleaning section Make sure cord plug is plugged tightly into outlet The time of day must first be set in order to operate the oven Service wiring is not complete Contact your dealer installing agent or aut...

Page 19: ... the set temperature before placing food in the oven Try adjusting the recipe s recommended temperature or baking time If you feel the oven is too hot or cool see Adjusting Your Oven Temperature in this Use Care Manual Control s not set properly Follow instructions under Self Cleaning section Self cleaning cycle was interrupted Follow steps under Stopping or Interrupting a Self Cleaning Cycle in t...

Page 20: ...ice be required If service is performed it is in your best interest to obtain and keep all receipts This written warranty gives you specific legal rights You may also have other rights that vary from state to state Service under this warranty must be obtained by contacting Electrolux Home Products Inc or Electrolux Canada Corp FULLONE YEAR WARRANTY LIMITED 2ND 5TH YEARWARRANTY Glass Smoothtop Seal...

Reviews: