background image

CARE AND CLEANING

WARNING!

Refer to "Safety information" chap-
ter.

Notes on cleaning:

• Clean the front of the appliance with a

soft cloth with warm water and a clean-
ing agent.

• To clean metal surfaces, use a usual

cleaning agent.

• Clean the appliance interior after each

use. Then you can remove dirt more
easily and it does not burn on.

• Clean stubborn dirt with a special oven

cleaner.

• Clean all accessories after each use and

let them dry. Use a soft cloth with warm
water and a cleaning agent.

• If you have nonstick accessories, do not

clean them using aggressive agents,
sharp-edged objects or a dishwasher. It
can cause damage to the nonstick coat-
ing.

PYROLYTIC CLEANING

Remove all accessories and re-
movable shelf supports.

Do not start the pyrolytic
cleaning if:

• You did not remove the shelf

supports or telescopic shelf run-
ners (if supplied). In some mod-
els, the display shows “C1”
when this error occurs.

• You did not fully close the oven

door. In some models, the dis-
play shows “C3” when this error
occurs.

1.

Remove the worst dirt manually.

2.

Set the Pyrolytic cleaning function. Re-
fer to "Oven functions".

3.

When 

 flashes, press 

 or 

 to

set the necessary procedure:

P1

 – If the oven is not very dirty. The

procedure is 1:30 h long.

P2

 – If you cannot easily remove the

dirt. The procedure is 2:30 h long.

After 2 seconds the procedure starts.
To change the default length of the
procedure (

P1

 or 

P2

), press 

 to set

 , and then press 

 or 

 to set

the length of the pyrolytic procedure.
You can use the End function to delay
the start of the cleaning procedure.
When the oven is at its set tempera-
ture, the door locks. The display shows
the symbol 

 and the bars of the heat

indicator until the door unlocks.

During pyrolytic cleaning the lamp
is off.

Cleaning reminder

To remind you that the pyrolytic cleaning is
necessary, 

PYR

 flashes in the display for

10 seconds after each activation and deac-
tivation of the appliance.

The cleaning reminder goes
out:

• After the end of the Pyrolytic

cleaning function.

• If you press “ 

 " and “ 

 ” at

the same time.

ENGLISH

29

Summary of Contents for EOC5651CAX

Page 1: ...EOC5651CA EN OVEN USER MANUAL ...

Page 2: ...ou use it you can be safe in the knowledge that you ll get great results every time Welcome to Electrolux Visit our website for Get usage advice brochures trouble shooter service information www electrolux com Register your product for better service www electrolux com productregistration Buy Accessories Consumables and Original spare parts for your appliance www electrolux com shop CUSTOMER CARE ...

Page 3: ...ppliance is installed below and adjacent safe structures The sides of the appliance must stay ad jacent to appliances or to units with the same height Electrical connection WARNING Risk of fire and electrical shock All electrical connections should be made by a qualified electrician The appliance must be earthed Make sure that the electrical information on the rating plate agrees with the power su...

Page 4: ...ot appliance do not keep moist dishes and food in the appliance after you finish the cook ing be careful when you remove or install the accessories Discoloration of the enamel has no effect on the performance of the appliance It is not a defect in the sense of the warranty law Use a deep pan for moist cakes Fruit jui ces cause stains that can be permanent CARE AND CLEANING WARNING Risk of injury f...

Page 5: ...house lighting WARNING Risk of electrical shock Before replacing the lamp disconnect the appliance from the power supply Only use lamps with the same specifica tions DISPOSAL WARNING Risk of injury or suffocation Disconnect the appliance from the mains supply Cut off the mains cable and discard it Remove the door catch to prevent chil dren and pets to get closed in the appli ance ENGLISH 5 ...

Page 6: ... lamp 7 Socket for the core temperature sen sor 8 Heating element 9 Lamp 10 Fan 11 Rear wall heating element 12 Bottom heat 13 Shelf support removable 14 Shelf positions ACCESSORIES Wire shelf For cookware cake tins roasts Grill Roasting pan To bake and roast or as a pan to collect fat Trivet For roasting and grilling Use the trivet only with the Grill roasting pan 6 www electrolux com ...

Page 7: ...Core temperature sensor To measure how far the food is cooked Telescopic runners For shelves and trays ENGLISH 7 ...

Page 8: ...2 00 12 flashes 1 Press or to set the current hour 2 Press to confirm necessary only for the first setting Later the new time will be saved automatically after 5 sec onds The display shows and the set hour 00 flashes 3 Press or to set the current mi nutes 4 Press to confirm necessary only for the first setting Later the new time will be saved automatically after 5 sec onds The Temperature Time dis...

Page 9: ... Up To decrease the heat up time True Fan Cooking To bake on the maximum temperature on three oven levels at the same time When you use this function decrease the oven temperature by 20 40 C from the standard temperatures you use for Conventional Cooking Also to dry food Pizza Setting To bake food on one oven level for a more in tensive browning and a crispy bottom When you use this function decre...

Page 10: ...n function DISPLAY A B C D E F G A Timer B Heat up and residual heat indicator C Water drawer selected models only D Core temperature sensor selected models only E Door lock selected models only F Hours minutes G Clock functions BUTTONS Button Function Description CLOCK To set a clock function MINUS PLUS To set the time MINUTE MINDER To set the MINUTE MINDER Hold the button for more than 3 seconds...

Page 11: ... hour 5 Press to confirm An acoustic sig nal sounds for 2 minutes after the time ends or symbol and time set ting flash in the display The oven stops 6 Press any button or open the oven door to stop the acoustic signal If you press when you set the hours for DURATION the ap pliance goes to setting of the END function SETTING THE MINUTE MINDER 1 Press and 00 flash in the display 2 Press or to set t...

Page 12: ...You cannot use the Count Up Tim er when Duration or End function operates 12 www electrolux com ...

Page 13: ...dis played during the next use of the core temperature sensor 6 Make sure that the core temperature sensor stays in the meat and in the socket during the cooking 7 When the meat is at the set core tem perature the symbol for the core tem perature and the core temperature sensor flash An acoustic signal sounds for two minutes Press a but ton to stop the signal 8 Remove the plug of the core tempera ...

Page 14: ...eep pan together Put the wire shelf on the deep pan Push the deep pan between the guide bars of one of the oven levels TELESCOPIC RUNNERS INSERTING THE OVEN ACCESSORIES Put the baking tray or deep pan on the telescopic runners Put the wire shelf on the telescopic runners so that the feet point downwards The high rim around the wire shelf is a special device to prevent the cookware from slipping 14...

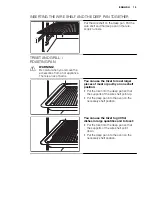
Page 15: ... burns You can use the trivet to roast larger pieces of meat or poultry on one shelf position Put the trivet into the deep pan so that the supports of the wire shelf point up Put the deep pan into the oven on the necessary shelf position You can use the trivet to grill flat dishes in large quantities and to toast Put the trivet into the deep pan so that the supports of the wire shelf point down Pu...

Page 16: ...ven has Pyro Cleaning func tion and the function operates the door is locked You can deactivate the appliance when the Control lock is on When you deactivate the appliance the control lock deactivates Loc comes on in the display when you turn a knob or press a button RESIDUAL HEAT INDICATOR The display shows the residual heat indica tor when the appliance is off and the temperature in the oven is ...

Page 17: ...tions are gone How to use the Baking Tables The manufacturer recommends that you use the lower temperature the first time If you cannot find the settings for a spe cial recipe look for the one that is almost the same You can extend baking times by 10 15 minutes if you bake cakes on more than one level Cakes and pastries at different heights do not always brown equally at first If this occurs do no...

Page 18: ...l Cooking 3 170 190 30 40 Christmas stol len Conventional Cooking 2 160 180 1 50 70 Bread rye bread 1 First part of baking procedure 2 Second part of baking procedure Conventional Cooking 1 1 230 1 2 160 180 1 20 2 30 60 Cream puffs Eclairs Conventional Cooking 3 190 210 1 20 35 Swiss roll Conventional Cooking 3 180 200 1 10 20 Cake with crumble top ping dry True Fan Cooking 3 150 160 20 40 Butter...

Page 19: ...unc tion Shelf position Temperature C Time min Short pastry biscuits True Fan Cooking 3 150 160 10 20 Short bread Short bread Pastry stripes True Fan Cooking 3 140 20 35 Short bread Short bread Pastry stripes Conventional Cooking 3 160 1 20 30 Biscuits made with sponge mixture True Fan Cooking 3 150 160 15 20 Pastries made with egg white Merun gues True Fan Cooking 3 80 100 120 150 Macaroons True ...

Page 20: ...n Shelf position 2 levels 3 levels Cream puffs Eclairs 1 4 160 180 1 25 45 Dry streusel cake 1 4 150 160 30 45 1 Preheat the oven Biscuits small cakes small cakes pastries rolls Type of bak ing True Fan Cooking Temperature in C Time min Shelf position 2 levels 3 levels Short pastry biscuits 1 4 1 3 5 150 160 20 40 Short bread Short bread Pastry Stripes 1 4 1 3 5 140 25 50 Biscuits made with sponge...

Page 21: ...ake sinks and be comes soggy lumpy or streaky There is too much liquid in the mixture Use less liquid Be careful with mixing times espe cially if you use a mixing machine The cake is too dry The oven temperature is too low The next time you bake set a higher oven temper ature The cake is too dry The baking time is too long The next time you bake set a shorter baking time The cake browns uneven ly ...

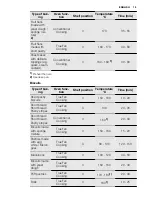
Page 22: ...r er You can roast large roasting joints direct ly in the deep pan if present or on the wire shelf above the deep pan Roast lean meats in the roasting tin with the lid This keeps the meat more succu lent All types of meat that can be browned or have crackling can be roasted in the roasting tin without the lid ROASTING WITH TURBO GRILLING Beef Type of meat Quantity Oven function Shelf posi tion Tem...

Page 23: ...eal 1 kg Turbo Grill ing 1 160 180 90 120 Knuckle of veal 1 5 2 kg Turbo Grill ing 1 160 180 120 150 Lamb Type of meat Quantity Oven func tion Shelf posi tion Tempera ture C Time min Leg of lamb Roast lamb 1 1 5 kg Turbo Grill ing 1 150 170 100 120 Saddle of lamb 1 1 5 kg Turbo Grill ing 1 160 180 40 60 Game Type of meat Quantity Oven func tion Shelf posi tion Tempera ture C Time min Saddle Leg of...

Page 24: ... Time min Whole fish 1 1 5 kg Convention al Cooking 1 210 220 40 60 GRILLING Always grill with the maximum temperature setting Set the shelf into the shelf position as rec ommended in the grilling table Always set the pan to collect the fat into the first shelf position Grill only flat pieces of meat or fish Always preheat the empty oven with the grill functions for 5 minutes CAUTION Always grill ...

Page 25: ...ts 1 180 200 40 55 Spinach flan 1 160 180 45 60 Quiche Lorraine 1 170 190 45 55 Swiss Flan 1 170 190 45 55 Apple cake cov ered 1 150 170 50 60 Vegetable pie 1 160 180 50 60 Unleavened bread 2 230 2501 10 20 Puff pastry flan 2 160 180 1 45 55 Flammekuchen Pizza like dish from Alsace 2 230 2501 12 20 Piroggen Russian version of calzone 2 180 200 1 15 25 1 Preheat the oven 2 Use a deep pan DEFROSTING...

Page 26: ... or metal tins Use the first shelf from the bottom for this function Put no more than six one litre preserve jars on the baking tray Fill the jars equally and close with a clamp The jars cannot touch each other Put approximately 1 2 litre of water into the baking tray to give sufficient moisture in the oven When the liquid in the jars starts to sim mer after approximately 35 60 minutes with one li...

Page 27: ...peration Open the appliance door and let the appliance cool down After that complete the drying proc ess Vegetables Food to be dried Shelf position Temperature C Time h 1 level 2 levels Beans 3 1 4 60 70 6 8 Peppers 3 1 4 60 70 5 6 Vegetables for sour 3 1 4 60 70 5 6 Mushrooms 3 1 4 50 60 6 8 Herbs 3 1 4 40 50 2 3 Fruit Food to be dried Shelf position Temperature C Time h 1 level 2 levels Plums 3 ...

Page 28: ...of mutton 80 85 Roast lamb Leg of lamb 70 75 Game Food Food Core Temperature C Saddle of hare 70 75 Leg of hare 70 75 Whole hare 70 75 Saddle of venison 70 75 Leg of venison 70 75 Fish Food Food Core Temperature C Salmon 65 70 Trouts 65 70 Information on acrylamides Important According to the newest scientific knowledge if you brown food specially the one which contains starch acrylamides can pose...

Page 29: ... not fully close the oven door In some models the dis play shows C3 when this error occurs 1 Remove the worst dirt manually 2 Set the Pyrolytic cleaning function Re fer to Oven functions 3 When flashes press or to set the necessary procedure P1 If the oven is not very dirty The procedure is 1 30 h long P2 If you cannot easily remove the dirt The procedure is 2 30 h long After 2 seconds the procedu...

Page 30: ...to the front LAMP WARNING There is a risk of electrical shock The lamp and the lamp glass cover can be hot Before you change the lamp Deactivate the appliance Remove the fuses from the fuse box or deactivate the circuit breaker CAUTION Put a cloth on the bottom of the in terior of the appliance It prevents damage to the lamp glass cover and the cavity Always use the same lamp type Replacing the la...

Page 31: ...away from the appli ance at an up angle 5 Put the door with the outer side down on a soft cloth on a stable surface This is to prevent scratches 2 B 1 6 Hold the door trim B on the top edge of the door at the two sides and push inwards to release the clip seal 7 Pull the door trim to the front to re move it 8 Hold the door glass panels on their top edge one by one and pull them up out of the guide...

Page 32: ...The lamp is defective Replace the lamp The pyrolytic cleaning does not operate the clock display shows C1 You did not remove the shelf support telescopic runners Remove the shelf support telescopic runners The pyrolytic cleaning does not operate the time display shows C3 You did not fully close the door or the door lock is defective Fully close the door The display shows C2 You did not remove the ...

Page 33: ...e it again If the display shows the error code again con tact the Customer Care Department If you cannot find a solution to the problem yourself contact your dealer or the service centre The necessary data for the service centre is on the rating plate The rating plate is on the front frame of the appliance cavity We recommend that you write the data here Model MOD Product number PNC Serial number ...

Page 34: ...ING Refer to Safety information chap ter The built in unit must meet the sta bility requirements of DIN 68930 min 3 mm 20 30 5 21 200 590 567 579 572 547 546 594 594 114 590 min 530 min 560 min cm2 34 www electrolux com ...

Page 35: ...max R1200 mm 130 140 alternativ 100 H05VV F H05RR F min 1600 mm 90º 2x3 5x25 ENGLISH 35 ...

Page 36: ...ial environment plus those which are subject to rental agreements Products of Electrolux manufacturer that are not marketed by Electrolux Service and Spare Parts Please contact your local Service Force Centre 08445 616 616 Call will be routed to Service Force Centre covering your postcode area For address of local Service Force Centre and further information please visit www serviceforce co uk Bef...

Page 37: ...the seller of the appliance The appliance guarantee is for the same period and to the same extent for labour and parts as exists in your new country of residence for this particular model or range of appliances The appliance guarantee is personal to the original purchaser of the appliance and cannot be transferred to another user The appliance is installed and used in accordance with instructions ...

Page 38: ...agreb Ireland 353 1 40 90 753 Long Mile Road Dublin 12 Italia 39 0 434 558500 C so Lino Zanussi 26 33080 Porcia PN Latvija 371 67313626 Kr Barona iela 130 2 LV 1012 Riga Lietuva 370 5 278 06 03 Ozo 10a LT 08200 Vilnius Luxembourg 352 42 431 301 Rue de Bitbourg 7 L 1273 Hamm Magyarország 36 1 252 1773 H 1142 Budapest XIV Erzsébet kirá lyné útja 87 Nederland 31 17 24 68 300 Vennootsweg 1 2404 CG Al ...

Page 39: ...0 3589 129090 Москва Олимпийский проспект 16 БЦ Олимпик Україна 380 44 586 20 60 04074 Київ вул Автозаводська 2а БЦ Алкон ENVIRONMENT CONCERNS Recycle the materials with the symbol Put the packaging in applicable containers to recycle it Help protect the environment and human health and to recycle waste of electrical and electronic appliances Do not dispose appliances marked with the symbol with t...

Page 40: ...www electrolux com shop 892948844 A 512011 ...

Reviews: