background image

10 

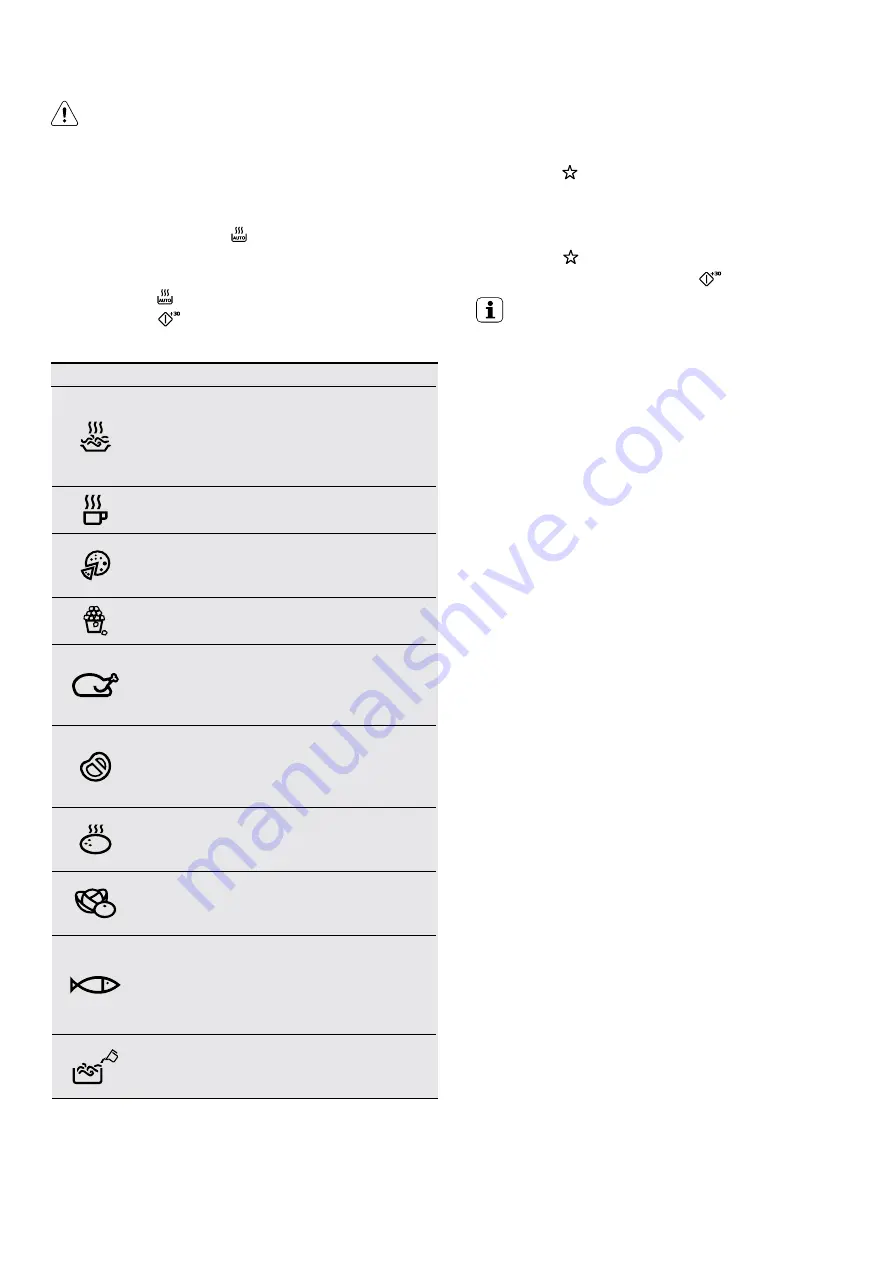
AUTOMATIC PROGRAMMES

Display 

Menu

Weight

Auto 
Reheat

150g 
250g 
350g 
450g 
600g

Beverage

1 cup

Pizza

200g 
300g 
400g

Popcorn

50g
100g

Chicken

500g
750g 
1kg 
1.2kg

Meat

150g 
300g 
450g 
600g

Potato

230g 
460g 
690g

Vegetable

150g 
350g 
500g

Fish

150g 
250g 
350g 
450g 
650g

Pasta

50g (add 450ml of water) 
100g (add 800ml of water) 
150g (add 1200ml of water)

 WARNING!

Refer to the safety chapters.

Auto Cooking

You can use Auto Cooking function to easily cook food.
 

1.   Repeatedly press   to set the desired menu.


2.   Press the Setting pads to input the weight.


3.   To change the set menu for a different one  

press  .


4.     Press 

 to confirm and start the appliance.

Favourite 

Setting the programmes


1.   Set the function and parameters you want to save.


2.   Press   and hold for 2 seconds. 


3.   An acoustic signal sounds after the settings  

are saved.

Using the programmes 


1.   Press  . 


2.   To start the appliance press 


  You can save only one Favourite setting.

Summary of Contents for EMF2529DSD

Page 1: ...EMF2529DSD Installation User manual Freestanding microwave ...

Page 2: ...eral warnings 3 Safety instructions 4 Product description 5 Accessories 5 Control panel 5 Before first use 6 Daily use 7 Automatic programmes 10 Using the accessories 11 Additional functions 11 Helpful hints and tips 12 Care and cleaning 13 Troubleshooting 13 Installation 14 Electrical Installation 15 Notes 16 Warranty 17 SYMBOLS WARNING This symbol indicates information concerning your personal s...

Page 3: ...se instructions or any other safety instructions incorporated in this book be ignored When heating food in plastic or paper containers keep an eye on the appliance due to the possibility of ignition The appliance is intended for heating food and beverages Drying of food or clothing and heating of warming pads slippers sponges damp cloth and similar may lead to risk of injury ignition or fire If sm...

Page 4: ...Do not allow food spills or cleaner residue to accumulate on door sealing surfaces Remaining fat or food in the appliance can cause smoke fire particularly on the grill element Clean the appliance with a moist soft cloth Only use neutral detergents Do not use abrasive products abrasive cleaning pads solvents or metal objects Do not use a steam cleaner to clean this appliance Disposal WARNING Risk ...

Page 5: ...odes only Using this wire grill rack on microwave only mode may cause damage to the appliance 1 3 4 8 7 6 5 2 Control panel Symbol Function Description 1 _ Display Shows the settings and current time 2 Function pads To set the microwave grill convection combi auto defrost and auto cooking function 3 Time Set pads To set the desired time 4 Start 30 sec To start the appliance or increase the cooking...

Page 6: ...pply or after a power cut the display shows 0 00 You can set the time in a 24 hour clock system 1 Press twice 2 To set the amount of hours press the setting pads 3 Press to confirm 4 To set the amount of minutes press the setting pads 5 Press to confirm 6 The display shows On The clock is shown on the display when the appliance is not used If you do not want the clock to be shown when the applianc...

Page 7: ...t a lower power level Dishes which contain sauce must be stirred from time to time Vegetables that have a firm structure such as carrots peas or cauliflower must be cooked in water Turn larger pieces after half of the cooking time If possible cut vegetables into similar sized pieces Use flat wide dishes Do not use cookware made of porcelain ceramic or earthenware with small holes e g on handles or...

Page 8: ...nt plastic up to 200 C 3 Cardboard paper Clingfilm Roasting film with microwave safe closure 3 Roasting dishes made of metal e g enamel cast iron Baking tins black lacquer or silicon coated 3 Baking tray Browning cookware e g Crisp pan or Crunch plate Ready meals in packaging 3 1 With no silver gold platinum or metal plating decorations 2 Without quartz or metal components or glazes which contain ...

Page 9: ...art the appliance 4 For weight defrosting the display shows the set defrosting time For weight defrosting the time is set automatically When using the time defrost function time should be reduced for food that is left out to thaw for more than 20 minutes To activate weight defrosting you must use more than 100g of food and less than 2000g To defrost less than 200g of food place it on the edge of t...

Page 10: ... Refer to the safety chapters Auto Cooking You can use Auto Cooking function to easily cook food 1 Repeatedly press to set the desired menu 2 Press the Setting pads to input the weight 3 To change the set menu for a different one press 4 Press to confirm and start the appliance Favourite Setting the programmes 1 Set the function and parameters you want to save 2 Press and hold for 2 seconds 3 An a...

Page 11: ... rack on microwave only mode may cause damage to the appliance Kitchen Timer 1 Press 2 Press the Setting pads to set the time 3 The Kitchen Timer activates automatically after a few seconds When the set time is reached an acoustic signal sounds You can set maximum 95 minutes When a function is running and the timer is set you can see the time left or clock if required Pressing 0 will toggle betwee...

Page 12: ... a traditional oven No microwaves are used Combi Cooking Use the Combi Cooking to keep the crispness of certain foods At the half of the cooking time turn over the foods then continue There are 4 modes for Combi Cooking Each mode combines the microwave grill and convection functions at different time periods and power levels Power setting table Problem Remedy You cannot find details for the amount...

Page 13: ...e cavity There are metal dishes or dishes with metal trim Remove the dish from the appliance There are metal skewers or aluminium foil that touches the interior walls Make sure that the skewers and foil does not touch the interior walls The turntable set makes scratching or grinding noise or does not rotate smoothly There is an object or dirt below the glass cooking tray Clean the area below the g...

Page 14: ...e not to obstruct it or let curtains come between the oven and the rear wall NOTE It is recommended to have greater than 7 5cm clearance on at least one of the sides to improve product performance and operation The oven should be placed in a stable position to avoid the possibility of causing vibration or noise Do not remove the legs from the bottom of the oven This oven should only be installed f...

Page 15: ...cable and main plug WARNING The microwave oven is fitted with a plug and must be only connected to a properly installed earthed socket In accordance with the appropriate regulations the socket must only be installed and the connecting cable must only be replaced by a qualified electrician If the plug is no longer accessible following installation an all pole isolating switch must be present on the...

Page 16: ...16 NOTES ...

Page 17: ...or inappropriate operation viii insect or vermin infestation ix failure to comply with any additional instructions supplied with the Appliance In addition Electrolux is not liable under this warranty if a the Appliance has been or Electrolux reasonably believes that the Appliance has been used for purposes other than those for which the Appliance was intended including where the Appliance has been...

Page 18: ...lux com au Electrolux Home Products New Zealand telephone 0800 436 245 fax 0800 225 088 email customercare electrolux co nz web electrolux co nz electrolux com au or electrolux co nz To add a touch of professional inspiration to your home visit electrolux com au or electrolux co nz 2018 Electrolux Home Products Pty Ltd EMAN_EMF2529DSD_Micro_Sep18 ...

Reviews: