Electrolux EI30BM60M Installation Instructions Manual Download Page 16

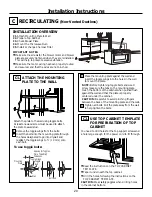
INSTALLATION OVERVIEW

B1.

Prepare Rear Wall

B3.

Attach Mounting Plate to Wall

B4.

Prepare Top Cabinet

B5.

Adjust Blower

B6.

Mount the Microwave Oven

IMPORTANT NOTES:

Make sure the screws for the 
blower motor and blower plate 
are securely tightened when 
they are reinstalled. This will 
help to prevent excessive 
vibration.

been properly routed and secured, 
and that the wires are not pinched.

Remove and save the screw that holds the blower
plate to the microwave. Lift off the blower plate.

Back of 
Microwave

Installation Instructions

PREPARING THE REAR WALL 
FOR OUTSIDE BACK EXHAUST

B1.

You need to cut an opening in the rear wall for
outside exhaust.

Read the instructions on the REAR 
WALL TEMPLATE.

Tape it to the rear wall. 

Cut the opening, following the instructions of the
REAR WALL TEMPLATE.

B2.

OUTSIDE BACK EXHAUST 

(Horizontal Duct)

B

Blower Plate

REMOVE BLOWER PLATE 

B2. 

Remove Blower Plate

3/8" TO EDGE

































NOTE: IT IS VE

RY IMPOR

TANT TO

READ AND

 FOLLOW TH

E DIRECTIONS

IN THE IN

STALLATIO

N INSTRUCTIO

NS

BEFORE PR

OCEEDING

 WITH THIS

REAR WALL

 TEMPLATE

.

This Rear Wall 

Template serv

es to position 

the bottom 

mounting plate a

nd to locate the

 horizontal exhaust


outlet. 

1. Use a level 

to check that th

e template is posi

tioned 

    accurat

ely. 

2. Locate and 

mark at least one

 stud on the lef

t or 

    right side 

of the centerline.



It is important 

to use at leas

t one wood 

screw mounted 

firmly in a stud

 to support the

 weight 

of the microw

ave. Mark two 

additional, evenly 

spaced 

locations for the 

supplied toggle 

bolts. 

3. Drill holes 

in the marked 

locations. Wh

ere there is 

    a stud, drill a 

3/16" hole for wood

 screws. For hol

es 

    that do not li

ne up with a stu

d, drill 5/8" hole

s for 

    toggle bolts. 



DO NOT INSTALL

 THE MOUNT

ING PLATE

AT THIS TIME.


4. Remove the

 template from

 the rear wall.


5. Review 

the Installation 

Instruction boo

k for your 

    installation sit

uation. 

Locate and

 mark holes to

 align with ho

les in the


mounting p

late. 

IMPORTANT:


LOCATE

 AT LEAST ON

E STUD ON EITH

ER SIDE OF 

THE CENTER

LINE. 

MARK TH

E LOCATION FOR

 2 ADDITIONAL

, EVENLY 

SPACED TOGG

LE BOLTS IN

 THE MOU

NTING PLA

TE

AREA.

Locate and

 mark holes to

 align with h

oles in the


mounting plate

IMPORTA

NT: 

LOCATE

 AT LEAST ON

E STUD ON EIT

HER SIDE

 OF 

THE CENTER

LINE. 

MARK TH

E LOCAT

ION FOR

 2 ADDITIONAL

, EVENLY 

SPACED TOGG

LE BOLTS

 IN THE MOU

NTING PLA

TE

AREA.

Trim the rear wa

ll template a

long the d

otted line. 

Trim the rear wall 

template along 

the dotted

 line. 















12"

4"

Darle vuelta a la

 hoja para consul

tar la 

versión en Españ

ol.

Make sure the motor wiring has 

3/8" TO EDGE























NOTE: IT IS VERY IMPOR

TANT TO

READ AND FOLLOW THE 

DIRECTIONS

IN THE INSTALLATION INST

RUCTIONS

BEFORE PROCEEDING WIT

H THIS

REAR WALL TEMPLATE.
This Rear Wall Template serv

es to position the bottom 

mounting plate and to locate 

the horizontal exhaust 

outlet. 

1. Use a level to check that th

e template is positioned 

    accurately. 

2. Locate and mark at least o

ne stud on the left or 

    right side of the centerline.



It is important to use at least 

one wood 

screw mounted firmly in a stu

d to support the weight 

of the microwave. Mark two a

dditional, evenly spaced 

locations for the supplied tog

gle bolts. 

3. Drill holes in the marked lo

cations. Where there is 

    a stud, drill a 3/16" hole for

 wood screws. For holes 

    that do not line up with a s

tud, drill 5/8" holes for 

    toggle bolts. 



DO NOT INSTALL THE MOU

NTING PLATE

AT THIS TIME. 

4. Remove the template from 

the rear wall. 

5. Review the Installation Ins

truction book for your 

    installation situation. 

Locate and mark holes to ali

gn with holes in the 

mounting plate. 
IMPORTANT: 
LOCATE AT LEAST ONE STUD

 ON EITHER SIDE OF 

THE CENTERLINE. 
MARK THE LOCATION FO

R 2 ADDITIONAL, EVENLY 

SPACED TOGGLE BOLTS

 IN THE MOUNTING PLATE

AREA.

Locate and mark holes to 

align with holes in the 

mounting plate. 
IMPORTANT: 
LOCATE AT LEAST ONE 

STUD ON EITHER SIDE O

THE CENTERLINE. 
MARK THE LOCATION FO

R 2 ADDITIONAL, EVENL

SPACED TOGGLE BOLTS 

IN THE MOUNTING PLATE

AREA.

Trim the rear wall template along

 the dotted line. 

Trim the rear wall template

 along the dotted line. 











12"

4"

Darle vuelta a la hoja para co

nsultar la 

versión en Español.

16

Summary of Contents for EI30BM60M

Page 1: ...to Installer Be sure to leave these instructions with the Consumer BEFORE YOU BEGIN Note to Consumer Keep these instructions for future reference Skill level Installation of this appliance requires basic mechanical and electrical skills Proper installation is the responsibility of the installer Product failure due to improper installation is not covered under the Warranty 1 877 435 3287 US Questio...

Page 2: ... B C Installation Instructions 21 20 20 Recirculating Mount the Microwave Oven 19 Preparation of Top Cabinet 17 Attach Mounting Plate to Wall 17 Outside Back Exhaust 16 Connecting Ductwork 15 Adjust the Exhaust Adaptor 15 Operation 14 Outside Back Exhaust 16 19 Adapting Microwave Blower for Outside top Exhaust 13 14 Placement of The Mounting Plate 12 15 Preparing Rear Wall for Remove Blower Plate ...

Page 3: ...CK The power cord of this appliance is equipped with a three prong grounding plug which mates with a standard three prong grounding wall receptacle to minimize the possibility of electric shock hazard from this appliance You should have the wall receptacle and circuit checked by a qualified electrician to make sure the receptacle is properly grounded Where a standard two prong wall receptacle is e...

Page 4: ... customer repair or replacement must be made by arrangement between customer and installer DAMAGE SHIPMENT INSTALLATION Installation Instructions PARTS INCLUDED You will find the installation hardware contained in a packet with the unit Check to make sure you have all these parts NOTE Some extra parts are included HARDWARE PACKET PART QUANTITY Template 1 Template Installation 1 Instructions Separa...

Page 5: ...een the cabinets must be 30 76 2 cm wide and free of obstructions If you are going to vent your microwave oven to the outside see Hood Exhaust Section for exhaust duct preparation When installing the microwave oven beneath smooth flat cabinets be careful to follow the instructions on the top cabinet template for power cord clearance Bottom Edge of Cabinet Needs to be 30 76 2 cm or More from the Co...

Page 6: ...he installation instructions filters glass Fold back all 4 carton flaps fully against carton sides Then carefully roll the oven and carton over onto the top side The oven should be resting in the Styrofoam REMOVING THE MICROWAVE OVEN FROM THE CARTON REMOVING THE MOUNTING PLATE FINDING THE WALL STUDS B A 2 PLACEMENT OF THE MOUNTING PLATE 1 Wall Studs Center 3 Carton Pull the carton up and off the o...

Page 7: ...is important to use at least one wood screw mounted firmly in a stud to support the weight of the microwave Mark two additional evenly spaced locations for the supplied toggle bolts 3 Drill holes in the marked locations Where there is a stud drill a 3 16 hole for wood screws For holes that do not line up with a stud drill 5 8 holes for toggle bolts DO NOT INSTALL THE MOUNTING PLATE AT THIS TIME 4 ...

Page 8: ... the rear wall 5 Review the Installation Instruction book for your installation situation Locate and mark holes to align with holes in the mounting plate IMPORTANT LOCATE AT LEAST ONE STUD ON EITHER SIDE OF THE CENTERLINE MARK THE LOCATION FOR 2 ADDITIONAL EVENLY SPACED TOGGLE BOLTS IN THE MOUNTING PLATE AREA Locate and mark holes to align with holes in the mounting plate IMPORTANT LOCATE AT LEAST...

Page 9: ...ACK EXHAUST HORIZONTAL DUCT RECIRCULATING NON VENTED DUCTLESS See page 12 On modelsshipped for recirculating exhaust a disposable charcoal filter isfactory installed to help remove smoke and odors Adaptor inP lacefor O utsideT opE xhaust Installation Instructions 2 B C Adaptor Must Be MovedtotheBackfor O utsideBackE xhaust NOTE Thismicrowave isshipped assembled for Recirculating Select the type of...

Page 10: ...es clear venting of exhaust and helps prevent blockages Also make sure dampers swing freely and nothing is blocking the ducts Exhaust connection The exhaust adaptor has been designed to mate with a standard 31 4 x 10 8 2 x 25 4 cm rectangular duct If a round duct is required a rectangular to round transition adaptor must be used Maximum duct length For satisfactory air movement the total duct leng...

Page 11: ...aken to align exhaust with space between studs or wall should be prepared at the time it is constructed by leaving enough space between the wall studs to accommodate exhaust IMPORTANT If a rectangular to round transition adaptor is used the bottom corners of the damper will have to be cut to fit using the tin snips in order to allow free movement of the damper The following chart describes an exam...

Page 12: ...ed A7 Connect Ductwork A3 A4 Check Damper Operation Adapting Microwave Blower for Outside Top Exhaust 3 8 TO EDGE NOTE IT IS VERY IMPORTANT TO READ AND FOLLOW THE DIRECTIONS IN THE INSTALLATION INSTRUCTIONS BEFORE PROCEEDING WITH THIS REAR WALL TEMPLATE This Rear Wall Template serves to position the bottom mounting plate and to locate the horizontal exhaust outlet 1 Use a level to check that the t...

Page 13: ...crew holding the blower motor to the microwave Blower Plate Blower Motor Screw Back of Microwave 2 End B End A Carefully pull out the blower unit The wires will extend far enough to allow you to adjust the blower unit 1 ADAPTING MICROWAVE BLOWER FOR OUTSIDE TOP EXHAUST Roll the blower unit 90 so that fan blade microwave 3 Back of Microwave Before Rotation After Rotation Back of Microwave Back of M...

Page 14: ...hrough hole in bottom of top cabinet Keep it tight throughout Steps 1 3 Do not pinch cord or lift oven by pulling cord Lift microwave tilt it forward and hook slots at back bottom edge onto four lower tabs of mounting plate 1 CHECK FOR PROPER DAMPER OPERATION Exhaust Adaptor Blower Plate Damper Back of Microwave Make sure tape securing damper is removed and damper pivots easily before mounting mic...

Page 15: ...rew Install grease filters See the Owner s Manual packed with the microwave Installation Instructions ADJUST THE EXHAUST ADAPTOR Open the top cabinet and adjust the exhaust adaptor to connect to the house duct Back of Microwave For Front to Back or Side to Side Adjustment Slide the Exhaust Adaptor as Needed Blower Plate Damper Self Aligning Screw 5 MOUNT THE MICROWAVE OVEN cont A6 A5 CONNECTING DU...

Page 16: ...AST ONE STUD ON EITHER SIDE OF THE CENTER LINE MARK THE LOCATI ON FOR 2 ADDITIO NAL EVENLY SPACED TOGGL E BOLTS IN THE MOUNT ING PLATE AREA Locate and mark holes to align with holes in the mountin g plate IMPORT ANT LOCATE AT LEAST ONE STUD ON EITHER SIDE OF THE CENTER LINE MARK THE LOCATI ON FOR 2 ADDITIO NAL EVENLY SPACED TOGGL E BOLTS IN THE MOUNT ING PLATE AREA Trim the rear wall templat e alo...

Page 17: ...mounting plate through the holes designated to go into drywall and reattach the toggle wings to 3 4 19 mm onto each bolt 1 2 Place the mounting plate against the wall and insert the toggle wings into the holes in the wall to mount the plate NOTE Before tightening toggle bolts and wood screw make sure the tabs on the mounting plate touch the bottom of the cabinet when pushed flush against the wall ...

Page 18: ...g Wires Routed Through Right Side Wires Routed Through Left Side Back of Microwave Back of Microwave Blower Plate Blower Motor Screw Secure the blower unit to the microwave with the original screw Before Rolling After Rolling Back of Microwave End A End B Back of Microwave Back of Microwave CAUTION Do not pull or stretch the blower unit wiring Make sure the wires are not pinched and that they are ...

Page 19: ... later Be sure to keep power cord tight Be careful not to pinch the cord especially when mounting flush to bottom of cabinet 8 7 5 Cabinet Front Cabinet Bottom Shelf Tighten the outer two screws to the top of the microwave oven While tightening screws hold the microwave oven in place against the wall and the top cabinet Filler Block Microwave Oven Top Equivalent to Depth of Cabinet Recess Insert 2...

Page 20: ...eattach the toggle wings to 3 4 19 mm onto each bolt 1 Wall Mounting Plate Spacing for Toggles More Than Wall Thickness Bolt End Toggle Bolt Toggle Wings To use toggle bolts 2 RECIRCULATING Non Vented Ductless C Install or change Charcoal Filter C3 Check Blower Plate 3 8 TO EDGE NOTE IT IS VERY IMPORTANT TO READ AND FOLLOW THE DIRECTIONS IN THE INSTALLATION INSTRUCTIONS BEFORE PROCEEDING WITH THIS...

Page 21: ...rt a self aligning screw through top center cabinet hole Temporarily secure the oven by turning the screw at least two full turns after the threads have engaged It will be completely tightened later Be sure to keep power cord tight Be careful not to pinch the cord especially when mounting flush to bottom of cabinet Self Aligning Screw 4 2 Rotate front of oven up against cabinet bottom NOTE When mo...

Page 22: ...ave C4 3 2 1 1 Phillipsscrewdriver Open the door Remove the grille Pull the grille straight off NOTE The charcoal filter isfactory installed in recirculating models Follow these stepsto replace a filter or to install a filter after converting a vented model to recirculating operation Remove screwson top of grille using a C5 INSTALLING OR CHANGE THE CHARCOAL FILTER 6 4 Replace the grille and the sc...

Page 23: ...n has been installed according to instructions 1 BEFORE YOU USE YOUR MICROWAVE Ensure proper ground exists before use INSTALLATION INSTRUCTIONS INSTALLATION INSTRUCTIONS MANUAL 3 USE CARE FILL OUT PRODUCT REGISTRATION CARD 8 D G DDDDDDD PRODUCT CARD Read the Manual Installation Instructions ring and glass tray in cavity Install turntable REGISTRATION USE CARE Replace house fuse or turn breaker bac...

Page 24: ... a stud drill 5 8 holes for toggle bolts DO NOT INSTALL THE MOUNTING PLATE AT THIS TIME 4 Remove the template from the rear wall 5 Review the Installation Instruction book for your installation situation Locate and mark holes to align with holes in the mounting plate IMPORTANT LOCATE AT LEAST ONE STUD ON EITHER SIDE OF THE CENTERLINE MARK THE LOCATION FOR 2 ADDITIONAL EVENLY SPACED TOGGLE BOLTS IN...

Reviews: