background image

Use & Care Guide

European Wine Tower

Guia de Uso y Cuidado

European Wine Tower

Guide D’utilisation et D’entretien

European Wine Tower

241995300  January 2009

Summary of Contents for EI24WC75

Page 1: ...Use Care Guide European Wine Tower Guia de Uso y Cuidado European Wine Tower Guide D utilisation et D entretien European Wine Tower 241995300 January 2009 ...

Page 2: ...f this manual This information will help you quickly identify a problem and get it remedied In the event you require assistance please contact the dealer where you purchased your unit NOTE Registering your product with Electrolux enhances our ability to serve you You can register online at www electroluxappliances com or by dropping your Product Registration Card in the mail Complete and mail the ...

Page 3: ...e take off the doors and leave shelves in place so that children may not easily climb inside WARNING Never attempt to repair or perform maintenance on the unit until the electricity has been disconnected Altering cutting of power cord removal of power cord removal of power plug or direct wiring can cause serious injury fire and or loss of property and or life and will void the warranty Do not lift...

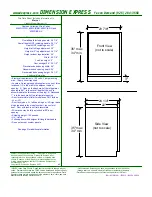
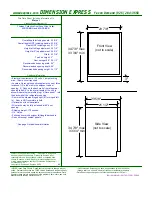
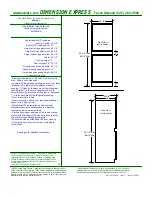
Page 4: ...s be increased by at least inch over the dimensions given for your unit Width Height Depth 23 1 2 inches 75 76 inches 24 7 8 inch Unit Dimensions Side View 29 875 75 88 cm 27 50 69 85 cm 24 875 63 18 cm 75 76 191 193 cm Front View 23 50 59 69 cm 3 25 2 75 Top View 49 124 46 cm 23 50 59 69 cm 3 00 7 62 cm 6 98 cm 8 25 cm NOTE All units require zero clearance when installed flush with a cabinet or w...

Page 5: ... regulations WARNING The Anti Tip Kit must be installed on this unit before it is used All screws supplied with the Anti Tip Kit are for mounting the bracket directly to wall studs These screws will not work if used with sheetrock dry wall or anything other than wall studs Installation clearances Allow the following clearances for ease of installation proper air circulation and plumbing and electr...

Page 6: ...e not touching the floor 3 Turn the front leveling legs clockwise to raise and counterclockwise to lower 3 Ensure the door does not bind and the seal touches the cabinet on all four sides 4 Replace the toe grille by aligning hooks with opening in front panel and snapping it into place Installation NOTE The front rollers should only be used to help maneuver the wine keeper into it s final location ...

Page 7: ...f the end cap of handle end cap The end caps should be drawn tight against the door with no gaps 1 Remove handle from carton and any other protective packaging 2 Position handle end caps over upper and lower pre installed shoulder bolts A that are fastened into door ensuring the holes for the set screws are facing towards the outside edge of the door 3 While holding handle firmly against door fast...

Page 8: ...temperature of the water Press the or indicator to adjust the temperature to the desired setting The temperature display will begin to blink with the first touch Adjust the temperature by touching the key After three 3 seconds of inactivity the display will beep to accept the new temperature The internal temperature can be controlled between 45 F to 65 F 7 C to 18 C Start Up and Temperature Contro...

Page 9: ...y also is used to acknowledge alarm conditions denoted by a flashing red in dicator Press and hold the mute sounds key for three 3 seconds to enable control lock which prevents undesired changes to the unit settings Temperature display will show LOC temperature mode Simultaneously pressing and holding the and keys for three 3 seconds causes the temperature display to toggle from Fahrenheit to Cels...

Page 10: ...eekly basis DO NOT CLEAN WITH STEEL WOOL PADS DO NOT USE CLEANERS THAT ARE NOT SPECIFICALLY INTENDED FOR STAINLESS STEEL this includes glass tile and counter cleansers If any surface discolors or rusting appears clean it quickly with Bon Ami or Barkeepers Friend Cleanser and a non abrasive cloth Always clean in the direction of the grain Always finish this process with a high quality all in one st...

Page 11: ...humidity Replacing the air filter In general you should change the air filter every six months AF will show in the display to prompt you to replace the filter after six months to ensure optimal filtering of odors To replace your PureAdvantageTM air filter 1 Pull the air filter cartridge straight out 2 Remove the old filter and discard it 3 Unpack the new filter and place it inside the cartridge 4 ...

Page 12: ...Light staying on Airflow to front grille blocked Door gasket not sealing properly Adjust temperature colder Allow 24 hours for temperature to stabilize Turn off manual light control See Operation section Airflow must not be obstructed to front grille See Installation section Adjust door gasket Unit too cold Contents of unit too cold frozen Adjust temperatures see Adjusting the Temperature in the S...

Page 13: ... of Alaska 13 Damages to the finish of appliance or home incurred during transportation or installation including but not limited to floors cabinets walls etc 14 Damages caused by services performed by unauthorized service companies use of parts other than genuine Electrolux parts or parts obtained from persons other than authorized service companies or external causes such as abuse misuse inadequ...

Reviews: