


83
Fjern sokkelen og alt tilbehør fra
emballasjen.
Forsikre deg om at de bakre
gummiføttene er montert.
Juster de fremre justerbare føttene
slik at sokkelen står stabilt og i water.
Hvis du installerer sokkelen under et
helt nytt apparat, pakker du ut appara-
tet slik som beskrevet i den medfølg-
ende brukerhåndboken, og fortsetter
med Trinn 6.
Dersom apparatet allerede er tilkoplet:
- Trekk støpslet ut av stikkontakten.
- FSteng vannkranen.
- Kople tilførselsslangen(e) fra vann-
kranen og la vannet renne ut av
tilførselsslangen(e). Tøm avløpsslangen
og samle opp vannet i et lavt kar.
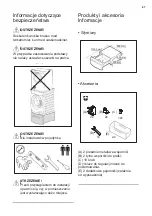
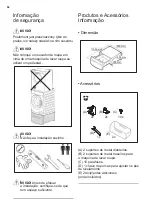
Installasjonsprosedyre
3
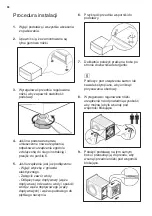
Installation Procedure
1.
Remove the pedestal and all
accessories form the box.
2.
Make sure that the rear rubber
feet are mounted.
3.
Adjust the front adjustable feet to
make the pedestal stable.
4.
If you install the pedestal under a
brand new appliance, unpack the
appliance as indicated in the
instructions supplied with it and
then proceed with step 6.
5.
If the appliance is already
connected:
- Disconnect the mains plug from
the mains socket.
- For washing machine. Close the
water tap.
- For washing machine.
Disconnect the inlet hose(s) from
the water tap and let the water
flow out from the inlet hose(s)
and the drain hose and collect it
in a shallow basin.
- For tumble dryer. Empty the
water container in a wash basin
or, if available, activate the direct
drain system to let the water flow
out.
6.
Screw the front brackets on the
pedestal.
7.
For washing machine. Gently lay
the washing machine on its
detergent dispenser side.
Lay it on cardboard or on a piece
of polystyrene to avoid scratching
the cabinet.
3
Installation Procedure
1.
Remove the pedestal and all
accessories form the box.
2.
Make sure that the rear rubber
feet are mounted.
3.
Adjust the front adjustable feet to
make the pedestal stable.
4.
If you install the pedestal under a
brand new appliance, unpack the
appliance as indicated in the
instructions supplied with it and
then proceed with step 6.
5.
If the appliance is already
connected:
- Disconnect the mains plug from
the mains socket.
- For washing machine. Close the
water tap.
- For washing machine.
Disconnect the inlet hose(s) from
the water tap and let the water
flow out from the inlet hose(s)
and the drain hose and collect it
in a shallow basin.
- For tumble dryer. Empty the
water container in a wash basin
or, if available, activate the direct
drain system to let the water flow
out.
6.
Screw the front brackets on the
pedestal.
7.
For washing machine. Gently lay
the washing machine on its
detergent dispenser side.
Lay it on cardboard or on a piece
of polystyrene to avoid scratching
the cabinet.
1.
2.
3.
4.
5.
6.
7.
8.
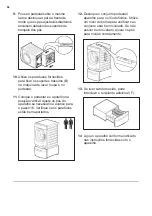
Skru fast de fremre brakettene på
sokkelen.
Legg vaskemaskinen forsiktig ned på
vaskemiddelkammer-siden.
Legg den ned på noe kartong eller
isopor for å unngå riper.
Still inn de justerbare føttene i
passende høyde slik at de glir under
fotsperrebrakettene.
4
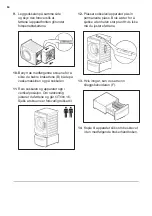
8.
For washing machine. Adjust the
appliance adjustable feet at a
suitable height to allow it to slide
under the foot locking brackets.
9.
For washing machine. Lay the
pedestal on the same side and
slide it forward so that the
appliance front feet slides under
foot locking brackets.
11.
For washing machine. Put the
pedestal and appliance in vertical
position. If necessary, adjust the
appliance feet and go to step 16.
Check that the screws are firmly
screwed.
12.
For tumble dryer. Unscrew and
retain the two bottom screws from
the back of the appliance.
10.
For washing machine. Use the
screws supplied to secure the rear
brackets (B) on both the washer
and the pedestal.
13.
For tumble dryer. Screw the rear
brackets (C) on the pedestal by
using the screws supplied in the
stand box.
Summary of Contents for E6WHPED2
Page 6: ...6 Note ...
Page 11: ...11 Забележка ...
Page 16: ...16 Poznámka ...
Page 21: ...21 Note ...
Page 26: ...26 Hinweis ...
Page 31: ...31 Σεκείσζε ...
Page 36: ...36 Nota ...
Page 41: ...41 Märkus ...
Page 46: ...46 Huomaa ...
Page 51: ...51 Remarque ...
Page 56: ...56 Napomena ...
Page 61: ...61 Jegyzetek ...
Page 66: ...66 Nota ...
Page 71: ...71 Pastaba ...
Page 76: ...76 Piezīme ...
Page 81: ...81 Opmerking ...
Page 86: ...86 Notater ...
Page 91: ...91 Uwaga ...
Page 96: ...96 Nota ...
Page 101: ...101 Notă ...
Page 106: ...106 Примечание ...
Page 111: ...111 Opomba ...
Page 116: ...116 Poznámka ...
Page 121: ...121 Напомена ...
Page 126: ...126 OBS ...
Page 131: ...131 Not ...
Page 136: ...136 Примітка ...
Page 137: ......
Page 138: ...G0013222 001 A07155701 ...