


74
Some hints
For baking cakes
Cakes require a moderate temperature
(normally between 150 and 200°C). In
addition, the oven must be heated up
beforehand - for about 10 minutes.
The oven door should not be opened before
at least 3/4 of the set cooking time is up.
Normal short pastry dough should be cooked
in a mould or tin for 2/3 of total cooking time
required and then garnished as desired
before being cooked completely.
Clearly, the remaining cooking time depends
on the type of garnish used (jam, fruit, etc.).
Care should be taken to ensure that any
dough and cake mixes are of the right
consistency since an unduly moist mix
lengthens cooking time unnecessarily. The
raw dough or mix should therefore be fairly
difficult to detach from the spoon or beater.
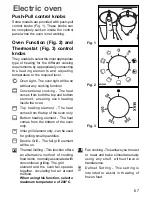
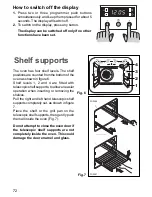
If three shelves are filled with cakes and tarts
simultaneously, it is advisable to slot in an
extra shelf between the two lower shelves
(Fig. 8).
For cooking meat and fish
Meat cooked in the oven should weigh at
least 1 kg to prevent it from becoming too
dry during cooking. Very tender red meat to
be cooked rare, i.e. well cooked on the
outside but extremely juicy inside, requires
high-temperature cooking (200-220°C).
White meat, poultry and fish instead require
low-temperature cooking (150-175°C).
The ingredients for the accompanying sauce
or gravy should be put in the baking pan at
the very beginning only when cooking times
are short.
Otherwise they should be added during the
last half hour. A simple way of checking
whether meat is done or not is to press it
with a spoon; if the meat does not yield
under this pressure it means that it is done
to a turn. In the case of roast beef and fillet
steaks, the inside of which should remain
fairly pink in color, cooking times must be
short.
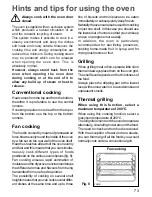
The meat can be cooked in a baking pan or
else directly on the shelf - in this case a
dripping pan must obviously be placed
underneath the shelf to collect the juice.
Should you cook very fat food, place the
meat directly on the grill and the grill over
the dripping pan in order not to dirty the oven.
Once the meat is cooked, it is advisable to
let it rest for at least 15 minutes before
carving so that the juice does not seep out.
To prevent the formation of too much smoke
in the oven during roasting, it is a good idea
to pour a little water into the dripping pan
and—to prevent steam—to add a little bit
more during cooking if the original amount
dries up too much.
Before serving, the various courses can be
kept hot in the oven which should be turned
down to the minimum temperature.
Warning!
- Do not place objects on
the bottom of the oven and do not
cover it with aluminium foil while
cooking, as you can damage the
enamelled surfaces and the food you
are cooking.
Always place pans, heat-resisting
pans and aluminium foils on the oven
shelves.
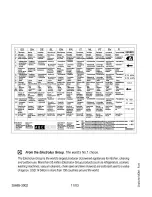
Cooking times
Cooking times vary according to the type of
food to be cooked, its consistency, and
volume.We suggest that you take particular
note of your first cooking experiments with
the oven, since operating in the same
conditions for the same dishes you will of
course obtain similar results.
Only experience will enable you to make
the appropriate changes to values given
on charts.
Summary of Contents for Built-in ovens
Page 21: ......