background image

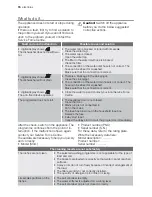
Water hardness is measured in equivalent
scales:
• German degrees (dH°).
• French degrees (°TH).
• mmol/l (millimol per litre - international unit

for the hardness of water).

• Clarke.
Adjust the water softener to the water hard-
ness in your area. If necessary, contact your
local water authority.

Water hardness

Water hardness setting

°dH

°TH

mmol/l

Clarke

manually

electronically

51 - 70

91 - 125

9,1 - 12,5

64 - 88

2

10

43 - 50

76 - 90

7,6 - 9,0

53 - 63

2

9

37 - 42

65 - 75

6,5 - 7,5

46 - 52

2

8

29 - 36

51 - 64

5,1 - 6,4

36 - 45

2

7

23 - 28

40 - 50

4,0 - 5,0

28 - 35

2

6

19 - 22

33 - 39

3,3 - 3,9

23 - 27

2

5

15 - 18

26 - 32

2,6 - 3,2

18 - 22

1

4

11 - 14

19 - 25

1,9 - 2,5

13 - 17

1

3

4 - 10

7 - 18

0,7 - 1,8

5 - 12

1

2

< 4

< 7

< 0,7

< 5

1

1)

1

1)

1) No use of salt required.

You must set the water softener man-
ually and electronically.

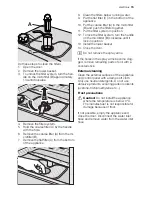
Manual adjustment

The appliance is set at the factory at po-
sition 2.

1. Open the door.
2. Remove the lower basket.
3. Turn the water hardness dial to position

1 or 2 (refer to the chart).

4. Install the lower basket.

5. Close the door.

Electronic adjustment

The water softener is set at the fac-
tory at level 5.

1. Switch on the appliance.
2. Make sure that the appliance is in setting

mode.

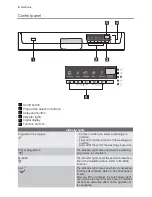
3. Press and hold function buttons B and C

until the indicator lights of function but-
tons A, B and C start to flash.

4. Release function buttons B and C.
5. Press function button A.

– The indicator lights for function buttons

B and C go off.

– The indicator light for function button A

continues to flash.

– The digital display shows the current

level.

Example: digital display shows 

 = lev-

el 5.

6. Press the function button A one time to

increase the water softener level by one
step.

7. Press the on/off button to save the oper-

ation.

 electrolux

Summary of Contents for ASF65090

Page 1: ...user manual Dishwasher ASF 65090 ...

Page 2: ...oor while the appliance is in operation hot steam can escape Risk of skin burns Do not remove dishes from the dishwasher before the end of the washing programme When the washing programme is comple ted disconnect the mains plug from the mains socket and close the water tap Only an authorised service engineer can repair this appliance Use only original spare parts Do not do repairs yourself to prev...

Page 3: ...liance Do not use the appliance if the mains cable or water hoses are damaged if the control panel worktop or plinth area are damaged that you can get ac cess to the inner side of the appliance Contact your local Service Force Centre Do not drill into the sides of the appliance to prevent damage to hydraulic and elec trical components Warning Carefully obey the instructions for electrical and wate...

Page 4: ...ing programme End of programme The indicator light comes on when the washing programme is completed Multitab The indicator light shows the activation deactiva tion of the multitab function Refer to Multitab function Salt 1 The indicator light comes on when it is necessary to fill the salt container Refer to Use of dishwash er salt After you fill the container the salt indicator light can continue ...

Page 5: ...ate the multitab func tion Refer to the chapter Multitab func tion To deactivate activate the rinse aid dis penser when multitab function is active Refer to the chapter Multitab function Setting mode When you press the on off button and all programme indicator lights come on the ap pliance is in setting mode The appliance must be in setting mode for these operations To set a washing programme To s...

Page 6: ...lectronically Manual adjustment The appliance is set at the factory at po sition 2 1 Open the door 2 Remove the lower basket 3 Turn the water hardness dial to position 1 or 2 refer to the chart 4 Install the lower basket 5 Close the door Electronic adjustment The water softener is set at the fac tory at level 5 1 Switch on the appliance 2 Make sure that the appliance is in setting mode 3 Press and...

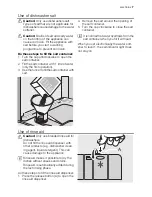
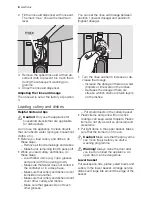
Page 7: ... the salt around the opening of the salt container 5 Turn the cap clockwise to close the salt container It is normal that water overflows from the salt container when you fill it with salt When you set electronically the water soft ener to level 1 the salt indicator light does not stay on Use of rinse aid Caution Only use branded rinse aid for dishwashers Do not fill the rinse aid dispenser with o...

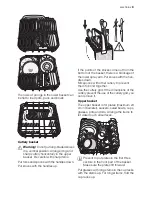
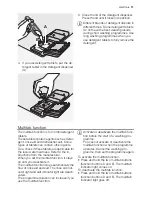
Page 8: ...d cutlery and dishes do these steps Remove all food remainings and debris Make burnt remaining food in pans soft While you load cutlery and dishes do these steps Load hollow items e g cups glasses and pans with the opening down Make sure that water does not collect in the container or in a deep base Make sure that cutlery and dishes do not lie inside one another Make sure that cutlery and dishes d...

Page 9: ...lower spray arm Put knives with the han dles down Mix spoons with other cutlery to prevent them to bond together Use the cutlery grid If the dimensions of the cutlery prevent the use of the cutlery grid you can remove it Upper basket The upper basket is for plates maximum 24 cm in diameter saucers salad bowls cups glasses pots and lids Arrange the items to let water touch all surfaces Prevent to p...

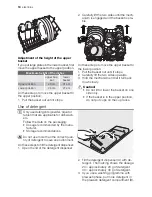
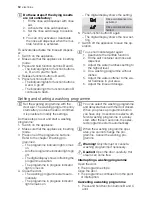
Page 10: ... and let it fall back down slowly Caution Do not lift or lower the basket on one side only If the basket is in the upper position do not put cups on the cup racks Use of detergent Only use detergents powder liquid or tablet that are applicable for dishwash ers Follow the data on the packaging Dosage recommended by the manu facturer Storage recommendations Do not use more than the correct quan tity...

Page 11: ... water hardness Refer to the in structions from the manufacturer When you set the multitab function it stays on until you deactivate it The multitab function stops automatically the flow of rinse aid and salt The rinse aid indi cator light and salt indicator light are deacti vated The programme duration can increase if you use the multitab function Activate or deactivate the multitab func tion bef...

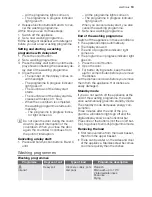
Page 12: ...ge Setting and starting a washing programme Set the washing programme with the door ajar The washing programme only starts after you close the door Until then it is possible to modify the settings Do these steps to set and start a washing programme 1 Switch on the appliance 2 Make sure that the appliance is in setting mode 3 Press one of the programme buttons Refer to the chapter Washing pro gramm...

Page 13: ...ess indicator light goes off When you cancel a delay start you also cancel the washing programme 2 Set a new washing programme End of the washing programme Switch off the appliance in these conditions The appliance stops automatically The display shows 0 The end of programme indicator light comes on The programme in progress indicator light goes on 1 Press the on off button 2 Open the door 3 For b...

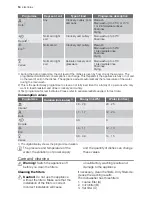
Page 14: ...mme to clean a not fully load Ideal for a family of 4 persons who only want to load breakfast and dinner crockery and cutlery 3 Test programme for test institutes Please refer to separate leaflet supplied for test data Consumption values Programme Duration in minutes 1 Energy in kWh Water in litres Intensif 1 8 2 0 23 25 Auto 1 1 1 7 12 23 Rapide 0 9 9 Eco 1 0 1 1 12 13 Verres 0 8 0 9 14 15 1 The ...

Page 15: ...12 To lock the filter system turn the handle on the microfilter B clockwise until it lock in position 13 Install the lower basket 14 Close the door Do not remove the spray arms If the holes in the spray arms become clog ged remove remaining parts of soil with a cocktail stick External cleaning Clean the external surfaces of the appliance and control panel with a damp soft cloth Only use neutral de...

Page 16: ... contact your local Service Force Centre The programme does not start The appliance door is not closed Close the door Mains plug is not connected in Put in the mains The fuse has blown out in the household fuse box Replace the fuse Delay start is set Cancel the delay start to start the programme immediately After the check switch on the appliance The programme continues from the point of in terrup...

Page 17: ...Pa Maximum 8 bar 0 8 MPa Capacity Place settings 12 Installation Fitting under a counter Warning Make sure that mains plug is disconnected from the mains socket during installation Put the appliance adjacent to a water tap and a water drain Remove the appliance work top to install it under a sink unit or a kitchen worktop Make sure that the dimensions of the recess agree with the given dimensions ...

Page 18: ...he water inlet hose is not squashed or entangled Turn the inlet hose to the left or the right to suit the installation Fit the locknut correctly to prevent water leaks Caution Do not connect the appliance to new pipes or pipes that are not used for a long time Let the water run for some minutes then connect the inlet hose Water drain hose 1 Connect the water drain hose to the sink spigot and attac...

Page 19: ...household waste Instead it should be taken to the appropriate collection point for the recycling of electrical and electronic equipment By ensuring this product is disposed of correctly you will help prevent potential negative consequences for the environment and human health which could otherwise be caused by inappropriate waste handling of this product For more detailed information about recycli...

Page 20: ...117955520 00 012009 www electrolux com ...

Reviews: