g
12
Using your steam iron
0
Plug the power cable into a 220-240 V
power outlet.
The power ON light (Fig 1/H, positioned
on top of the handle) will illuminate to
indicate that the steam iron is
switched on and heating.
0
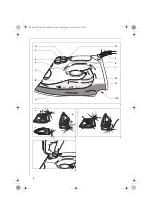
Turn the temperature selector (Fig. 1/L)
to the desired setting by aligning the
setting on the selector with the tem-
perature control light (Fig. 1/M).
The temperature control light will illu-
minate to indicate that the iron is
heating to the selected temperature.
When the temperature control light
goes out the iron is at the selected
temperature and is ready to iron.
3
When the temperature selector is
changed from a high setting to a lower
temperature setting during ironing, the
temperature control light will go out
immediately. This indicates that the
iron is cooling to the selected tempera-
ture. To ensure that the iron has
reached the selected temperature and
is not too hot, wait until the tempera-
ture control light comes on again and
then goes out before ironing.
Dry ironing
0
Connect the steam iron to the mains
and set the desired temperature as
described above.
0
Select „dry“ on the steam selector
(Fig. 1/G).
This will cut off the steam flow if there
is water in the tank.
Steam ironing
0
Connect the steam iron to the mains
and set the desired temperature as
described above.
3
When steam ironing, ensure that the
temperature selector is set to any tem-
perature within the steam band, and
that the tank is at least 1/4 full of
water.
0
Turn the steam selector (Fig. 1/G) to
the desired steam setting.
Using the spray mist
The spray mist can be used when steam
or dry ironing to pre-dampen hard to
iron fabrics.
3
Ensure that the tank is at least ¼ full
of water.
0
Press the spray button
(Fig. 1/E)
during ironing to release a fine mist
from the spray nozzle (Fig. 1/D).
Using the steam jet function
The steam jet function can be used
when dry or steam ironing, when the
temperature control is set to any tem-
perature within the steam band or
above the two dot (••) setting.
3
Ensure that the tank is at least ¼ full
of water.
0
Select the desired temperature and
wait until the temperature control
light goes out.
0
Press the steam jet button
(Fig. 1/F)
several times with the iron on the sole-
plate to prime the pump.
3
If the water tank has run dry, it may be
necessary to re-prime the pump after
filling the steam iron with water.
3
The steam iron is equipped with a drip-
stop system. This system automatically
stops water flowing to the steam
chamber should the temperature fall
too low to generate steam. This pre-
vents dripping, even at low tempera-
tures.
Steaming hanging items of clothing
3
The vertical steam jet function is ideal
for steaming curtains, suits and deli-
cate fabrics.
0
Hang the article concerned on a hanger
and hold the steam iron at a distance
of 10–20 cm from the material.
0
Now press the steam jet button
(Fig. 1/F).
1
Do not attempt to freshen up clothing
whilst it is still being worn. Risk of
burning!
822 949 436_DB75xx_AEG.book Seite 12 Donnerstag, 19. Juni 2008 12:58 12


