background image

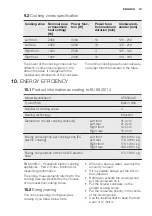
9.2 

Cooking zones specification

Cooking zone Nominal pow-

er (maximum

heat setting)

[W]

Power func-

tion [W]

Power func-

tion maximum

duration [min]

Cookware di-

ameter [mm]

Left front

2300

3200

10

125 - 210

Left rear

2300

3200

10

125 - 210

Right front

1400

2500

4

125 - 145

Right rear

1800

2800

10

145 - 180

The power of the cooking zones can be

different in some small range from the

data in the table. It changes with the

material and dimensions of the cookware.

For optimal cooking results use cookware

not larger than the diameter in the table.

10. 

ENERGY EFFICIENCY

10.1 

Product information according to EU 66/2014

Model identification


KTI6500XE

Type of hob


Built-In Hob

Number of cooking zones


4

Heating technology


Induction

Diameter of circular cooking zones (Ø)

Left front

Left rear

Right front

Right rear

21.0 cm

21.0 cm

14.5 cm

18.0 cm

Energy consumption per cooking zone (EC

electric cooking)

Left front

Left rear

Right front

Right rear

168.6 Wh / kg

176.3 Wh / kg

178.1 Wh / kg

169.2 Wh / kg

Energy consumption of the hob (EC electric

hob)


173.1 Wh / kg

EN 60350-2 - Household electric cooking

appliances - Part 2: Hobs - Methods for

measuring performance
The energy measurements referring to the

cooking area are identified by the crosses

of the respective cooking zones.

10.2 

Energy saving

You can save energy during everyday

cooking if you follow below hints.

• When you heat up water, use only the

amount you need.

• If it is possible, always put the lids on

the cookware.

• Before you activate the cooking zone

put the cookware on it.

• Put the smaller cookware on the

smaller cooking zones.

• Put the cookware directly in the centre

of the cooking zone.

• Use the residual heat to keep the food

warm or to melt it.

ENGLISH

19

Summary of Contents for KTI6500XE

Page 1: ...KTI6500XE EN HOB USER MANUAL ...

Page 2: ...age advice brochures trouble shooter service information www electrolux com Register your product for better service www registerelectrolux com Buy Accessories Consumables and Original spare parts for your appliance www electrolux com shop CUSTOMER CARE AND SERVICE Always use original spare parts When contacting our Authorised Service Centre ensure that you have the following data available Model ...

Page 3: ... a child safety device we recommend you activate it Cleaning and user maintenance shall not be made by children without supervision Children of less than 3 years should be kept away unless continuously supervised 1 2 General Safety The appliance and its accessible parts become hot during use Do not touch the heating elements Do not operate the appliance by means of an external timer or separate re...

Page 4: ...ll a non combustile separation panel under the appliance to prevent access to the bottom Make sure that the ventilation space of 2 mm between the worktop and the front of the below unit is free The warranty does not cover damages caused by the lack of an adequate ventilation space 2 2 Electrical Connection WARNING Risk of fire and electrical shock All electrical connections should be made by a qua...

Page 5: ... immediately the appliance from the power supply This to prevent an electrical shock Users with a pacemaker must keep a distance of minimum 30 cm from the induction cooking zones when the appliance is in operation When you place food into hot oil it may splash WARNING Risk of fire and explosion Fats and oil when heated can release flammable vapours Keep flames or heated objects away from fats and ...

Page 6: ...onnect the appliance from the mains supply Cut off the mains cable and discard it 2 6 Service To repair the appliance contact an Authorised Service Centre Use original spare parts only 3 PRODUCT DESCRIPTION 3 1 Cooking surface layout 180 mm 145 mm 1 1 1 1 2 1 Induction cooking zone 2 Control panel 3 2 Control panel layout 5 1 2 3 6 4 7 9 8 11 10 Use the sensor fields to operate the appliance The d...

Page 7: ... increase or decrease the time 10 Power function To activate and deactivate the function 11 Control bar To set a heat setting 3 3 Heat setting displays Display Description The cooking zone is deactivated The cooking zone operates STOP GO function operates Automatic Heat Up function operates Power function operates digit There is a malfunction OptiHeat Control 3 step Residual heat indicator continu...

Page 8: ...e hob again you use incorrect cookware The symbol comes on and the cooking zone deactivates automatically after 2 minutes you do not deactivate a cooking zone or change the heat setting After some time comes on and the hob deactivates The relation between the heat setting and the time after which the hob deactivates Heat setting The hob deacti vates after 1 3 6 hours Heat setting The hob deacti va...

Page 9: ...hould operate for a single cooking session First set the cooking zone then set the function You can set the heat setting before or after you set the function To set the cooking zone touch again and again until the indicator of a necessary cooking zone comes on To activate the function touch of the timer to set the time 00 99 minutes When the indicator of the cooking zone starts to flash slowly the...

Page 10: ...n you deactivate the hob you also deactivate this function 4 11 The Child Safety Device This function prevents an accidental operation of the hob To activate the function activate the hob with Do not set the heat setting Touch for 4 seconds comes on Deactivate the hob with To deactivate the function activate the hob with Do not set the heat setting Touch for 4 seconds comes on Deactivate the hob w...

Page 11: ...The function divides the power between cooking zones connected to the same phase The function activates when the total electricity loading of the cooking zones connected to a single phase exceeds 3700 W The function decreases the power to the other cooking zones connected to the same phase The heat setting display of the reduced zones changes between two levels Power management function with Power...

Page 12: ...istle sound you the cooking zone with high power level and the cookware is made of different materials sandwich construction humming you use high power level clicking electric switching occurs hissing buzzing the fan operates The noises are normal and do not refer to hob malfunction 5 3 Öko Timer Eco Timer To save energy the heater of the cooking zone deactivates before the count down timer sounds...

Page 13: ...fry chips Boil large quantities of water Power function is activated 6 CARE AND CLEANING WARNING Refer to Safety chapters 6 1 General information Clean the hob after each use Always use cookware with clean bottom Scratches or dark stains on the surface have no effect on how the hob operates Use a special cleaner applicable for the surface of the hob Use a special scraper for the glass 6 2 Cleaning...

Page 14: ... and the hob deactivates An acoustic signal sounds when the hob is deactiva ted You put something on one or more sensor fields Remove the object from the sensor fields The hob deactivates You put something on the sensor field Remove the object from the sensor field Residual heat indicator does not come on The zone is not hot be cause it operated only for a short time If the zone operated suffi cie...

Page 15: ...hob from the electrical supply for some time Disconnect the fuse from the electrical sys tem of the house Connect it again If comes on again speak to an Author ised Service Centre comes on There is an error in the hob because a cookware boils dry Automatic Switch Off and the overheating protec tion for the zones operate Deactivate the hob Re move the hot cookware Af ter approximately 30 sec onds a...

Page 16: ... Connection cable The hob is supplied with the connection cable Replace the damaged mains cable only with the spare parts cable Speak to your local Authorised Service Center WARNING All electrical connections must be made by a qualified electrician CAUTION Do not drill or solder the wire ends This is strictly forbidden CAUTION Do not connect the cable without cable end sleeve Two phase connection ...

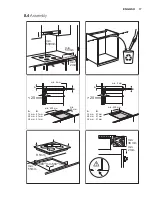
Page 17: ... 500mm min 2mm min 2 mm A B A 12 mm 28 mm 38 mm B 57 mm 41 mm 31 mm min 30 mm min 500 mm 20 mm 20 mm min 2 mm A B A 12 mm 28 mm 38 mm B 57 mm 41 mm 31 mm min 500 mm R 5mm min 55mm 560 1mm 490 1 mm min 38 mm min 2 mm ENGLISH 17 ...

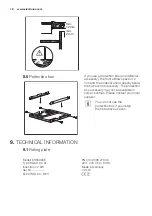
Page 18: ...ecessary The protection box accessory may not be available in some countries Please contact your local supplier You can not use the protection box if you install the hob above an oven 9 TECHNICAL INFORMATION 9 1 Rating plate Modell KTI6500XE PNC 949 596 270 00 Typ 58 GAD DC AT 220 240 V 50 60 Hz Induction 7 2 kW Made in Germany Ser Nr 7 2 kW ELECTROLUX REX www electrolux com 18 ...

Page 19: ...ones Ø Left front Left rear Right front Right rear 21 0 cm 21 0 cm 14 5 cm 18 0 cm Energy consumption per cooking zone EC electric cooking Left front Left rear Right front Right rear 168 6 Wh kg 176 3 Wh kg 178 1 Wh kg 169 2 Wh kg Energy consumption of the hob EC electric hob 173 1 Wh kg EN 60350 2 Household electric cooking appliances Part 2 Hobs Methods for measuring performance The energy measu...

Page 20: ...rs to recycle it Help protect the environment and human health and to recycle waste of electrical and electronic appliances Do not dispose appliances marked with the symbol with the household waste Return the product to your local recycling facility or contact your municipal office www electrolux com 20 ...

Page 21: ...ENGLISH 21 ...

Page 22: ...www electrolux com 22 ...

Page 23: ...ENGLISH 23 ...

Page 24: ...www electrolux com shop 867317187 A 392014 ...

Reviews: