background image

- 11 -

CARE AND MAINTENANCE

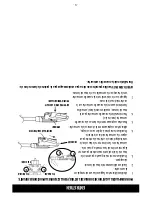
REPLACING THE STYLUS 

1.  Lift the tone arm off the tone arm rest.
2.  At the front end of the tone arm, place the tip of your fingernail between the stylus holder and the 

cartridge housing as shown, press down on the stylus holder until it separates from the cartridge 
housing.

3.  Completely remove the stylus holder with worn stylus and discard it.
4.  Place the new stylus holder with stylus under the cartridge housing. First, press upward on the back 

side of the stylus holder, and then press up on the front edge of the stylus holder until it snaps into place 
on the cartridge housing.

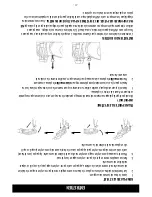
TRANSPORTING THE SYSTEM

IMPORTANT!

To protect the turntable from damage during transportation, a silver transit screw is located at the upper 
right of the turntable platform.
1.  Before playing, please use a screwdriver to turn the transit screw in clockwise direction (screw going 

down) completely to 

unlock

 the turntable.

2.  To 

lock

 the turntable again for transportation, please turn screw in counter-clockwise direction.  

CARE OF THE CABINET

Care of the cabinet is the same as any piece of furniture. When the cabinet is dusty, you may wipe it using 
a soft, non-abrasive dust cloth. If the cabinet becomes smudged with fingerprints, you may use any good 
quality commercial dusting and polishing spray cleaner. 

DO NOT SPRAY ANY PLASTIC OR METAL PARTS 

OF THIS SYSTEM. 

We recommend spraying the cleaner on the cloth, not directly on the cabinet, to avoid 

any over spray on any plastic or metal components. 

Summary of Contents for Archer EAnos300

Page 1: ...trohome product Please read this instruction manual carefully before using product to ensure proper use Keep this manual in a safe place for future reference electrohome com ARCHER TURNTABLE STEREO SYSTEM INSTRUCTION MANUAL EANOS300 EANOS300S ...

Page 2: ...bythemanufacturer 12 Unplugthisapparatusduringlightningstormsorwhenunusedforlongperiodsoftime 13 Referallservicingtoqualifiedservicepersonnel Servicingisrequiredwhentheapparatushasbeendamagedinany way suchaspower supplycordorplugisdamaged liquidhasbeenspilledorobjectshavefallenintotheapparatus theapparatushasbeenexposedtorainormoisture doesnotoperatenormally orhasbeendropped 14 Thisapplianceshalln...

Page 3: ...theequipmentandreceiver Connecttheequipmentintoanoutletonacircuitdifferentfromthattowhichthereceiverisconnected Consultthedealeroranexperiencedradio TVtechnicianforhelp ThisdevicecomplieswithPart15oftheFCCRules Operationissubjecttothefollowingtwoconditions 1 Thisdevicemaynotcauseharmfulinterference and 2 Thisdevicemustacceptanyinterferencereceived includinginterferencethatmaycauseundesiredoperatio...

Page 4: ...E STORE Please contact an ELECTROHOME customer support representative Please contact us via one of the methods below For more product information visit www ELECTROHOME com Support www electrohome com support Online web chat www electrohome com ...

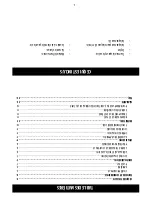
Page 5: ...6 MAIN UNIT 6 BACK 6 PREPARATION FOR USE 7 TURNTABLE 7 POWER SOURCE 7 UNPACKING AND SETUP 8 RAISING AND LOWERINGTHE LID 8 PROTECTYOUR FURNITURE 8 OPERATION 9 POWERING ONTHE UNIT 9 AUX IN OPERATION 9 PLAYING RECORDS 9 USB OPERATION 10 REMOVINGTHE USB DRIVE 10 CARE AND MAINTENANCE 11 REPLACINGTHE STYLUS 11 TRANSPORTINGTHE SYSTEM 11 CARE OFTHE CABINET 11 TO REPLACETHE CARTRIDGE FROMTONE ARM 12 WARRAN...

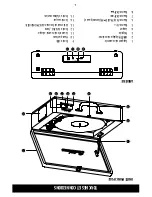
Page 6: ...S AND CONNECTIONS 1 Phonograph Lid Support Bracket 2 OFF VOLUME Control 3 Handle 4 Latch 5 10 Button 6 PLAY PAUSE Button 7 SKIP Button 8 SKIP Button 9 USB input 10 Speakers 11 Phonograph Lid 12 3 5mm AUX IN Jack 13 AUX PHONO USB Function Selector 14 Headphone input 15 Power Adapter Input BACK ...

Page 7: ...UTTONS AND CONNECTIONS TURNTABLE PREPARATION FOR USE POWER SOURCE Thissystemisdesignedtooperateonnormal120V60HzAConly Attemptingtooperatethissystemfrom any other power source may cause damage to the system and such damage is not covered by your warranty Connect the AC adapter to the power outlet as shown below AUX IN DC 12V 1500mA AUX USB PHONO ...

Page 8: ...rasitwillgountilthelidsupportbracket locks intheopenposition Toclose thelid liftitupwardslightlyandpullthebracketgentlytowardsyouuntilthebracket unlocks andthen gentlylowerthelid TOAVOIDDAMAGINGTHECABINETORTHELID NEVERFORCETHELIDCLOSED ALWAYSRAISETHELIDTO RELEASETHELIDSUPPORTBRACKET PROTECT YOUR FURNITURE This model is equipped with non skid rubber feet to prevent the product from moving when you ...

Page 9: ...one Jack of your external device is connected then you may need to adjust both the volume control of your external device and the volume control of this system to find the optimal volume setting The turntable still functions in AUX mode however no sound will come from the speakers Make sure tone arm is securely locked to the tone arm rest to avoid any damage Rotate the POWER VOLUME button counter ...

Page 10: ...uttons to choose your desired track 4 Press the 10 button to choose the desired track to play and advancing 10 tracks at a time 5 Rotate the POWER VOLUME button counter clockwise until a click is heard to turn off the unit when you are done REMOVING THE USB DRIVE PleasebesuretostopplaybackandturntheunitoffbeforeremovingtheUSBdrivetoavoiddamagetothe USBandthesystem Since PHONO USB are a combined fu...

Page 11: ...rntable from damage during transportation a silver transit screw is located at the upper right of the turntable platform 1 Before playing please use a screwdriver to turn the transit screw in clockwise direction screw going down completely to unlock the turntable 2 To lock the turntable again for transportation please turn screw in counter clockwise direction CARE OF THE CABINET Care of the cabine...

Page 12: ...according to the direction as shown to the left to separate the cartridge from the tone arm 4 Using either a tweezer or your fingers carefully unplug the terminals from the cartridge 5 Carefully connect the terminals to the new cartridge not included 6 To re install the new cartridge to the tone arm First pleaselock the front end of the new cartridge on the hook of the tone arm 7 Press the rear si...

Page 13: ...on or inappropriate use as outlined in the owner s manual B Any Electrohome product tampered with modified adjusted or repaired by any party other than Electrohome C Any cosmetic damage to the surface or exterior that has been defaced or caused by normal wear and tear D Any damage caused by external or environmental conditions including but not limited to transmission line power line voltage or li...

Page 14: ...rt i 0 Please note this feature may not be available on all models Can I charge my MP3 player with the USB port The USB port is for playback or recording depending on the device The USB port will not charge a device nor allow an MP3 player to play music If you would like to play audio from an iPod iPhone or an Android device please use the Line in port s on the unit Please note this feature may no...

Page 15: ... http electro home com support i 0 S il vous plaît notez que cette fonction peut ne pas être offerte sur tous les modèles Puis je utiliser le port USB pour recharger mon lecteur MP3 Le port USB sert pour la lecture ou l e nregistrement en fonction du périphérique que vous y branchez Le port USB ne rechargera pas un appareil et ne permettra pas non plus à un lecteur MP3 de jouer de la musique Si vo...

Page 16: ...se installation ou une mauvaise utilisation comme indiqué dans le guide de l utilisateur B Tout produit Electrohome qui a été altéré modifié ajusté ou réparé par une partie autre qu Electrohome C Tout dommage esthétique à la surface ou à l e xtérieur qui a été déformé ou causé par une usure normale D Tout dommage causé par des conditions externes ou environnementales incluant mais sans s y limiter...

Page 17: ... utilisant une pince à épiler ou vos doigts débranchez soigneusement les bornes de la cartouche 5 Branchez soigneusement les bornes à la nouvelle cartouche non inclus 6 Pour réinstaller la nouvelle cartouche pour le bras de lecture veuillez tout d abord verouillez l e xtrémité avant de la nouvelle cartouche sur le crochet du bras de lecture 7 Appuyez sur le côté arrière de la nouvelle cartouche ve...

Page 18: ... une vis de transport argentée se trouve en haut à la droite du plateau 1 Avant de jouer un disque veuillez utiliser un tournevis pour tourner la vis de transport dans le sens horaire pour la vis descendant complètement pour déverrouiller le plateau tournant 2 Pour verrouiller le plateau à nouveau pour le transport veuillez tourner la vis dans le sens anti horaire ENTRETIEN DU BOÎTIER L entretien ...

Page 19: ... Skip pour sélectionner une piste 4 Appuyez le bouton 10 pour sélectionner une piste et pour avancer 10 pistes à la fois 5 Tournez le bouton ARRÊT Réglage du volume dans le sens antihoraire jusqu à ce qu un clic est entendu lorsque vous avez terminé ENLEVER LA CLÉ USB Assurez vous d arrêter la lecture et éteindre l appareil avant de retirer la clé USB pour éviter d e ndommager la clé USB et le sys...

Page 20: ...t de régler la commande de volume de l appareil Si la prise d écouteurs de votre appareil externe est connecté vous devez peut être régler le contrôle du volume de votre périphérique externe et le contrôle du volume de ce système pour trouver le réglage du volume optimal Le tourne disque fonctionne toujours en mode AUX cependant aucun son ne sort des haut parleurs Assurez vous que le bras de lectu...

Page 21: ... le couvercle au maximum jusqu à ce que le de support se verrouille dans la position ouverte Pour fermer le couvercle soulevez le légèrement et tirez doucement sur le support vers vous jusqu à ce que le support déverrouille et ensuite baisser doucement le couvercle AFIN D ÉVITER D ENDOMMAGER LE COFFRET OU LE COUVERCLE NE JAMAIS FORCER LE COUVERCLE FERMÉ LEVEZ TOUJOURS LE COUVERCLE POUR LIBÉRER LE ...

Page 22: ...min CONFIGURATION SOURCE D ALIMENTATION Ce système est prévu pour une utilisation avec une prise normale 120V 60Hz seulement Utiliser ce système avec une autre source d alimentation peut causer des dommages au système et de tels dommages ne sont pas couverts par votre garantie Connectez l adaptateur CA à votre prise secteur comme indiqué ci dessous 7 AUX IN DC 12V 1500mA AUX USB PHONO 1 2 3 5 4 6 ...

Page 23: ... Support du couvercle 2 ARRÊT Réglage du volume 3 Poignée 4 Loquet 5 Bouton 10 6 Bouton PLAY PAUSE lecture pause 7 Bouton SKIP 8 Bouton SKIP 9 Entrée USB 10 Haut parleurs 11 Couvercle du tourne disque 12 Entrée AUX IN 3 5mm 13 Sélecteur de fonction AUX PHONO USB 14 Sortie casque 15 Entrée d alimentation ARRIÈRE 6 ...

Page 24: ...CONNEXIONS 6 UNITÉ PRINCIPALE 6 ARRIÈRE 6 PLATEAU 7 CONFIGURATION 7 SOURCE D ALIMENTATION 7 DÉBALLAGE ET INSTALLATION 8 LEVER ET BAISSER LE COUVERCLE 8 PROTÉGER VOS MEUBLES 8 UTILISATION 9 ALIMENTER L APPAREIL 9 OPÊRATION AUX IN 9 JOUER DES DISQUES 9 FONCTIONNEMENT USB 10 ENTRETIEN 11 REMPLACER LE STYLET 11 TRANSPORTER LE SYSTÈME 11 ENTRETIEN DU BOÎTIER 11 POUR REMPLACER LA CARTOUCHE DU BRAS DE LE...

Page 25: ...ientèle ELECTROHOME en ce qui concerne toute information supplémentaire sur les caractéristiques des produits les Veuillez nous contacter par l une des méthodes ci dessous Pour plus d information sur nos produits visitez www ELECTROHOME com Clavardage en ligne www electrohome com Soutien www electrohome com support ...

Page 26: ... CA différente de celle utilisée par le récepteur Consulter le revendeur ou un technicien spécialisé dans le service des radios téléviseurs pour obtenir de l aide Cet appareil est en accord avec la partie 15 des Lois FCC Son utilisation est sujette aux deux conditions suivantes 1 cet appareil ne doit pas causer d interférences nuisibles et 2 Cet appareil doit accepter toute interférence reçue incl...

Page 27: ... prolongées 13 Confiez toutes réparations de cet appareil à un personnel qualifié Une réparation peut être requise lorsque l appareil a éte endommagé de quelque manière que ce soit tel qu un cordon ou une fiche endommagé du liquide déversé ou des objets tombés dans I appareil I appareil a été exposé à la pluie ou à I humidité un appareil qui ne fonctionne pas normalement ou qui est tombé 14 L appa...

Page 28: ...ppareil Electrohome Veuillez lire ce manuel attentivement avant de faire fonctionner l appareil pour vous assurer de l utiliser correctement Conservez ce manuel dans un endroit sûr afin de pouvoir vous y référer au besoin electrohome com MANUEL D INSTRUCTION EANOS300 EANOS300S ...

Reviews: