10
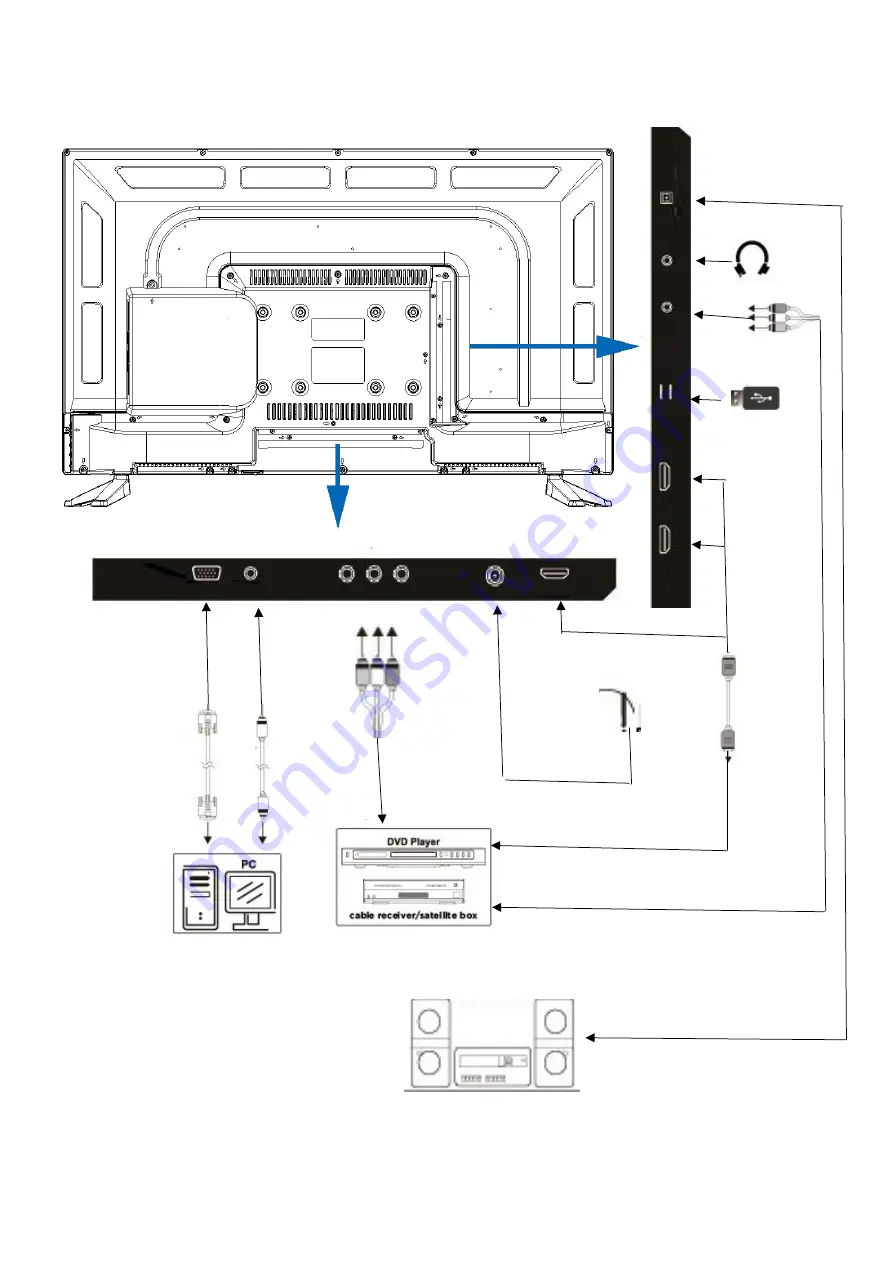
CONNECTING TO EXTERNAL DEVICES
VGA
AUDIO
VIDEO L
R
RF IN
HDMI1
H
D
M
I2
I3
US
B
1 / USB
2
O
P
TI
C
A
L
EA
N
E
YP
b
r
Headphones
Amplifier or Sound Bar
Aerial
HDMI Cable
VGA Cable
Audio Cable
Optical Cable
Page 1: ...USER MANUAL HD SMART LED TV WITH DVD PLAYER eiQ 32HDT2DVD...
Page 2: ...AND INTERFACE 8 CONNECTING TO EXTERNAL DEVICES 10 REMOTE CONTROL 11 INSTALLATION OF BATTERIES 12 INITIAL SETUP 13 BASIC OPERATION 14 CHANNEL SET UP 14 TUNING 15 TV MENU 16 PICTURE SETUP 16 SOUND SETU...
Page 3: ...r when unused for long periods of time Refer all servicing to qualified personnel Servicing is required when the apparatus has been damaged in any way such as power supply cord or plug is damaged liqu...
Page 4: ...Do not place the television set on cloth or other materials that may be located between the television set and the supporting furniture Educate children about the dangers of climbing on furniture to...
Page 5: ...eiling or cabinet Ensure the TV is positioned close to the wall to avoid it falling when pushed When twisting the TV set do not hold the top of the TV you should twist from the base When lifting the T...
Page 6: ...F LEGS 1 Place the TV with the front facing downwards on a soft cloth pads on a desk 2 Insert the legs into the sockets on the base of the TV 3 Insert the screws into the sockets and tighten them with...
Page 7: ...ions or are unsure how to install this product please contact a professional for assembly advice and assistance Careful consideration should be made regarding the location the television is to be wall...
Page 8: ...e MENU BUTTON To enter the main menu CH BUTTON To select the next channel CH BUTTON To select the previous channel VOL BUTTON To increase the volume VOL BUTTON To decrease the volume PLAY PAUSE BUTTON...
Page 9: ...es keyboards gaming accessories or USB flash drive for DTV recording timeshift or media playback Only connect low power USB flash drives or externally powered hard drives to the USB ports as they only...
Page 10: ...10 CONNECTING TO EXTERNAL DEVICES VGA AUDIO VIDEO L R RF IN HDMI1 HDMI2 HDMI3 USB1 USB2 OPTICAL HEADPHONE YPbPr Headphones Amplifier or Sound Bar Aerial HDMI Cable VGA Cable Audio Cable Optical Cable...
Page 11: ...set up Change screen angle Change language Enter sleep mode Navigation Exit current navigation Enter the menu Enter display settings Next Previous channel Increase Decrease volume Mute Change text si...
Page 12: ...fully inserted and the socket is switched on Check there are no special fluorescent light or neon light which could interfere with remote signals INITIAL SETUP 1 Connect your TV to the power outlet 2...
Page 13: ...ress the EXIT button to quit Select OSD Language Use the buttons to highlight the OSD Language Press the ENTER button to select the OSD Language you want to First Time Setup Select Country Use the but...
Page 14: ...menu 1 Use the buttons to select the option that you want to adjust in the CHANNEL menu 2 Press the Enter button to adjust 3 After finishing your adjustment Press the Enter button to save and return t...
Page 15: ...ttons are the shortcut buttons for channel programming Use the to highlight the channel you want to select then Press the Red button to delete the program in the list Press the Blue button to skip the...
Page 16: ...s colour sharpness and tint when the picture is in Personal mode TIP You can press the PMODE button to change the Picture Mode directly Contrast Brightness Colour Tint Sharpness Use the buttons to sel...
Page 17: ...Warm You can change the red green and blue values when the colour temperature is set to User mode Cold Increase the blue tone for the white Normal Increase the linked colours for the white Warm Increa...
Page 18: ...control to change the Sound Mode Standard Produces a balanced sound in all environments Music Preserves the original sound Good for musical programs Movie Enhances treble and bass for a rich sound exp...
Page 19: ...to enter the sub menu Use the buttons to select between 15min 30min 45min 60min 90min 120min and 240min Auto Standby Use the buttons to select Auto Standby then press the Enter button to enter the su...
Page 20: ...ystem then press Enter and enter the password The default password is 0000 Please contact the manufacturer for assistance if this is forgotten Set Password Use the buttons to select Set Password then...
Page 21: ...splayed The default is English Use the buttons to select Menu Language PVR File System Use the buttons to select PVR File System then press Enter to enter the sub menu Use the buttons to select Check...
Page 22: ...ns to select Caption then press Enter to turn on or off Software Update USB Use the buttons to select Software Update USB plug your USB device in the USB slot then press Enter to update the software R...
Page 23: ...ffset Size Phase automatically Horizontal Pos Adjust the horizontal position of the picture Use the buttons to select Horizontal Pos then press Enter to enter the sub menu Vertical Pos Adjust the vert...
Page 24: ...Enter to enter Photo Use the buttons to select PHOTO in the main menu then press Enter to enter Press the Exit button to return to the previous menu and exit menu to quit Use the buttons to select th...
Page 25: ...MUSIC in the main menu then press Enter to enter Press Exit to return to the previous menu and exit menu to quit Use the buttons to select the drive you want to watch then press Enter to enter Use the...
Page 26: ...nu and exit menu to quit Use the buttons to select the drive you want to watch then press Enter to enter Press media button to play the selected movie Press display to select the menu at the bottom yo...
Page 27: ...u then press Enter button to enter Press Exit to return to the previous menu and exit menu to quit Use the buttons to select the drive you want to watch then press the Enter button to enter Use the bu...
Page 28: ...Language English is default Last Memory ON OFF You may wish the player to remember where it finished playing a disc and then remove the disc When you stop the disc the player will automatically remem...
Page 29: ...quietest sound registered in a soundtrack Video Setup General Audio Dolby Video Preference Video Setup Page Sharpness MID Brightness 00 Contract 00 Go To Video Setup Page Sharpness Adjust the sharpnes...
Page 30: ...refore be adopted automatically when the player begins playing a disc 2 Subtitles vary between discs depending on the Discs You can also select alternative subtitle language by pressing the SUBTITLE b...
Page 31: ...m2 Static Contrast 4000 1 Response time 8ms Antenna Input X1 USB Input X2 HDMI Input X3 VGA Input X1 PC AUDIO Input X1 Audio Input L R X1 Mini AV Video Input X1 Mini AV YPbPr Input X1 Mini RJ45 Input...
Page 32: ...window Flashing spots or stripes appear on the screen Check that there is no emission Car HV cable or Neon lamp or other possible interference sources Image colour or quality deteriorates Check that...
Page 33: ...handled separately as special treatment is necessary Recycling facilities are now available for all customers at which you can deposit your old electrical products Customers will be able to take any...