background image

25 


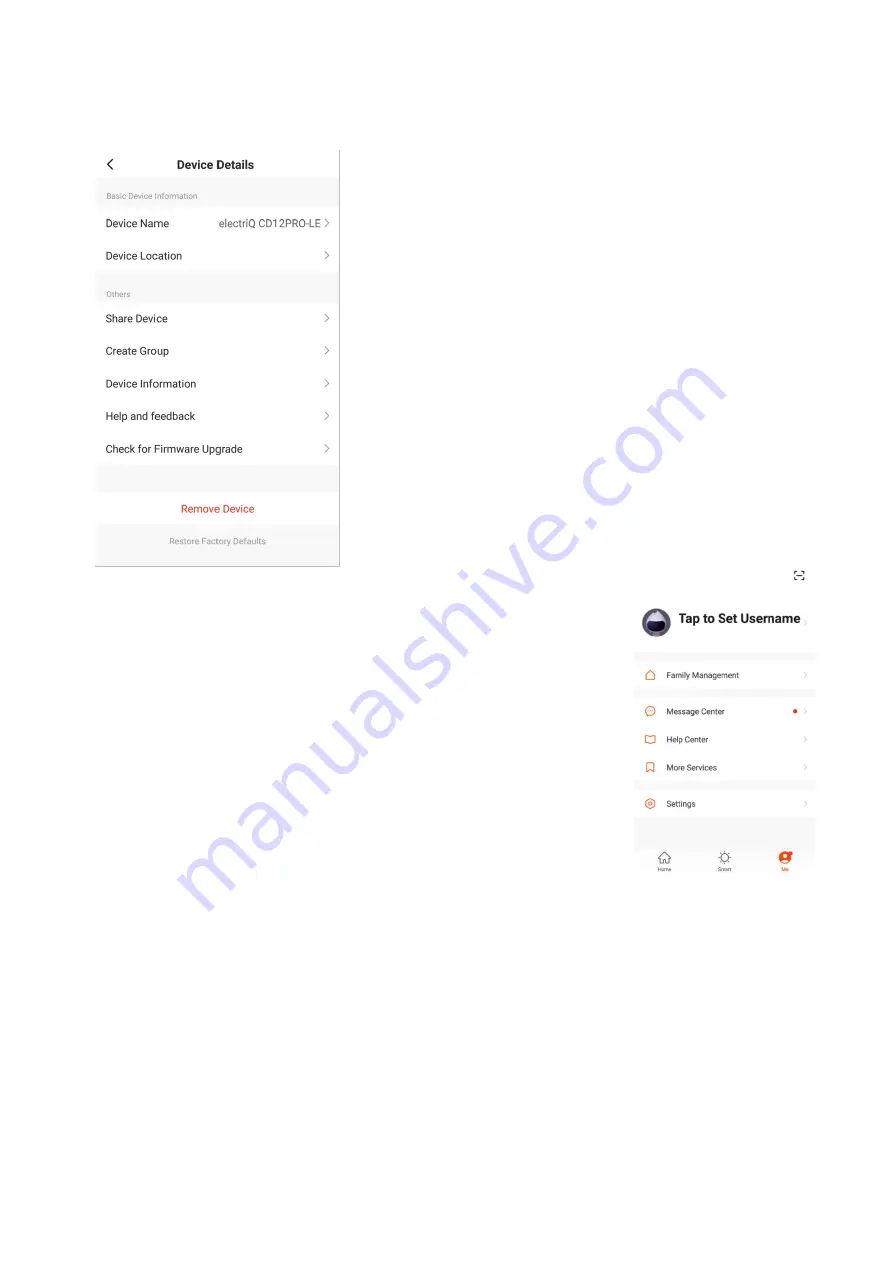
DEVICE DETAILS SCREEN 


The device details screen gives you the option to edit the 
details for the device, and use some of its additional 
features. The device details screen can be accessed from 
the device screen by pressing on the symbol in the top 
right hand corner.   


CHANGING THE NAME OF YOUR DEVICE 

The top option within this allows you to change the name 
of the device to something relevant to the use of the 
product, such as “Living Room Dehumidifier”. Within the 
menu, you also have the option of setting up a pattern lock 
or change your password. 

DEVICE SHARING 

This allows you to share access to the controls of your 
dehumidifier with friends and family. 

PROFILE TAB 


The Profile tab allows you to make changes to the app, such as 
setting up a username and editing or adding rooms. 


Within the Profile tab, you are also able to change settings 
related to the app itself. 


CONNECTION TROUBLESHOOTING 


1.  Check whether the device is powered on and is in the correct standby mode, if not please 

refer to the CHANGING BETWEEN CONNECTION MODES section on page 12. 

2.  Ensure the wifi password has been entered into the app correctly (Case sensitive) 
3.  Check that the phone is connected to the wifi you are connecting the device to. 
4.  Ensure  the  network  you  are  connecting  it  to  is  2.4Ghz  (5Ghz  wifi  networks  are  not 

supported), and that there is a strong wifi signal to the item.   

5.  If your router is dual band, ensure that the 2.4ghz network has a different network name 

(SSID).  Further advice on changing router settings will be available from your Internet 
service provider / Router manufacturer. 

6.  Check the settings on the router. Encryption should be WPA2-PSK and authorisation type 

should be set to AES 

7.  Try using the alternative connection method. i.e. If connection is failing when attempting 

to connect through CF mode, try AP mode. 

Summary of Contents for CD25PRO-LE-V2

Page 1: ...ONISER AND SMART WIFI APP CONTROL CD25PRO LE V2 25L Litres per day Thank you for choosing electriQ Please read this user manual before using this innovative Dehumidifier and keep it safe for future re...

Page 2: ...ANEL 8 QUICK REFERENCE GUIDE 10 OTHER FEATURES AND INDICATORS 12 POSITIONING THE DEHUMIDIFIER 13 WATER DRAINAGE 14 SETTING UP THE WIFI 16 CONTROLLING YOUR DEVICE THROUGH THE APP 21 CARE AND MAINTENANC...

Page 3: ...nect the power from the appliance before dismantling assembling or cleaning Avoid touching any moving parts of the appliance Never insert fingers pencils or any other objects through the guard This ap...

Page 4: ...ier Use the provided power button located on the control panel Always place the unit on a dry and stable surface The appliance should not be installed in a laundry or wet room where the humidity is hi...

Page 5: ...l allow dirt to gather inside the dehumidifier which could invalidate the warranty A dirty filter will restrict the airflow into the machine which will increase the resistance on the fan and could res...

Page 6: ...low energy premium dehumidifier range featuring low power consumption power saving logic and advanced air purification 1 Easy to use controls 2 Low energy Only uses a fraction of the electricity of si...

Page 7: ...Optional HEPA FILTER 6 stage dual action dehumidifier and purifier great in improving indoor air quality Air Outlet Handle Louvres Castors Power Cord Control Panel Pre Filter Activated Carbon Filter O...

Page 8: ...he filters will purify the air The UV and Plasma ioniser can also be used to further improve the air quality CHILD LOCK BUTTON Hold this button for 3 seconds to activate or deactivate the child lock W...

Page 9: ...t to stop 0 24 hours INTELLIGENT DEFROST The appliance will defrost automatically when the coil sensor detects that the internal temperature is too low During defrosting the indicator will light up On...

Page 10: ...laundry put the unit in High mode and use the down button to select a lower desired humidity e g 35 45 POWER BUTTON Press to turn the unit ON OFF OSCILLATION BUTTON Press once to make the louvre swing...

Page 11: ...w and for best results place the laundry within 1 5 meters of the dehumidifier NOTES If a permanent drainage pipe is fitted the unit will not stop operating Setting the desired humidity to around 35 i...

Page 12: ...the fan will continue to operate to ensure that the air within the room is not stale The unit will use only a minimal amount of energy in fan mode When the humidity of the room is equal to or higher t...

Page 13: ...ed in a central and clear location so that it can draw this moist air towards it from all over the home A warm hallway or landing is an excellent position for your dehumidifier If possible leave inter...

Page 14: ...t a while to avoid the water dripping into the unit and causing damage Only empty the water tank when it is full or before moving or storing the unit Do not rest the tank on the floor because the bott...

Page 15: ...inner diameter 15mm to the drain connector and ensure the connection is tight Please note the water tube is not supplied with the unit 3 Return the water tank back into position within the unit This...

Page 16: ...QR codes below or by searching for the app in your chosen store Android IOS CONNECTION METHODS AVAILABLE FOR SETUP The smart device has two different setup modes CF Quick Connection and AP Access Poi...

Page 17: ...mail address or phone number and press continue to register 4 A verification code will be sent by the method selected in step 3 Enter the code into the app 6 The app is now registered It will automati...

Page 18: ...CREATING ROOMS 1 Press on the ADD HOME button 2 Type in a name for your home 3 Press on the location button to select the location of your home See SETTING YOUR LOCATION below 4 New rooms can be added...

Page 19: ...2 Select the type of device as Dehumidifier in the Small Home Appliance tab 3 Ensure the WiFi light on the dehumidifier is flashing twice per second then press on the orange button at the bottom of t...

Page 20: ...idifier 3 Press on the AP mode button in the top right of the screen 4 Ensure the WiFi light on the dehumidifier is slowly flashing once per second then press on the orange button at the bottom of the...

Page 21: ...ROUGH THE APP THE HOME SCREEN DEVICE SCREEN ON OFF Button Use to quickly turn the unit on or off Name of dehumidifier Press to enter the Device Screen Add a device Choose the device to control Smart S...

Page 22: ...ode between Auto Fan High and Low Desired Humidity Change the desired humidity between 35 C and 80 C Oscillation Set the position of the louvres Room Temperature Shows the current room temperature Sch...

Page 23: ...preset configurations Below is an example of how to set up a scene 1 Press on the Smart Scene tab at the bottom of the Home screen 3 Select Scene to create a new Scene 2 Press on the Plus in the top...

Page 24: ...ext to Please Enter Scene Name to input the name for your Scene Press the Red Plus next to When any condition is satisfied to add the trigger Press the Red Plus next to Execute following actions to ad...

Page 25: ...ou are also able to change settings related to the app itself CONNECTION TROUBLESHOOTING 1 Check whether the device is powered on and is in the correct standby mode if not please refer to the CHANGING...

Page 26: ...e water and a mild detergent to clean the washable mesh filters Do not use bleach or abrasives Do not splash water directly onto the main unit Doing so may cause an electrical shock and can lead to th...

Page 27: ...th a relative humidity ranging from 30 to 80 For maximum efficiency use the unit between 15oC and 32oC Sometimes cold and or hot air comes out from the air outlet grill why When the unit is in dehumid...

Page 28: ...obstructions and restart the unit Ensure a distance of at least 20 cm between the unit walls Airflow seems weak Is filter dirty or clogged Please service the filters regularly as per user manual Unit...

Page 29: ...ce make these simple checks before calling the service line If the unit still fails to operate call 0871 620 1057 or complete the online form 1 Is the unit plugged into the mains 2 Is the fuse OK 3 Sw...

Reviews: