


EHC Electric Combination Radiators –
Installation and technical manual
Page 6
3.
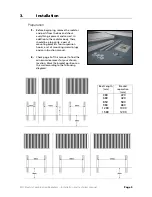
Installation
(cont.)
Wall fixture and fittings
3.
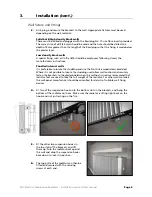
Drill, plug, and secure the brackets to the wall. Appropriate fixtures must be used
depending on the wall material:
Solid brick/High density block walls
These must be drilled and plugged with the Rawlplug No. 10 size fibre inserts provided.
The correct size of drill (5.5mm) should be used and the hole should be drilled to a
depth of 8mm greater than the length of the Rawlplug so that the fixing is made below
the plaster layer.
Low density block walls
A special fixing, such as Unifix LB70 should be employed, following closely the
manufacturers instructions.
Panelled internal walls
It is preferable to locate the studding and use the No.10 size woodscrews provided.
Where it is not possible to locate the studding use Hollow wall anchors and securely
fasten the brackets to the plasterboard when this method is used we recommend that
radiator feet are used to take the full weight of the radiator. For other wall materials
the wall panel manufacturer should be consulted for details of suitable wall fixing
devices.
4.
Fit two of the suspension hooks into the bottom slots in the brackets, and hang the
bottom of the radiator on them.
Make sure the radiator is sitting right back on the
hooks and not just resting on the fins.
5.
Fit the other two suspension hooks in
the top slots of the brackets, and lift
them up. Push the radiator back against
the wall and drop the suspension hooks
back down to lock it in position.
6.
The top grille of the radiator can then be
fitted and secured with the securing
screws at each end.