background image

OWNER’S MANUAL

The Liberty Trike™ logo is a registered trademark of Electric Bike Technologies, Inc. 

Copyright © 2020 Electric Bike Technologies, Inc. All rights reserved.

Summary of Contents for Liberty Trike

Page 1: ...OWNER S MANUAL The Liberty Trike logo is a registered trademark of Electric Bike Technologies Inc Copyright 2020 Electric Bike Technologies Inc All rights reserved ...

Page 2: ... WE ARE FAMILY 1 BIKE SAFETY 2 RESPONSIBILITY 3 BOX CONTENTS 4 ASSEMBLY 5 6 FOLD AND UNFOLD 7 ON AND OFF 8 BATTERY CARE 9 LCD OVERVIEW 10 11 CONTROLS 12 TORQUE 13 TROUBLESHOOTING 14 MAINTENANCE 15 16 TRIKE SPECIFICATIONS 17 BATTERY SPECIFICATIONS 18 WARRANTY 19 NOTES 20 ...

Page 3: ...erty Trike This manual will answer many of your questions but if you encounter any problems please email us at support libertytrike com or call 866 894 4620 Please join our Liberty Trike Facebook Rider page The Official Liberty Trike Rider page is packed with fellow Liberty Trike riders who are sharing their experiences pictures and even valuable questions and answers about their Liberty Trike ...

Page 4: ...d bike paths or as close to the edge of the road as possible in the direction of traffic flow or as directed by local governing laws 7 Stop at stop signs and traffic lights slow down and look both ways at street inter sections Remember that a bicycle always loses in a collision with a motor vehicle so be prepared to yield even if you have the right of way 8 Never ride with headphones They mask tra...

Page 5: ... is legal for you to operate Electric bicycles and tricycles may be restricted in speed or power output in your area It is your responsibility as the operator rider to research understand and obey all applicable laws Please only ride within your ability Do not exceed safe speeds corner quickly or attempt to ride over uneven terrain Failure to ride safely may result in serious injury or death Do no...

Page 6: ...mbled and maintained by the purchaser Electric Bike Technologies Inc disclaims any responsibility for injury damage or other consequences arising from the use of this product Each use will be different and therefore it is the responsibility of the purchaser to determine the best practices for operation and maintenance The following instructions should be considered general guidelines only your sit...

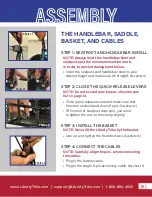
Page 7: ...ust be sure that you are able to control and stop the trike safely before you operate it STEP 5 CHECK THE FRONT WHEEL When putting on the handlebars during the assembly check that the front wheel is facing the forward If the front wheel and handlebars are backwards turn the wheel and the handlebars around STEP 6 TEST RIDE In a safe area pedal at a low speed and test your coaster brake and e brake ...

Page 8: ...THE QUICK RELEASE LEVERS NOTE Do not exceed max torque check torque list on page 13 Close quick release levers and make sure that the stem and seatpost doesn t spin See photo 1 2 If the stem or seatpost does spin you need to tighten the nut on the clamp slightly STEP 3 INSTALL THE BASKET NOTE Never lift the Liberty Trike by the basket Line up and tighten the thumbscrews See photo 1 3 STEP 4 CONNEC...

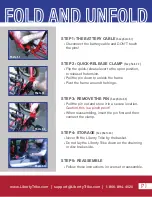
Page 9: ...STEP 3 REMOVE THE PIN See photo 2 3 Pull the pin out and store it in a secure location Caution this is a pinch point When reassembling insert the pin first and then connect the clamp STEP 4 STORAGE See photo 2 4 Never lift the Liberty Trike by the basket Do not lay the Liberty Trike down on the chainring or disc brake side STEP 5 REASSEMBLE Follow these instructions in reverse to reassemble Photo ...

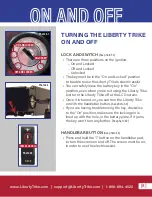
Page 10: ...e Liberty Trike on with the handlebar button See photo 3 3 If you are having trouble turning the key clockwise to the On position make sure the locking pin is lined up with the hole in the battery plate If it jams the key won t turn any further See photo 3 2 TURNING THE LIBERTY TRIKE ON AND OFF HANDLEBAR BUTTON See photo 3 3 Press and hold the i button on the handlebar pad to turn the screen on an...

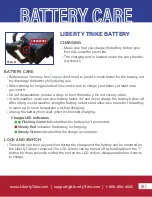
Page 11: ... hours for the battery to warm up to room temperature before charging Unplug the battery from wall when it s finished charging Charger LED Indicators Flashing Green indicates that the battery isn t connected Steady Red indicates the battery is charging Steady Green indicates that the charge is complete LOCK AND SWITCH The switch can be in any position during the charge and the battery can be mount...

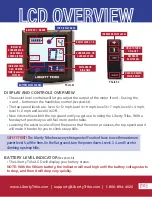
Page 12: ...r you to climb steep hills SAFETY FIRST The Liberty Trike has a very strong motor You don t have to use the maximum power level 5 all the time On the flat ground turn the power down Levels 3 4 and 5 are for climbing up steep hills ASSIST LEVEL 1 5 CURRENT MAX OR AVERAGE SPEED DISTANCE OR RIDE TIME BATTERY 1 5 BARS MAX SPD AVG SPD INDICATES CURRENT MAX OR AVERAGE SPEED DISPLAY TRIP ODO RIDETM INDIC...

Page 13: ...in will reset the max and average speeds and ride time counters CLEARING THE TRIP DISTANCE Hold and for 3 seconds Screen will now display EC n Press to change to EC y Hold i for 3 seconds to save and close BACKLIGHT FUNCTION See photo 6 2 Hold the button down for 3 seconds to increase the backlight Hold the button again to return the backlight to normal ASSIST LEVEL 1 5 CURRENT MAX OR AVERAGE SPEE...

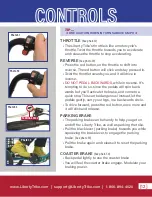
Page 14: ...activate the brake and come to a quick stop This can be dangerous Instead let the pedals gently carry your legs in a backwards circle To drive forward press the red button once more and it will click and release PARKING BRAKE The parking brake can be handy to help you get on and off the Liberty Trike as well as parking the trike Pull the black lever parking brake towards you while squeezing the br...

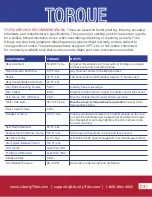
Page 15: ... hand pedal is left threaded marked L and knurled Rear Coaster Brake Axle Nuts 22 FT Lbs Disc Rotor Mounting Screws 5 Nm Industry has a wide range Disc Caliper 8 Nm Adapter to frame mount caliper to adapter and cable anchor Axle Torque Arm m6 Screw 9 Nm Must be installed and torqued before operation Motor Axle Nuts 35 40 FT Lbs Must be properly torqued before operation to avoid motor damaging the ...

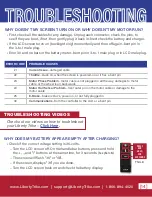
Page 16: ...s 36 volts Turn the LCD screen off On the handlebar buttons press and hold the and i buttons at the same time for 3 seconds See photo 8 1 The screen will flash 36 or 48 If the screen displays 36 you are done Turn the LCD screen back on and check the battery display PRESS AND HOLD FOR 3 SECONDS Photo 8 1 WHY DOESN T MY SCREEN TURN ON OR WHY DOESN T MY MOTOR RUN First check all the cables for any da...

Page 17: ... tight and secure Inflate the tires to the correct PSI recommended Under inflated tires can cause serious damage especially if you bottom out on the rim by a pothole or a curb Don t add more air than what the tire recommends There s a potential that you can blow the tube and have a flat tire Check cables wires and brakes that they are working correctly Working brakes are crucial and the brake cabl...

Page 18: ...oose Check the wiring that the connectors are rust free and don t exhibit corrosion or burning Check the bolts to make sure nothing has come loose due to vibration Here s a listing of bolts to check EVERY SIX MONTHS Inspect the bearings in your headset rear axle pedals and bottom bracket These bearings need to be periodically adjusted lubricated and replaced Be sure that these items are addressed ...

Page 19: ...brake mount Suspension None Rims F 16 alloy mag R 16 spoked 28 hole Spokes Rear wheels 13 gauge black stainless steel Tires 16 x 2 5 at 35 psi Saddle Wide and padded w backrest and a quick release Seatpost Steel 350mm length x 25 4mm diameter w quick release Handlebar Steel 387mm length Stem Steel 22 2mm diameter clamp Brakes F ProMax Mechanical Disc w 160mm rotor R Coaster brake and front left br...

Page 20: ...8S 4P Life Cycles 800 to 1000 cycles Max Continuous Discharge 22 5A Discharge Cut Off Voltage 30v Max Charge Voltage 42 5v Inner Resistance 130mΩ Charge Time 3 hours Operation Temperature Range Charge 0 C 45 C Discharge 20 C 60 C Storage Temperature 0 C 40 C Extended Storage 15 C 25 C Battery Box Material Aluminum box Assembled Pack Certificates UL UN38 3 MSDS RoHS SGS Limited Warranty 1 year Manu...

Page 21: ...ss of defects in materials or workmanship Electric Bike Technologies Inc will not cover the cost of replacement parts shipping or repairs outside of the 48 continental United States All sales outside the contiguous USA are final and not subject to our return policy WARRANTIES ARE LIMITED To replacement of parts and or products determined by Electric Bike Technologies Inc at its sole discretion to ...

Page 22: ...www LibertyTrike com support LibertyTrike com 1 866 894 4620 21 NOTES ...

Reviews: